Einleitung
This Laptop used in this guide is a Lenovo G580 but the guide could be followed and used for other models within the G series as the Positioning of the Processor and Memory will be similar but sadly I cannot confirm this as I have not seen the motherboard of every Lenovo G series laptop.
Was du brauchst
-
-
Begin by ensuring that the Laptop is powered off and disconnected from the power supply.
-
Close the lid and turn the Laptop to expose the bottom.
-
Remove the Battery.
-
Remove the two Phillips Screws that are boxed in red on the Picture.
-
Slide the black cover down by following the arrow on the Second Picture.
-
-
-
If you're just Upgrading the Memory/Ram skip to Step 13.
-
If you're just Upgrading the Processor carry onto step 12, ignoring step 13.
-
If you're upgrading the Processor and Memory then continue without skipping steps.
-
-
-
Remove the screws holding the Hard Drive in place (Boxed in Red). Then remove the Hard Drive.
-
Remove the screw holding the Optical drive in place (Boxed in Pink). Then slide the optical drive out, following the Pink Arrow.
-
Remove the screw holding the Wireless card (Boxed in Green) and then remove the wires going into the wireless card by gently pulling them up, take care not to apply too much pressure, use a Safe Open Tool if you are afraid of damaging them. (Ignore the second green box, the lower box is the one with a screw).
-
Remove the Wireless Card by gently removing it from its slot.
-
Disconnect the cable connected to the logic board near to the Wireless Card (Boxed in Yellow) by gently pulling up.
-
-
-
Remove the 3 Screws holding the Keyboard to the Laptop (Boxed In Red).
-
Turn the Laptop over and open the lid to reveal the Keyboard.
-
Using a Safe open tool or any prying tool begin to pry up the Keyboard from all sides.
-
Once the Keyboard is loose GENTLY push it towards the LCD without lifting it up more than three inches.
-
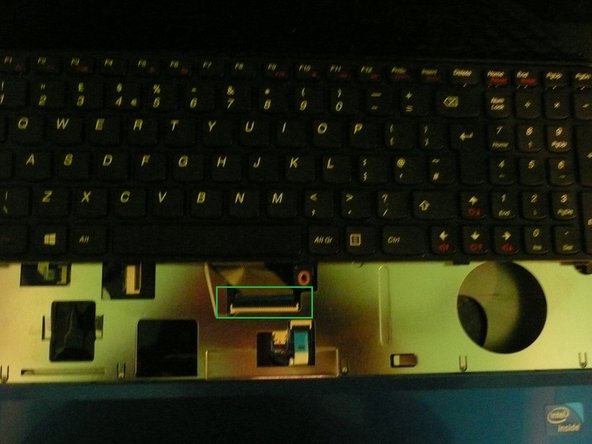
Pull up on the tab holding the Keyboard Flex in position (Boxed In Green) and remove the Keyboard.
-
-
-
Close the lid and turn the Laptop back upside down.
-
Remove all the screws boxed in red.
-
Remove the 2 remaining screws boxed in Blue.
-
-
-
-
WARNING THIS STEP WILL VOID ANY WARRANTY YOU CURRENTLY HAVE REGARDING THE LAPTOP!
-
Remove the Lenovo sticker (If you are really careful you can remove the sticker without tearing it and place it back on later) And then remove the screw underneath it.
-
Using the same method as the Keyboard unlock the 2 visible Flex cables connected to the motherboard (Boxed in green).
-
Unplug the two wires going into the motherboard (Boxed in Blue).
-
-
-
Ensure that all screws are removed and cables disconnected.
-
Gently pry on the side of the Laptop to release the top cover the the bottom cover working your way around all the sides of the Laptop (Front Left + Right).
-
Once the majority of the Sides are opened up carefully lift up the top case.
-
-
-
We will be working on the Big left motherboard so the other smaller boards will need to be disconnected.
-
Remove the Ribbon Flex holding the two smaller logic boards to the Mother board (Boxed in Red).
-
Remove The 4 wires connecting the Speakers to the Main Board (Boxed in Green).
-
Remove the flex going up to the display (Boxed in Blue).
-
-
-
Remove the 2 screws holding the Main Board to the bottom casing (Boxed in Red).
-
Lift the logic logic board gently out of the casing.
-
Place the casing to one side with the rest of the Parts.
-
-
-
Unplug the wires connected to the logic board from the Cooling Fan.
-
Unscrew the three screws (Boxed In Red).
-
Lift out the Fan and the heat sink it is attached to.
-
Twist the screw slightly to the left, so that the pointed black plastic point looks like picture 3. It will not come out easily if this is done wrong so check, check then check again.
-
Lift out the processor carefully.
-
-
-
Insert the new Processor.
-
Twist the screw Clockwise Back into its original position (So the black point is pointing right).
-
Use isopropyll to clean the processor is necessary.
-
Open up the thermal Compound and apply it to the shiny reflective part of the new processor ( Do not use lots only a little is needed but ensure that the whole of it is covered).
-
It should look just about like the second Photo but it will differ in colour and positioning.
-
-
-
Use some isopropyll to remove the old Thermal Grease/Compound from the heat sink.
-
Apply A little amount of Thermal Compound to the Copper part of the cooling unit in the same positioning as the last. A miniscule amount, just enough to create a tiny layer.
-
Screw in the Cooling unit/Heat sink. Screw the 2 bottom screws first then the top screw.
-
Plug the wires from the Cooling Fan back into the Mother Board.
-
There you have it :) Your new Processor is installed.
-
-
-
The Memory slots are now as exposed as possible so it's time to install the New Memory Modules.
-
If you have not already done so Remove the Memory Module By releasing the locks that hold it in place (Boxed in Green). Push them apart in the direction shown.
-
Lift out the Memory Module.
-
Insert the new module (If only upgrading with one module it is important to use the bottom Slot)
-
Push the Memory down until the Locks lock It into Position.
-
The new Memory Is now installed :)
-
To re-assemble follow the guide in reverse order ignoring steps 10,11 and 12.
-


To reassemble your device, follow these instructions in reverse order.
To reassemble your device, follow these instructions in reverse order.
Rückgängig: Ich habe diese Anleitung nicht absolviert.
19 weitere Nutzer:innen haben diese Anleitung absolviert.
8 Kommentare
Hi, will you still be completing this guide? I'd like to use it to upgrade my CPU if so. Thank you!
It is my intention, I have all the pictures I just had internet problems for a few weeks and forgot about it completely however this has now been resolved :) I shall make sure all pictures are ready but it may take a few days as I do not quite remember the order of them all :/ Thanks for using the guide, well sort of :)
I also look forward to having the pictures available.
Also, will any processor that is sold in the G580 work? I am thinking about putting in an i7 3612QM.
And are the cpu's ever soldered in? It would be a big disappointment to buy a new cpu and not be able to put it in.
I apologize I did not answer your question...
Looking at the specs of that processor it seems it is not supported :( The socket required for the processor is different than the socket on the Mother Board :(
The socket on the Mother Board is not compatible with that processor.