Einleitung
The display is incorporated into the Lid of the laptop and is susceptible to cracking from falls or pressure. Often this could result in the laptop being unusable. This guide will show you how to disconnect and remove the Lid from the main laptop body, separate the LCD from the lid.
Was du brauchst
-
-
Using the plastic opening tool, pry off the panel above the keyboard, starting near the right front speaker.
-
Use the plastic opening tool to pop off tabs along the length of this panel.
-
-
-
Unscrew the two 4.5 mm screws holding the keyboard on with the Phillips #1 screwdriver.
-
-
-
-
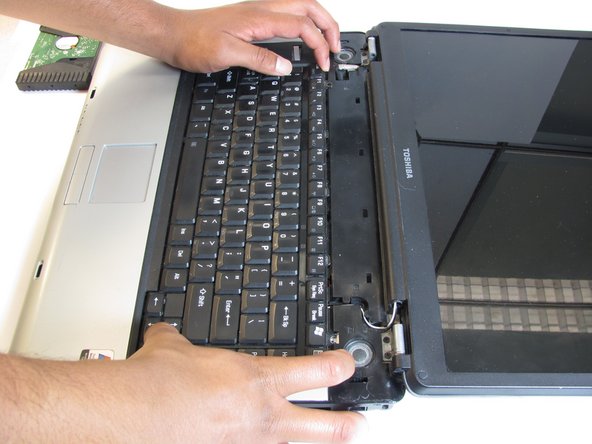
Lift the keyboard gently from the side closest the screen.
-
Pull out the ribbon connecting the keyboard to the laptop.
-
-
-
Turn your laptop upside down, and slide the right release tab outward.
-
Using you left hand, hold the left release tab towards the left side and then pull the battery out.
-
-
-
Remove the black and white wires. they simply lift off the posts.
-
Remove the cable attaching the LCD to the motherboard, on the left side of the laptop.
-
-
-
Using the Phillips screwdriver remove the two 4.0mm screws from each hinge above speakers.
-
Partially close the lid and remove the last two 4.0mm screws from the back of the laptop.
-
-
-
Peel off the rubber circles from the four corners.
-
Remove the four 4.0mm phillips screws.
-
-
-
Using the plastic prying tools separate the plastic surrounding the screen
-
Lift out the broken LCD to be replaced.
-


To reassemble your device, follow these instructions in reverse order.
To reassemble your device, follow these instructions in reverse order.

Team

UMass Dartmouth, Team 1-6, Cichon Spring 2014 Mitglied von UMass Dartmouth, Team 1-6, Cichon Spring 2014
UMASSD-CICHON-S14S1G6
3 Mitglieder
6 Anleitungen geschrieben