Zum Hauptinhalt wechseln

Nikon CoolPix S600 Motherboard Assembly Replacement

Was du brauchst

  1. Nikon CoolPix S600 Motherboard Assembly Replacement, Front and Rear Casing: Schritt 1, Bild 1 von 1
    • With the lens facing forward, remove the one 4.2 mm screw on the bottom right hand corner of the camera.

  2. Nikon CoolPix S600 Motherboard Assembly Replacement: Schritt 2, Bild 1 von 1
    • Remove the chrome side cover from the body of the camera.

  3. Nikon CoolPix S600 Motherboard Assembly Replacement: Schritt 3, Bild 1 von 1
    • Remove the four 3.2 mm screws on the bottom of the camera.

  4. Nikon CoolPix S600 Motherboard Assembly Replacement: Schritt 4, Bild 1 von 2 Nikon CoolPix S600 Motherboard Assembly Replacement: Schritt 4, Bild 2 von 2
    • Remove the two 3.2 mm screws from the right side of the camera (with lens is facing forward)

    • Remove the one 3.2 mm screw from the left side of the camera (with lens facing foward)

  5. Nikon CoolPix S600 Motherboard Assembly Replacement: Schritt 5, Bild 1 von 2 Nikon CoolPix S600 Motherboard Assembly Replacement: Schritt 5, Bild 2 von 2
    • Gently separate the back cover from the body of the camera.

    • The back casing will still be connected to the circuit board by a ribbon

  6. Nikon CoolPix S600 Motherboard Assembly Replacement: Schritt 6, Bild 1 von 1
    • Use the tweezers to disconnect the ribbon from the circuit board.

  7. Nikon CoolPix S600 Motherboard Assembly Replacement: Schritt 7, Bild 1 von 1
    • Remove the one 2.6 mm screw from the left side of the camera (with the lens facing forward)

  8. Nikon CoolPix S600 Motherboard Assembly Replacement: Schritt 8, Bild 1 von 2 Nikon CoolPix S600 Motherboard Assembly Replacement: Schritt 8, Bild 2 von 2
    • Gently separate the front cover from the body of the camera.

    • The front casing will still be connected to the circuit board by a few wires

  9. Nikon CoolPix S600 Motherboard Assembly Replacement: Schritt 9, Bild 1 von 1
    • Remove the two 3.2 mm screws that hold the flash to the front cover.

  10. Nikon CoolPix S600 Motherboard Assembly Replacement: Schritt 10, Bild 1 von 3 Nikon CoolPix S600 Motherboard Assembly Replacement: Schritt 10, Bild 2 von 3 Nikon CoolPix S600 Motherboard Assembly Replacement: Schritt 10, Bild 3 von 3
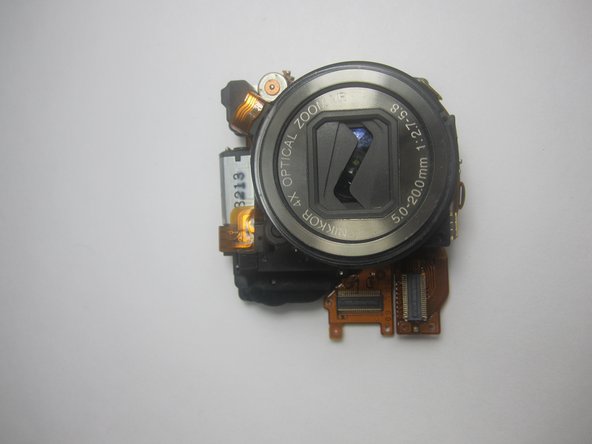
    • Use the Spudger to remove the copper colored light bulb clip.

    • Remove the front cover entierly from the camera body.

  11. Nikon CoolPix S600 Motherboard Assembly Replacement, Lens Assembly: Schritt 11, Bild 1 von 2 Nikon CoolPix S600 Motherboard Assembly Replacement, Lens Assembly: Schritt 11, Bild 2 von 2
    • From the top view of the camera, remove the one 5.8 mm screw.

    • From the top view of the camera, remove the one 2.8 mm screw

  12. Nikon CoolPix S600 Motherboard Assembly Replacement: Schritt 12, Bild 1 von 1
    • Remove the three 3.4 mm screws from the back side of the camera.

  13. Nikon CoolPix S600 Motherboard Assembly Replacement: Schritt 13, Bild 1 von 1
    • Remove the two 3.4 mm screws from the side of the camera.

  14. Nikon CoolPix S600 Motherboard Assembly Replacement: Schritt 14, Bild 1 von 1
    • Separate the two metal body pieces from the rest of the camera.

  15. Nikon CoolPix S600 Motherboard Assembly Replacement: Schritt 15, Bild 1 von 2 Nikon CoolPix S600 Motherboard Assembly Replacement: Schritt 15, Bild 2 von 2
    • Gently remove the two ribbons connecting the lens to the mother board.

  16. Nikon CoolPix S600 Motherboard Assembly Replacement: Schritt 16, Bild 1 von 2 Nikon CoolPix S600 Motherboard Assembly Replacement: Schritt 16, Bild 2 von 2
    • Gently separate the camera lens from the mother board.

  17. Nikon CoolPix S600 Motherboard Assembly Replacement, Motherboard Assembly: Schritt 17, Bild 1 von 1
    • The mother board is permanently fixed to the battery housing.

    • Mother board cannot be taken a part any further.

Abschluss

To reassemble your device, follow these instructions in reverse order.

Ein:e weitere:r Nutzer:in hat diese Anleitung absolviert.

Team

Cuesta, Team 1-6, Zipperian Fall 2011 Mitglied von Cuesta, Team 1-6, Zipperian Fall 2011

CUESTA-ZIPPERIAN-F11S1G6

2 Mitglieder

6 Anleitungen geschrieben

0 Kommentare

Kommentar hinzufügen

Seitenaufrufe:

Letzte 24 Stunden: 0

Letzte 7 Tage: 0

Letzte 30 Tage: 1

Insgesamt: 1,246