Einleitung
Wir haben uns ein 13 Zoll MacBook Pro im Unibodydesign besorgt und beschlossen, es mit einem Unibody MacBook zu vergleichen - von innen! Folge uns auf Twitter für alle neuen Updates und Teardowns!
Was du brauchst
-
-
Gerade eingetroffen: das neue 13 Zoll Unibody MacBook Pro
-
Wir werden es während des Teardowns mit dem Unibody MacBook vergleichen.
-
Wir haben da so ein Gefühl, dass es in vielen Fällen sehr ähnlich sein wird.
-
-
-
Was alles in der Schachtel steckt:
-
Bedienungsanleitung
-
DVD für die Systemwiederherstellung
-
60 Watt Netzteil
-
Verlängerungskabel
-
Putztuch
-
Wie üblich kein Videoadapter.
-
-
-
Ein paar Vergleiche mit dem MacBook Unibody:
-
Es gibt keine Klappe mehr für den Akku.
-
Ein SD-Kartenleser ist dazugekommen, der Digital/Mikrofonanschluss ist verschwunden.
-
FireWire ist zurück!
-
Das Laptopschloss ist jetzt auf der anderen Seite.
-
Die SD-Karte steht fast 13 Millimeter heraus! Das ist nicht das beste Design für ein MacBook "Pro", wenn du uns fragst.
-
-
-
Lasst uns anfangen.
-
Mit der Klappe ist auch die Öffnungslasche verschwunden.
-
Deshalb brauchen wir dafür einen Kreuzschlitz-Schraubendreher.
-
Einmal die Unterseite weggeklappt und ...
-
-
-
... es ist fast das Gleiche wie das alte, "kleine" Unibody MacBook.
-
Das Akkufach ist identisch zu dem, das wir im 17 Zoll MacBook Pro gefunden haben. Wir würden wetten, dass es im neuen 15 Zoll Pro genauso aussieht.
-
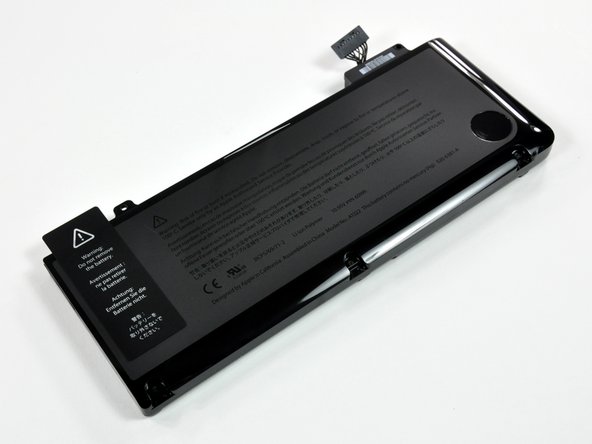
Entferne die zwei Tri-point-Schrauben und plötzlich ist der Akku austauschbar. Der Aufkleber löst sich wie beim 17 Zoll Pro sauber ab - weil es nur am Akku klebt und nicht am optischen Laufwerk.
-
-
-
Die 7 Stunden-Akku-Spezifikationen:
-
Modell A1322
-
10,95 V
-
60 Wh
-
"Dieser Akku enthält kein Quecksilber."
-
Obwohl die Akkus sehr ähnlich aussehen, sind sie definitiv nicht austauschbar. Der Akku des MacBook Pro ist zu groß (und hat eine andere Form), um in das ältere MacBook Unibody zu passen.
-
-
-
-
Wie nehmen die Festplatte raus ...
-
Laut Apple kannst du die Festplatte selber tauschen, aber du musst zehn Schrauben mehr entfernen, als im MacBook Unibody.
-
Wir ersetzen die 160 GB Hitachi gleich durch etwas ein wenig größeres.
-
-
-
Das optische Laufwerk ist mit drei Kreuzschlitzschrauben befestigt.
-
Die Halterungen und die Positionen der Schrauben sind identisch zum älteren MacBook Unibody.
-
-
-
Wenn das optische Laufwerk weg ist, liegt der rechte Lautsprecher frei.
-
Er ist festgeklebt. Ein schneller Handgriff mit dem Spudger wird ihn lösen.
-
-
-
Löse den LVDS-Anschluss.
-
Entferne die 7 Schrauben am Motherboard.
-
Entferne die zwei Schrauben am Stromanschluss.
-
Löse die Kabel von Trackpad, Tastatur, und Akkustandsanzeige.
-
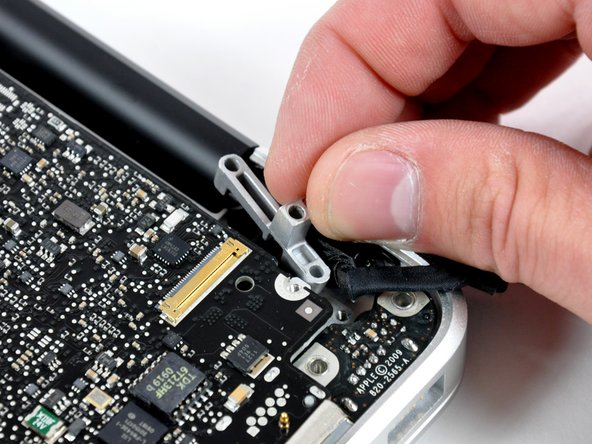
Entferne die Halterung für das LVDS-Kabel.
-
Und das Logic Board ist fast frei ...
-
-
-
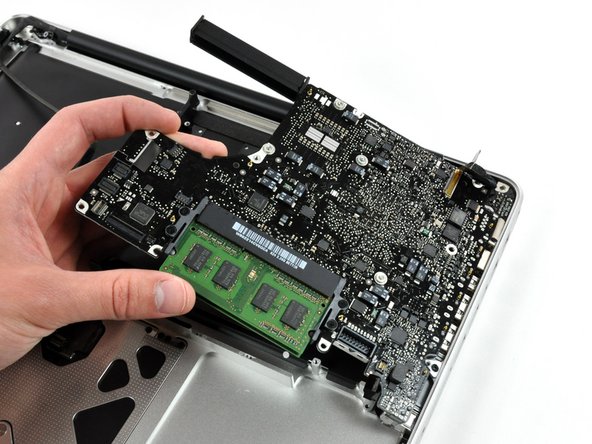
Ein paar Fotos des Logic Boards, bevor wir es ganz nackig machen ...
-
Wie beim MacBook Unibody kommt der Kühlkörper mit dem Logic Board raus.
-


Besonderer Dank geht an diese Übersetzer:innen:
100%


Diese Übersetzer:innen helfen uns, die Welt zu reparieren! Wie kann ich mithelfen?
Hier starten ›

10 Kommentare
Hi. AMAZING walkthrough and I really love your website. I need HELP!
I bought a refurbished MBP 13-inch 2.26 GHz and I don't think it came with a wireless card (I think I got ripped!). Bluetooth is working but my airport says "No Airport card installed".
Anyway - is it possible to check if the wireless card is in there? If not, is it possible to replace it? Any help and advice would be greatly appreciated!!!
The AirPort card is hidden in the display. We don't have a guide specifically for it, but you can follow the display guide to remove the display and then use the clutch cover guide to access the AirPort card (you don't have to remove the front display glass to access the card; the clutch cover guide was part of another guide for the LCD but the steps are generally the same).
great guidelines.... I have a macbook pro mid2009 A1278. buzzing sounds coming out when I play any music. is there any fix?
Hi, I have a macbook pro Mid 2009, now it very slow. can it upgrade? If it must upgrade What I I do for it?
Give me some your opinion, Thank you very much!
Sicerely
Tao Nguyen
nnhattao@yahoo.com