Zum Hauptinhalt wechseln

Brother PT-D200 Circuit Board Replacement

Grundständige Anleitung
Dies ist eine grundständige Anleitung, die nur als Teil einer anderen Anleitung verwendet werden sollte.

Was du brauchst

  1. Brother PT-D200 Circuit Board Replacement, Circuit Board Cables: Schritt 1, Bild 1 von 1
    • Gently pull out the ribbon cable from the circuit board.

    • The ribbon cable is very fragile.

  2. Brother PT-D200 Circuit Board Replacement: Schritt 2, Bild 1 von 1
    • Remove two-pin plastic connector from the circuit board.

    • Gently pull the two-pin connector from the circuit board to avoid damaging the board.

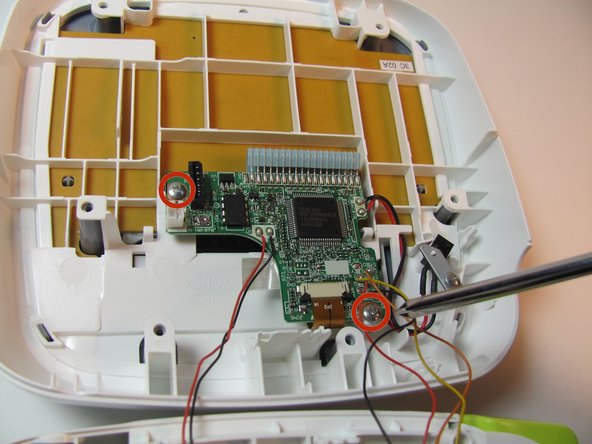
  3. Brother PT-D200 Circuit Board Replacement, Circuit Board: Schritt 3, Bild 1 von 2 Brother PT-D200 Circuit Board Replacement, Circuit Board: Schritt 3, Bild 2 von 2
    • Remove the two 3/16" screws from the circuit board using the Helping Hand 1/4" screwdriver.

  4. Brother PT-D200 Circuit Board Replacement: Schritt 4, Bild 1 von 1
    • Release the two black clips that hold the LCD cable ribbon in place. To release, pull the clips towards the ribbon.

  5. Brother PT-D200 Circuit Board Replacement: Schritt 5, Bild 1 von 1
    • Disconnect the LCD ribbon cable from the circuit board.

Abschluss

To reassemble your device, follow these instructions in reverse order.

Jeston Mitchell

Mitglied seit: 01/24/14

308 Reputation

3 Anleitungen geschrieben

Team

Cal Poly, Team 13-16, Regan Winter 2014 Mitglied von Cal Poly, Team 13-16, Regan Winter 2014

CPSU-REGAN-W14S13G16

3 Mitglieder

6 Anleitungen geschrieben

0 Kommentare

Kommentar hinzufügen

Seitenaufrufe:

Letzte 24 Stunden: 0

Letzte 7 Tage: 0

Letzte 30 Tage: 0

Insgesamt: 35