Zum Hauptinhalt wechseln

Olympus VR-350 Power Button Replacement

Was du brauchst

  1. Olympus VR-350 Power Button Replacement, Front Plate: Schritt 1, Bild 1 von 2 Olympus VR-350 Power Button Replacement, Front Plate: Schritt 1, Bild 2 von 2
    • Remove the two 4mm screws from each side of the camera with a Phillips PH000 screwdriver.

  2. Olympus VR-350 Power Button Replacement: Schritt 2, Bild 1 von 1
    • Remove the four 4mm screws from the bottom of the camera with a Phillips PH000 screwdriver.

  3. Olympus VR-350 Power Button Replacement: Schritt 3, Bild 1 von 3 Olympus VR-350 Power Button Replacement: Schritt 3, Bild 2 von 3 Olympus VR-350 Power Button Replacement: Schritt 3, Bild 3 von 3
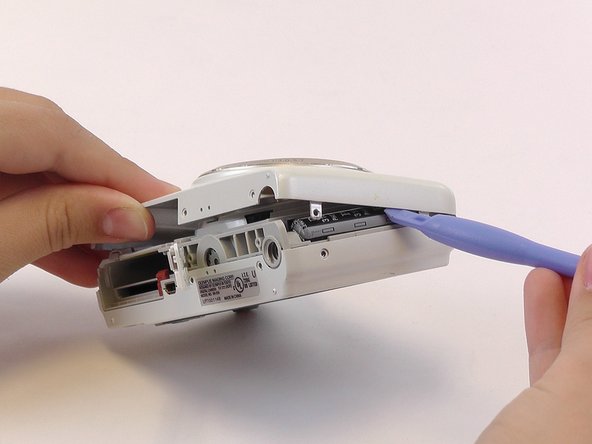
    • Use the plastic opening tools and your fingers to pry the front plate from the camera.

    • You might need to open the battery cover to remove the front plate.

  4. Olympus VR-350 Power Button Replacement, Back Plate: Schritt 4, Bild 1 von 2 Olympus VR-350 Power Button Replacement, Back Plate: Schritt 4, Bild 2 von 2
    • Use your fingers to pry open the back cover.

    • When you remove the back of the camera, the button membrane might fall out. Don’t lose this sheet.

    • The LCD screen is connected to the body of the camera by an orange ribbon cable. Don’t pull this ribbon cable out.

  5. Olympus VR-350 Power Button Replacement, Power Button: Schritt 5, Bild 1 von 2 Olympus VR-350 Power Button Replacement, Power Button: Schritt 5, Bild 2 von 2
    • Remove the silver panel from the top of the camera.

  6. Olympus VR-350 Power Button Replacement: Schritt 6, Bild 1 von 1
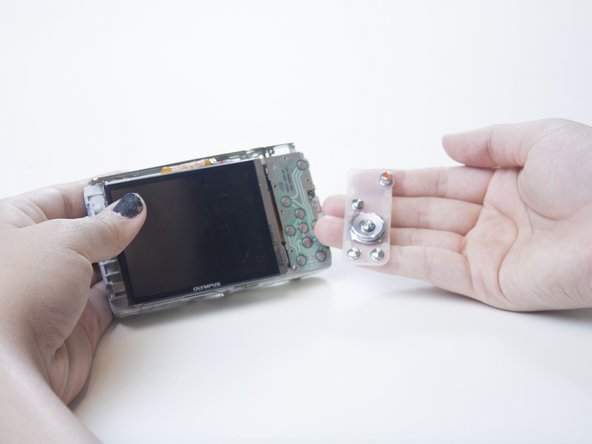
    • Flip the silver panel over. The power button is the smaller button covered by a metal backing.

  7. Olympus VR-350 Power Button Replacement: Schritt 7, Bild 1 von 1
    • Pull the metal backing away from the silver panel.

  8. Olympus VR-350 Power Button Replacement: Schritt 8, Bild 1 von 1
    • Push the power button down and out of the silver panel with your finger.

Abschluss

To reassemble your device, follow these instructions in reverse order.

2 weitere Nutzer:innen haben diese Anleitung absolviert.

Adri

Mitglied seit: 02/23/15

456 Reputation

3 Anleitungen geschrieben

Team

USF Tampa, Team 1-3, Leahy Winter 2015 Mitglied von USF Tampa, Team 1-3, Leahy Winter 2015

USFT-LEAHY-W15S1G3

3 Mitglieder

10 Anleitungen geschrieben

0 Kommentare

Kommentar hinzufügen

Seitenaufrufe:

Letzte 24 Stunden: 1

Letzte 7 Tage: 3

Letzte 30 Tage: 10

Insgesamt: 1,342