Einleitung
Der Lüfter wird nur von wenigen Schrauben festgehalten, allerdings verlaufen einige Kabel hinter anderen Bauteilen. Ziehe nicht zu stark an diesen Kabeln, hole sie lieber hinter den Bauteilen hervor, bevor du den Lüfter ausbaust. Achte darauf, an welcher Stelle die Schrauben waren, eine unterscheidet sich von den anderen. Der Zusammenbau wird dadurch weniger nervig.
Was du brauchst
-
-
Lege das Display mit der Bildschirmseite nach oben ab.
-
Bringe die Saugheber auf beiden Seiten oben fest am Bildschirm an.
-
Die Glasscheibe ist am restlichen Bildschirm mit kleinen Magneten befestigt. Hebe langsam an, bis sie sich ablöst.
-
-
-
Fasse den Stecker des ersten Kabels (das, was am weitesten von dem mit Schrauben befestigten entfernt ist) an und ziehe ihn langsam heraus.
-
-
-
-
Um an den Stecker vom nächsten Kabel, direkt neben dem eben gelösten, zu gelangen, musst du erst an einem Stück Klebeband an einer Metallleiste ziehen.
-
Benutze das Klebeband als Griff und klappe die Metallleiste herum.
-
Fasse dann den Stecker und ziehe ihn langsam aus dem Anschluss auf dem Logic Board ab.
-
-
-
Fasse behutsam den Stecker auf der anderen Seite des Logic Boards unten an und ziehe ihn vom Board ab.
-
-
-
Das letzte Kabel des LCDs ist mit einer Torx T 10 Schraube gesichert. Drehe sie heraus.
-
-
-
Der Lüfter ist am Logic Board mit zwei Steckern angeschlossen. Fasse die Stecker beim Ablösen so nahe wie möglich am Board an und ziehe sie langsam heraus, damit sie unbeschädigt bleiben.
-
Entferne das Klebeband, mit dem die Kabel am Gehäuse befestigt sind.
-
-
-
Der Lüfter ist mit drei Schrauben am Gehäuse befestigt.
-
Drehe die drei TR10 Schrauben heraus.
-
-
-
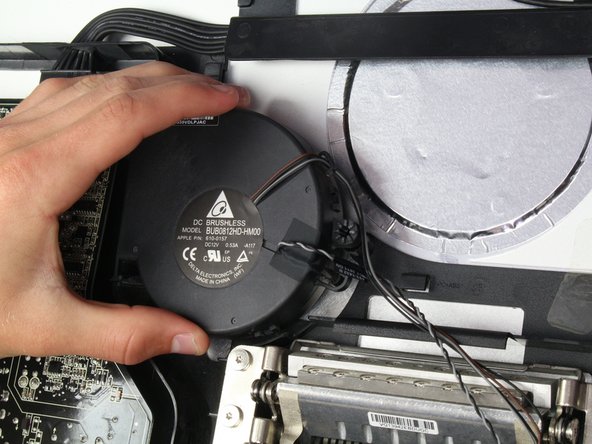
Hole den Lüfter behutsam heraus, beschädige dabei keine der umliegenden Bauteile.
-
Tausche den Lüfter gehen einen neuen aus.
-


Um dein Gerät wieder zusammenbauen, folge den Schritten in umgekehrter Reihenfolge.
Um dein Gerät wieder zusammenbauen, folge den Schritten in umgekehrter Reihenfolge.
Rückgängig: Ich habe diese Anleitung nicht absolviert.
27 weitere Nutzer:innen haben diese Anleitung absolviert.
Besonderer Dank geht an diese Übersetzer:innen:
100%
VauWeh hilft uns, die Welt in Ordnung zu bringen! Wie kann ich mithelfen?
Hier starten ›
Team

Cal Poly, Team 5-11, Maness Spring 2015 Mitglied von Cal Poly, Team 5-11, Maness Spring 2015
CPSU-MANESS-S15S5G11
4 Mitglieder
19 Anleitungen geschrieben
10 Kommentare
I have been having trouble with fan noise -- a noisy, rapid thumping sound, especially on startup but getting worse over a few weeks and lately persisting all day. Following this excellent guide, I removed the fan and examined it. I could see nothing wrong except perhaps a fine layer of dust on the blades, no worse than could be expected. I did not manage to disassemble the fan itself, as its two-part housing is very firmly clipped together, but applied a vacuum cleaner hose to both the entry and exit sides to clean it up as much as possible. I put it back and reassembled the whole display, and am pleased to report that the noise has completely disappeared. This may be good news to anyone dismayed by the apparent non-availability of replacement fans.
This guide made the power supply replacement quick and easy.
I had the rumbling fan cleaned by a pro. but the rattling didn't go. I just finished replacing the fan on my 27'' Thunderbolt Display using these instructions, and so far so good after 3 hours. It usually started the rattling after 30mn!
I purchased the fan on eBay. There were a couple available then.
I got the fan for $18 and spent 30mn on the job. At the Apple certified spot in town, they were going to charge me $250! I bought this Apple Display second hand for $250! and now it is back to its old self, working like a charm :)
Thank you very much for this web page which walked me through the process.
By the way, for a succion cup I used the two small ones that are attached to my soap holder, from the bathroom tiled wall; worked just fine and I didn't have to spend $20 to buy one.
cheers
Many thanks to Mr. Laverty and the other contributors. I followed this guide to install a new power supply in my darkened 27” Thunderbolt Display to bring it back from the dead. While the instructions were specifically for replacing the fan, I found that after following them to remove the LCD panel, it was easy to replace the power supply as well. For anyone else who may suspect a failed power supply (loud buzzing and then black), I ordered mine directly from China, supposedly a brand new one. It looks identical to the original in every way and does have a 2018 sticker affixed to it. It took a month to arrive but did the trick. I paid $70.50 for it from wwon_one off eBay (https://www.ebay.com/itm/273134311780). Thanks again for the extremely helpful guide!
Many thanks to Mr. Laverty and the other contributors. I followed this guide to install a new power supply in my darkened 27” Thunderbolt Display to bring it back from the dead. While the instructions were specifically for replacing the fan, I found that after following them to remove the LCD panel, it was easy to replace the power supply as well. For anyone else who may suspect a failed power supply (loud buzzing and then black), I ordered mine directly from China, supposedly a brand new one. It looks identical to the original in every way and does have a 2018 sticker affixed to it. It took a month to arrive but did the trick. I paid $70.50 for it from wwon_one off eBay. Thanks again for the extremely helpful guide!