Zum Hauptinhalt wechseln

Insignia Flex 8 NS-15AT08 Screen Replacement

Was du brauchst

  1. Insignia Flex 8 NS-15AT08 Screen Replacement, Back Casing: Schritt 1, Bild 1 von 2 Insignia Flex 8 NS-15AT08 Screen Replacement, Back Casing: Schritt 1, Bild 2 von 2
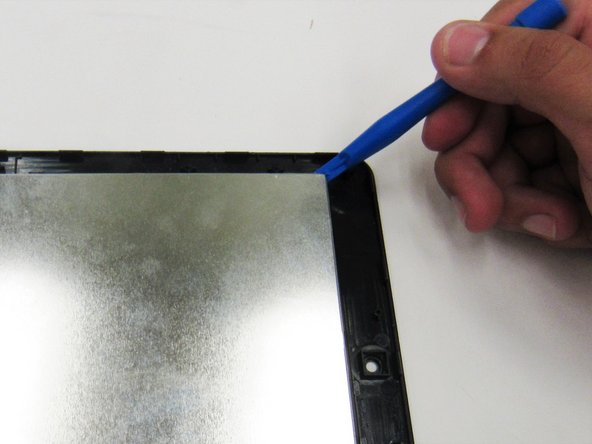
    • Insert a plastic opening tool into the seam between the back casing and the screen to separate the back casing from the tablet.

    • You may need to use a metal opening tool for extra prying power, but beware that it can scratch your device or damage the internal components if the tool is inserted too deep.

    • You will hear the tabs pop as you separate the back casing around the tablet.

  2. Insignia Flex 8 NS-15AT08 Screen Replacement: Schritt 2, Bild 1 von 2 Insignia Flex 8 NS-15AT08 Screen Replacement: Schritt 2, Bild 2 von 2
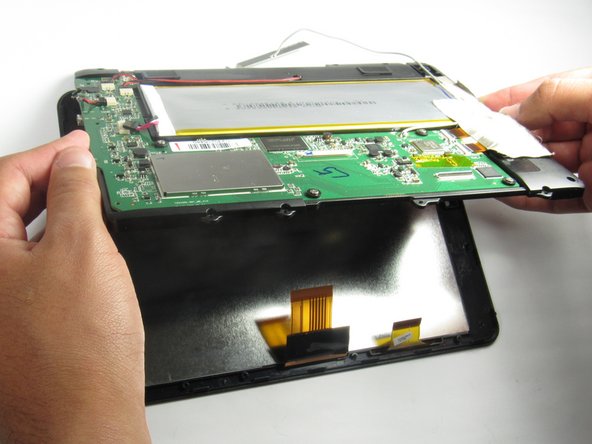
    • Lift the back casing away from the rest of the device which should include the exposed circuit board and screen.

    • Set the casing aside.

  3. Insignia Flex 8 NS-15AT08 Screen Replacement, Screen: Schritt 3, Bild 1 von 1
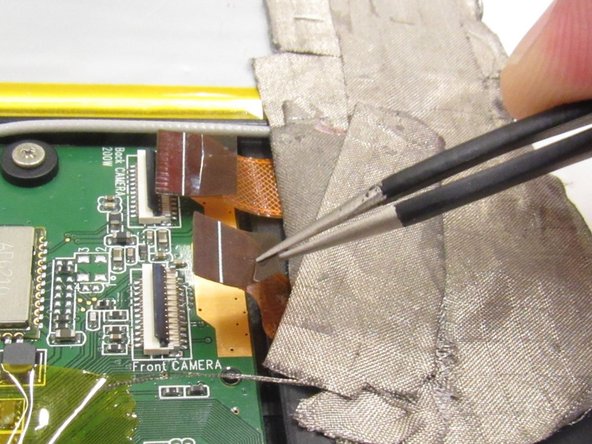
    • Use a plastic opening tool to flip up the black strip that is holding the orange camera ribbon near the module on the circuit board labeled "front camera" in white print.

    • Repeat this action on the orange camera ribbon near the module on the circuit board labeled "back camera" in white print.

  4. Insignia Flex 8 NS-15AT08 Screen Replacement: Schritt 4, Bild 1 von 2 Insignia Flex 8 NS-15AT08 Screen Replacement: Schritt 4, Bild 2 von 2
    • Use tweezers to gently pull on both orange camera ribbons in the opposite direction in which they are connected until they disconnect from the modules on the circuit board.

  5. Insignia Flex 8 NS-15AT08 Screen Replacement: Schritt 5, Bild 1 von 2 Insignia Flex 8 NS-15AT08 Screen Replacement: Schritt 5, Bild 2 von 2
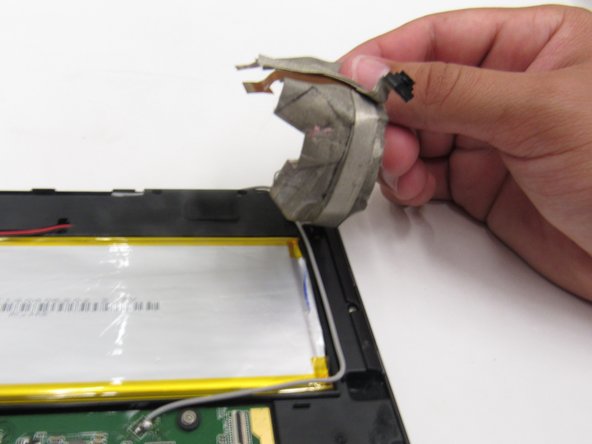
    • Peel the grey tape off of the device in order to separate the cameras and their respective ribbons from the rest of the device.

    • Do not use excessive force while removing the tape to prevent tears in the ribbons.

  6. Insignia Flex 8 NS-15AT08 Screen Replacement: Schritt 6, Bild 1 von 1
    • Unscrew fifteen (15) 4mm Phillips #00 screws.

  7. Insignia Flex 8 NS-15AT08 Screen Replacement: Schritt 7, Bild 1 von 3 Insignia Flex 8 NS-15AT08 Screen Replacement: Schritt 7, Bild 2 von 3 Insignia Flex 8 NS-15AT08 Screen Replacement: Schritt 7, Bild 3 von 3
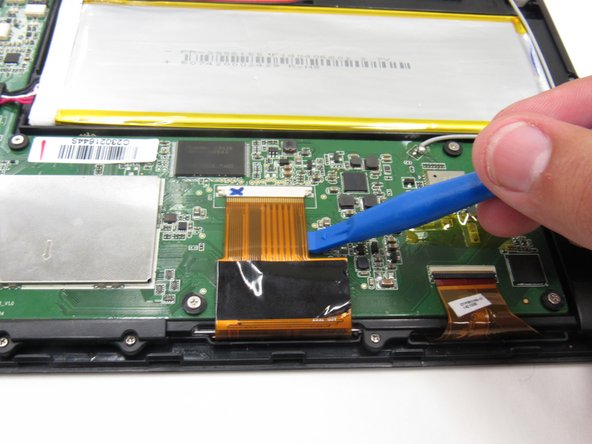
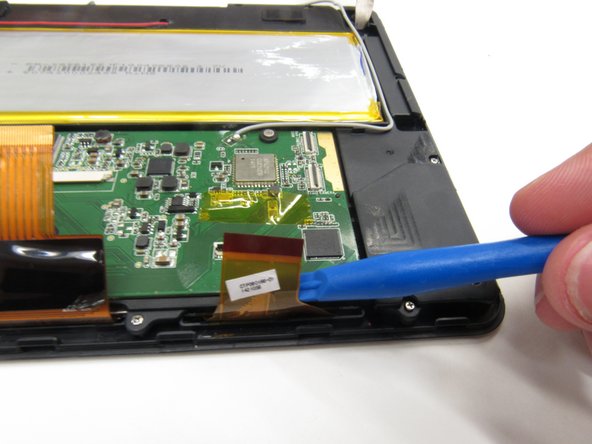
    • Wedge a plastic opening tool between the black clip and white module on the large, orange display ribbon in the middle of the circuit board.

    • Pull the clip toward you with the plastic opening tool in order to completely disconnect the display ribbon.

    • The black clip holding this ribbon can fly out if enough force is used. Be careful not to lose that black clip.

  8. Insignia Flex 8 NS-15AT08 Screen Replacement: Schritt 8, Bild 1 von 2 Insignia Flex 8 NS-15AT08 Screen Replacement: Schritt 8, Bild 2 von 2
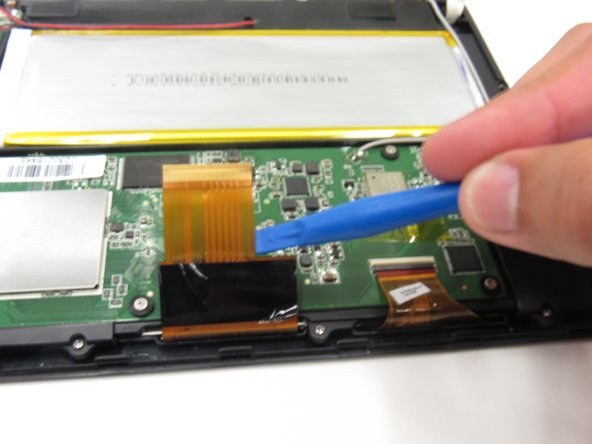
    • Use a plastic opening tool to flip up the black strip on the white module which is holding the connection between the other display ribbon and the circuit board.

    • Once the black strip has been flipped up, the connection between the module and the ribbon has been unlocked. Use the spudger to pull the ribbon towards you in order to completely disconnect it from the circuit board.

  9. Insignia Flex 8 NS-15AT08 Screen Replacement: Schritt 9, Bild 1 von 2 Insignia Flex 8 NS-15AT08 Screen Replacement: Schritt 9, Bild 2 von 2
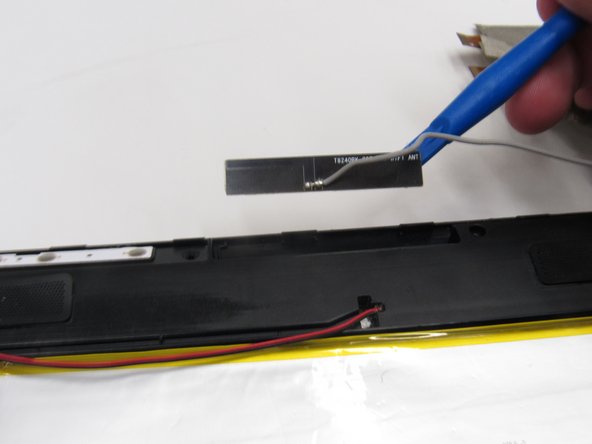
    • Pry out the antenna board with a plastic opening tool which is located right above the black internal speakers.

    • The antenna board is glued to the device, so some force might be needed.

  10. Insignia Flex 8 NS-15AT08 Screen Replacement: Schritt 10, Bild 1 von 2 Insignia Flex 8 NS-15AT08 Screen Replacement: Schritt 10, Bild 2 von 2
    • Lift the circuit board from the screen underneath and set it aside.

  11. Insignia Flex 8 NS-15AT08 Screen Replacement: Schritt 11, Bild 1 von 2 Insignia Flex 8 NS-15AT08 Screen Replacement: Schritt 11, Bild 2 von 2
    • Use a plastic opening tool to pry the LCD display away from the screen.

    • Make sure the display ribbons are not tucked underneath the LCD display when reassembling the screen and LCD display (as shown in the first image of this step).

Abschluss

To reassemble your device, follow these instructions in reverse order.

Team

Baylor, Team 6-7, Williams Fall 2015 Mitglied von Baylor, Team 6-7, Williams Fall 2015

BU-WILLIAMS-F15S6G7

3 Mitglieder

10 Anleitungen geschrieben

Ein Kommentar

I need help with my tablet, I am sure that this is the one I have, but I am not sure what is causing it. My tablet screen has different colored lines on it, but they stay exactly the same when I rotate it. But, depending on the color of what's on the screen, the lines seem to change color. I looked up a couple of things, and and it could be dead pixels but I can't remember the rest. Can you help me?

Sarah Guymon - Antwort

Kommentar hinzufügen

Seitenaufrufe:

Letzte 24 Stunden: 0

Letzte 7 Tage: 0

Letzte 30 Tage: 1

Insgesamt: 1,559