Zum Hauptinhalt wechseln

iMac Intel 17" Optical Drive Replacement

Grundständige Anleitung
Dies ist eine grundständige Anleitung, die nur als Teil einer anderen Anleitung verwendet werden sollte.

Was du brauchst

  1. iMac Intel 17" Optical Drive Replacement, Optical Drive: Schritt 1, Bild 1 von 1
    • Remove the two 7 mm T10 Torx screws securing the optical drive clip to the logic board.

  2. iMac Intel 17" Optical Drive Replacement: Schritt 2, Bild 1 von 1
    • Remove the optical drive clip.

  3. iMac Intel 17" Optical Drive Replacement: Schritt 3, Bild 1 von 1
    • Pull the optical drive thermal sensor cable connector away from its socket on the logic board.

  4. iMac Intel 17" Optical Drive Replacement: Schritt 4, Bild 1 von 2 iMac Intel 17" Optical Drive Replacement: Schritt 4, Bild 2 von 2
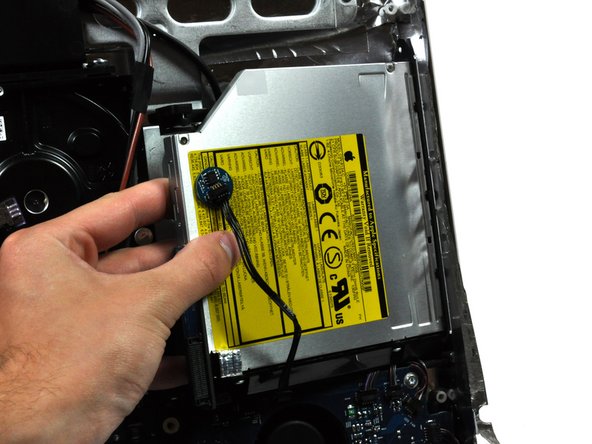
    • Squeeze the two optical drive bracket ears together while pulling the drive toward yourself.

    • It may be helpful to hold the logic board down near the optical drive connector when pulling the drive toward yourself to avoid both components lifting together.

    • Pull the optical drive away from the side of the rear panel and remove it from the iMac.

Abschluss

To reassemble your device, follow these instructions in reverse order.

Ein:e weitere:r Nutzer:in hat diese Anleitung absolviert.

0 Kommentare

Kommentar hinzufügen

Seitenaufrufe:

Letzte 24 Stunden: 0

Letzte 7 Tage: 0

Letzte 30 Tage: 0

Insgesamt: 1,721