Einleitung
如果你的iPhone XS Max屏幕破裂,触摸没有响应,或者在手机开机时没有显示画面,请按照本更换使用新的屏幕总成,将iPhone恢复到正常工作状态。
固定在屏幕背面的组合式听筒与传感器组件在出厂时已经与你的iPhone配对,因此你必须在更换屏幕时将这些从旧屏幕转移到新屏幕上。它包含泛光感应元件,它是面部识别技术Face ID功能的一部分。如果损坏或更换,Face ID将停止运行,因此在此过程中请特别注意不要损坏任何这些组件。如果损坏,只有Apple可以恢复Face ID功能。
注意:更换屏幕后即使使用苹果原装屏幕,也会禁用“原彩显示”功能。
Was du brauchst
Einführungsvideo
-
-
在开始拆卸之前关闭iPhone电源。
-
取下iPhone底部边缘的两颗6.9毫米长的梅花型螺丝。
-
打开iPhone的显示屏会损害其防水密封。在完成此步骤之前,请准备好更换密封件,或者在不更换密封件的情况下重新组装iPhone时,请注意避免液体接触。
-
-
-
如果您的iPhone屏幕破裂,在修理过程中通过胶带贴在玻璃上,防止进一步的破损,造成身体伤害。
-
将胶带条贴在iPhone的显示屏上,直到覆盖整个屏幕上。(如果不够宽可以重叠贴,如果要用吸盘重叠部分会漏气,所以最好使用7厘米宽的胶带,用吸盘时容易吸住)。做一步的目的是为了保持屏幕组件的受力结构,以方便拆卸。
-
在下面的步骤中如果吸盘吸不住已经破损的屏幕,可以用胶带把吸盘粘在屏幕上,然后在提起屏幕。
-
-
-
将透明胶带条重叠粘贴到 iPhone 屏幕上,直至覆盖整个屏幕。
-
如果在后续几步无法让吸盘粘住,请将一块坚固的胶带(例如强力胶带)折叠成手柄状,然后用它抬起屏幕。
-
-
-
将蓝色手柄向后拉,解锁反向钳的手臂。
-
将手臂滑过 iPhone 的左边缘或右边缘。
-
将吸盘靠近 iPhone 的底部边缘——一个在前面,一个在后面。
-
将吸盘一起挤压,以向所需区域施加吸力。
-
-
-
加热 iOpener 并将其穿过反向钳的手臂。
-
把 iOpener 折叠起来,放在 iPhone 的底部边缘。
-
等待一分钟,让粘合剂有机会释放,形成一个开口缝隙。
-
将打开工具插入开口缝隙,位于屏幕和塑料边框之下,而不是屏幕本身。
-
跳过接下来的三个步骤。
-
-
-
使用吹风机或加热枪,或者准备一个iOpener,把它涂在iPhone的下边缘大约一分钟,以便软化下面的粘合剂。
besteht da die Gefahr das sich das Displayglas vom lcd löst?
Besteht da die Gefahr das sich der Kleber vom Displayglas löst?
-
-
-
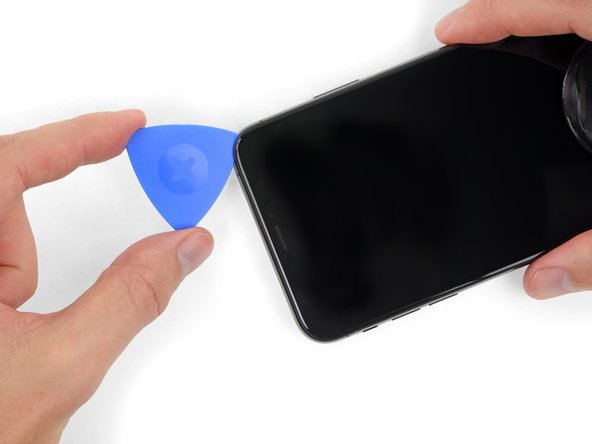
保持相同的力量匀速向上拉动吸盘,使前面板与后壳之间露出微小的缝隙。
-
将撬片插入缝隙,位于屏幕和塑料边框之下,而不是屏幕本身。
-
-
-
-
卸下固定顯示器連接器支架的三個Y000螺釘:
-
兩個1.5毫米螺釘
-
一個1.1毫米螺釘
I am replacing the screen for the 2nd time - the first repair was done by someone else, and the first 2 screws are 1.5mm and the last screw is 1.1mm… If I put the screw back in am I risking Long Screw Damage?
Thanks for all your comments! I'll amend this step.
Hi, I just changed the screen on my XS Max and for this bracket I used 2 x 1.1 mm and 1 x 1.5 mm.
Starting from left to right:
- left 1.1 mm (I tried with 1.5 mm like in the above picture but I felt that it didn't wanted to go deeper so I didn't forced and I tried it in the middle and it fit perfectly)
- middle 1.5 mm
- right 1.1 mm
For the two brackets I had 7 screws, I aligned them on the desk by length and I had 2 x 1.5 mm, 4 x 1.1 mm and 1 x 3.7 mm.
Good luck and I hope it will help someone!
-
-
-
使用spudger或指甲將數字轉換器電纜連接器從插槽中向上撬起。
-
-
-
小心抬起電纜,直到粘合劑分離。 。
-
-
-
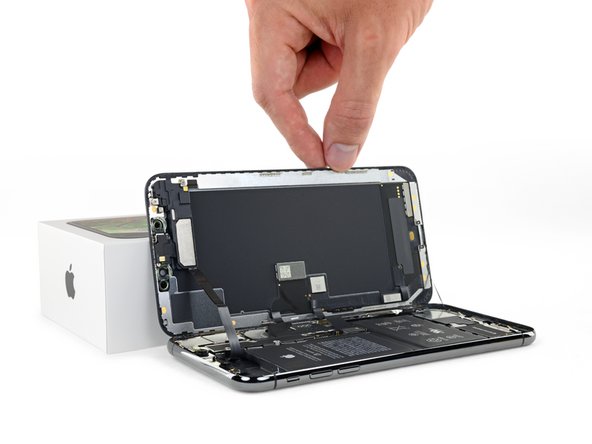
卸下顯示屏部件。
-
-
-
移除固定扬声器/传感器组件的三个 Y000号螺丝:
-
一颗1.4 mm 螺丝
-
两颗 1.5 mm 螺丝
Ciao @max94949 Quale lunghezza stai cercando? Il passo menziona che si tratta di una vite Y000 da 1,4 mm e di due vite Y000 da 1,5 mm.
-
-
-
使用撬棒,轻轻撬动扬声器组件的顶部边缘,然后将其翻转并远离显示器的顶部边缘。
If you are using a refurbished display, check for dirt in the earpiece speaker cutout.
If you have poor quality or low sound after changing the display, use a cotton bud and isopropyl alcohol to clean the earpiece cutout.
-
-
-
使用开口撬片小心地在麦克风下方的柔性电缆下边缘滑动。
-
轻轻扭动以分离麦克风,同时注意不要拉紧或损坏柔性电缆。
-
如果需要,使用撬棒的点完成麦克风与前面板凹槽的分离。如果麦克风仍然难以分离,请加热。
-
-
-
使用镊子摆动环境光传感器并将其从显示屏的凹槽中提起。
This was the most difficult part for me so i erred on the side of caution. I reheated the display in the oven at 85 degrees celsius. Like in the third picture in the next step, i got a razor into the slot below, to get the diffuser a little loose before wiggling the sensor out. I didn't understand the wiggling until i simply rocked it like a boat would side to side like to the top of the display to the bottom on the display, and voila, all came out easy and in one piece with the diffuser still attached.
-
-
-
如果你成功移除了整个环境光线传感器,如第一张照片所示,请继续执行下一步骤。
-
如果白色漫射条脱落并嵌入显示屏中,如第二张照片所示,则需要使用薄刀片或撬具工具沿顶部边缘小心地将其拉出。首先重新加热可以使这项任务更容易一些。
I have accidentally damaged flood illuminator will it affect the face id also or if I just replace the Earpiece Speaker and Sensor Assembly it will get fixed.
-
-
-
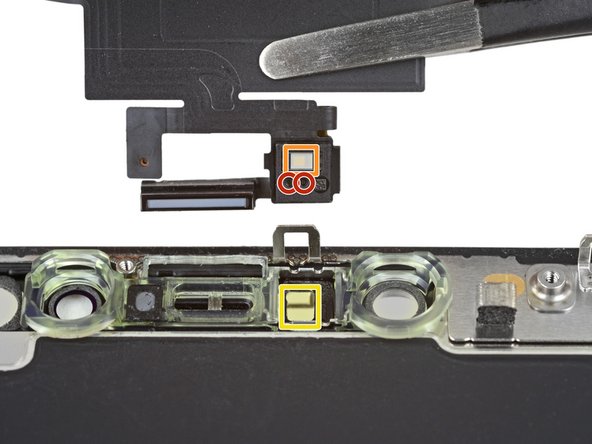
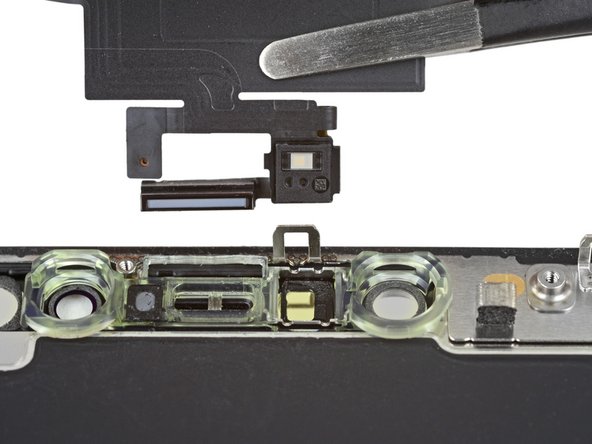
取下耳机扬声器和前传感器组件。
-
接近传感器
-
泛光照明器
-
必须正确定位这些模块,这样才不会被任何粘合剂阻塞。
Do you have to remove the earpiece speaker and front sensor assembly. If you are taking a screen from another Xs max with it already attached?
The front sensor assembly is part of Face ID, so you must transfer the original assembly to the replacement screen in order to maintain Face ID functionality.
No, you just take the whole unit. Warm it up and remove the glued sensors like described. Handle it carefully, the speaker cable is quite thin. If damaged, you might loose your face-ID functionality.
Does the screen need a reprogamation onto the new screen?
if the pentalope screws are rusted and the driver can’t fit in it to remove them is there any other way to remove them to replace screen?
-


在安装之前,对比您的新、旧组件——你可能需要转移额外的部件或者移除新组件上的保护膜。
按相反顺序执行上述步骤以重新组装你的设备。
将你的电子废料带到 R2 或 e-Stewards 认证的回收商.
修理过程中有什么问题,可以查看我们的答疑社区以获取更多排除故障的帮助信息。
在安装之前,对比您的新、旧组件——你可能需要转移额外的部件或者移除新组件上的保护膜。
按相反顺序执行上述步骤以重新组装你的设备。
将你的电子废料带到 R2 或 e-Stewards 认证的回收商.
修理过程中有什么问题,可以查看我们的答疑社区以获取更多排除故障的帮助信息。
Rückgängig: Ich habe diese Anleitung nicht absolviert.
175 weitere Nutzer:innen haben diese Anleitung absolviert.
Besonderer Dank geht an diese Übersetzer:innen:
100%


Diese Übersetzer:innen helfen uns, die Welt zu reparieren! Wie kann ich mithelfen?
Hier starten ›


37 Kommentare
Nice guide. I could be wrong but for the first time in a while, changing a display on an Apple phone looks like it’s not anymore difficult than previous models.
John K
the-screen-savers.com
If you remove the screen but then apply the same screen back on the phone, will True Tone still be disabled?
@onslivion Nope! It'll continue to work fine, so long as you didn’t damage anything.
Hi i broke the Flex cable of the Part.
what i can do now.
is their some Parts for sale?
I just switched the screens from 2 phones and both are unresponsive, if put them back to its original logic board the work again, any idea why they dont work? both are original.
Why is True Tone disabled afterwards? Even with an Original Screen how is that possible?
That's normal. There's a chip in the screen that has info that is specific to the original logic board so unless you have a special machine to read/write to that chip, truetone will not work.
This was perfect. It definitely helped me replace the screen on a friend IPhone XS Max!
Every authoritative source (such as Apple Support, Wikipedia) that I read about the iPhone XS Max display states that it has an OLED display - not an AMOLED display, and not an LCD display (such as on the XR model). Yet the parts associated with this guide are LCD (website quirk?) and the written text for XS Max mention AMOLED. Isn’t this important to get right when replacing? The model I have is A1921.
Hi Mark,
The iPhone XS Max uses an AMOLED display. Active Matrix OLED (AMOLED) is a subcategory of the general OLED tech—AMOLED displays contain circuitry which allows them to switch each OLED pixel on or off. Compared to Passive Matrix OLED, AMOLED displays have a higher refresh rate and are more energy efficient . However AMOLED displays are complex, difficult to source, and very expensive to replace (think $200-400 for the part!) Hardware manufacturers sought to resolve this problem by producing LCD replacement screens. These screens are made to be completely compatible with the iPhone XS Max, but are significantly cheaper to replace. They do look slightly different compared to the original screen. Check this link out for a more in-depth review of the differences.
Where is the INSTALL GUIDE this is just removal? And don’t tell me it’s the reverse. I have a small gasket that’s not mentioned in this and it doesn’t explain how to remove the main old gasket or install the new gasket
Where is the installation guide? This is just a removal guide. Don’t tell me that it’s the opposite of removal to install because I have a small gasket that is not mentioned in the YouTube video or on this site in my package
I would like to echo this comment. It is extremely disappointing to see a guide this comprehensive and detailed stop short of reassembly. Especially because some parts need to be transferred from the original display to the replacement one.
Completed the Repair with the more Expensive alternative - the OLED display.
The guide is very comprehensive and covered all the points including looking out for bits left behind!
- I noticed a tiny piece of conductive foam on the old display which i moved to the new one.
The OLED display is top quality, but a little darker due to losing the “True Tone” no doubt.
The Adhesive kit is very good, but separating the two films was a little difficult and messed up the alignment slightly, however I managed to recover!
One more addition I had to make after undertaking this repair.
I had noted that after swapping the display the earpiece was very quiet. I thought that I had missed a gasket, misaligned the earpiece speaker or not plugged in the leads correctly.
Nope. Much simpler than that. CLEAN THE EAR PIECE CUTOUT! *Eeeewwww* After putting up with this for about 4 weeks, I happened to get out the Cotton Buds. A quick wipe revealed someone elses EAR GUNK was clogging up the ear piece cutout !
Disgusted, I got out the Isopropyl and cleaned it (carefully) about 10 times, the audio is now crystal clear.
@ifixit - Please ensure your “Refurbished displays” have a clean earhole. It was pretty gross that it was clogged to the point that I could not HEAR!
Great guide, completely worked for me!
This guide worked perfectly for my iPhone Max XS screen replacement. This is only my second “project” from iFixit (the first was a replacement display screen for my Canon 6D) and both times, miraculously, everything worked. I’m really not sure if it is my skills or the details in the guides (it’s definitely the latter and a tiny bit of the former). The replacement parts are reasonably priced and the toolkits are VERY GOOD in quality.
For this iPhone screen fix, I used a previously purchased toolkit and “borrowed” suction handles (yes, definitely makes a difference and better than the tape alternative—I tried both) from a bathroom rack.
It took me about 3 hours to get this done. I rushed on step one and stripped the first pentalobe screw. Luckily, one stripped pentalobe screw is still OK. I managed to pull it apart by wiggling the screen around (without too much force). I used a hair dryer to heat the frame/adhesive.
Follow the instructions closely and don’t lose the tiny screws. A magnetic screwdriver helped.
I have accidentally damaged flood illuminator will it affect the face id also or if I just replace the Earpiece Speaker and Sensor Assembly it will get fixed.
Step 1: Remove pentalobe screws…is very careful to NOT STRIP THE SCREW…tools provided/metal is not hard enough and is unable to take out the screw in Step 1 and am now currently going out to buy better pentalobe screw driver. THANKS. Why don’t you just provide better tools and increase the cost……………………………………………
for me at least once you get use to repairing this it can take around 30 min too an hour but i also repair all devices even phones for living so i do have experience with repairing these
Changing just the glass screen on my iphone xs max and the black part behind the screen is cracked what do I do ?
Executed this repair almost flawlessly. The FaceID flex cable is very fragile and glued down very well. I advise you be careful when removing is as not much pressure at all can cause it to break (Speaking from experience). Other than that the guide was very easy to follow.
This was an incredible guide! With the video, it was the perfect guide and I managed to complete the fix in less than 2 hours.
Can water damaged iphone be restored by replacing screen?
Hey Team iFixit, vielen dank für diese ausführliche Anleitung. Einfach richtig lesen dann macht man auch keine Fehler haha
Last month I ordered and received a new screen/digitizer for my iPhone XS max. Installation was easy and the phone was back on-line in half ah hour. Not for long unfortunately. A week after the replacement, the digitizer became irresponsive. I had to let the battery die and subsequently reboot my phone.
It fixed the problem for one day. Then the digitizer froze up again. I decided I was going to open the phone to check the ribbon cables for faulty connection. Alas, when opening the iPhone,one of the cables between the screen and the main board tore.
I resorted to re-installing my old cracked screen that now has been working flawlessly for one week.
Is there a fix for the broken ribbon cable, or can I return the screen for credit or repair?
Hey, I'm thinking on fixing up my Iphone Xsmax screen will the Face Id still function after replacement
Hello oguntayo tosin, as mentioned in the introduction, for Face ID to work you have to transfer the earpiece speaker + sensor assembly as they are paired to your individual iPhone.
I cant put the display on the iPhone and I dont know why.It just doesn't fit right and rises about 2mm higher than it should.What can I do?
Hello Robin, did you already go through the recommended troubleshooting steps? It sounds like it could be a bracket or elements of the earpiece speaker and front sensor assembly that are not seated correctly or that there is some issue with the clips holding the display. You could also try checking whether your replacement part deviates from the original screen as discussed here. Hope this helps!
If purchasing the OLED option from here, would I be able to use a programmer to enable back True Tone?
There's a couple extra chips near the bottom of the original screen that aren't on the replacement. Are they surplus to requirement?
after re assembly the screen is loose I attempted to open it and re sitting but still loose!!! why???
PLEASE HELP! I have an IPhone XS Max with a cracked screen. It has loads of irreplaceable information on it. I can’t afford to buy a screen right now but I have a brand new screen for a IPhone 6 Plus, I don’t want to install it onto the XS but I was wondering if it could be hooked up long enough to type the passcode and trust a computer so I can download the phone’s contents? Pretty much I just need to know if the cables for the display are compatible.
This is the only thing I could think of that might possibly work and not cost me a bunch of money. I was recently attacked, robbed and assaulted. The IPhone XS Max was recording during the assault but couldn’t back up because I didn’t have any Icloud storage available. If anyone has any other suggestions please help me out. P.s. I have went to the police and they couldn’t care less, I live in a small town and my abuser is a prominent member of the community so I am on my own.