Einleitung
Being one one of the most important component of a motorcycle, the carburetor is responsible for controlling how much fuel and oxygen is allowed into the engine, and therefore must be kept clean and maintained at all times.
The most common issues that may be due to a poor carburetor are when the engine is in too high or too low RPM when the motorcycle is at idle. Additionally, a poor carburetor can lead too having throttling issues, when you open the throttle nothing happens, or vise versa.
If you are having any of the listed issues, this guide will help disassemble the carburetor in order to clean or fix anything within the part.
Was du brauchst
-
-
The Carburetor is located to the rear of the engine block, right under the gas tank.
-
-
-
Before beginning the disassembly process, first turn your fuel off by turning the dial located on the left side of the motorcycle, to the off position.
-
Disconnect the fuel line from the gas tank located on the the fuel dial.
-
-
-
Remove the rear plastic panels, one on either side, by unscrewing the two 8 mm screws located at the bottom of each panel, by using the 8 mm socket wrench.
-
-
-
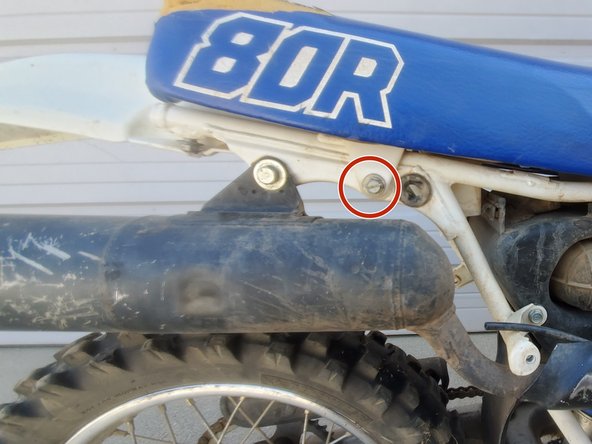
Remove the seat by unscrewing the two 8 mm screws located 2/3 to the rear of the seat, on either side.
-
-
-
-
Remove the gas tank by unscrewing the two 8 mm screws located on both sides, by using the socket wrench.
-
-
-
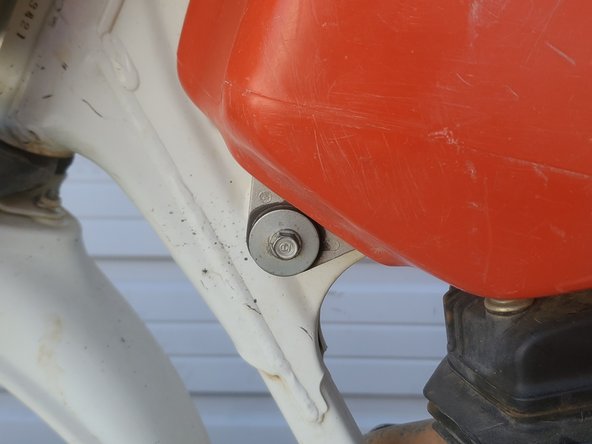
Loosen screw, located to the left of the carburetor, using Philip head screw driver.
-
The Air intake now can be pulled off from the Carburetor.
-
-
-
Remove the two 8 mm nuts that hold the carburetor to the engine block.
-
The carburetor can now be freely removed from the engine block.
-
-
-
Unscrew the the top of the carburetor and pull out the wire that is connected to the fuel needle. Set the top aside.
-
-
-
Using the Phillips head screwdriver, remove the two 10 mm screws located on the underside of the carburetor.
-
-
-
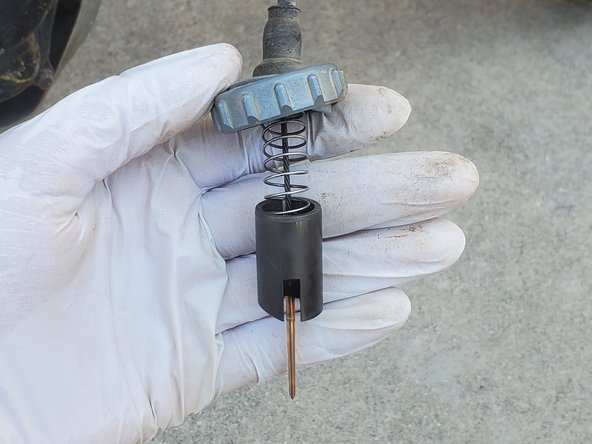
On the bottom half of the carburetor, remove the pin that is holding together the fuel bubbler and fuel pin by using needle nose plyers.
-
-
-
In order to remove the Pilot Jets, you will use the Flathead screwdriver to unscrew the two jets from the top.
-
-
-
Once fully disassembled, use carburetor cleaner and a rag to fully clean the interior and components of the carburetor, or replace any damaged parts.
-


To reassemble your device, follow these instructions in reverse order.
To reassemble your device, follow these instructions in reverse order.
Rückgängig: Ich habe diese Anleitung nicht absolviert.
2 weitere Nutzer:innen haben diese Anleitung absolviert.

Team

Embry-Riddle Aeronautical University, Team S3-G26, Cromer Twal Fall 2020 Mitglied von Embry-Riddle Aeronautical University, Team S3-G26, Cromer Twal Fall 2020
ERAU-CROMER TWAL-F20S3G26
1 Mitglied
1 Anleitung geschrieben