Diese Version enthält möglicherweise inkorrekte Änderungen. Wechsle zur letzten geprüften Version.
Was du brauchst
-
Dieser Schritt ist noch nicht übersetzt. Hilf mit, ihn zu übersetzen!
-
Identify the jack point, located directly underneath your car, in the center portion between the front two wheels.
-
Place the Hydraulic Jack beneath the jack point.
-
Pump the lever on the Hydraulic Jack, up and down, until the jack makes contact with the jack point. (Adjust the placement if necessary).
-
Continue pumping the lever until the wheels are two inches off the ground.
-
-
Dieser Schritt ist noch nicht übersetzt. Hilf mit, ihn zu übersetzen!
-
Identify the jack points located behind each front tire. Place a Jack Stand underneath both jack points.
-
Slowly rotate the Hydraulic Jack counter-clockwise to lower it. (Half a turn should be enough.)
-
After fully lowering the Hydraulic Jack, remove it from underneath your car.
-
-
Dieser Schritt ist noch nicht übersetzt. Hilf mit, ihn zu übersetzen!
-
Identify the open hood latch. It is located to the left of your brake pedal.
-
Pull latch toward you. You should hear a click from the front of the car.
-
-
-
Dieser Schritt ist noch nicht übersetzt. Hilf mit, ihn zu übersetzen!
-
Walk to the front of the car.
-
Slide your hand under the hood, just above the Honda logo. Feel for a small rectangular lever. Pull the lever up, and lift the hood.
-
-
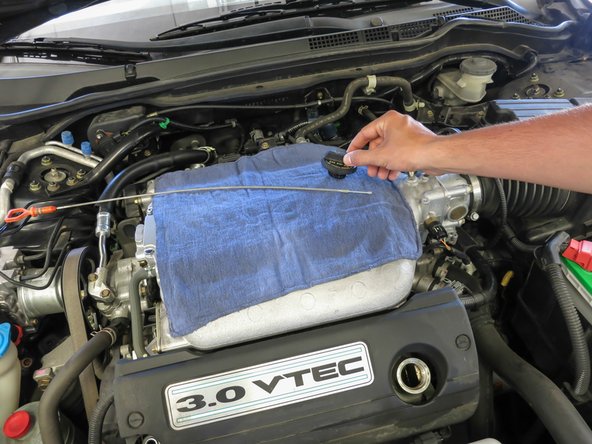
Dieser Schritt ist noch nicht übersetzt. Hilf mit, ihn zu übersetzen!
-
Pull out the dipstick
-
Unscrew the cap from the oil tank
-
Set both aside. lay a towel over the engine block and set dipstick and the cap on that to avoid traces of oil.
-
-
Dieser Schritt ist noch nicht übersetzt. Hilf mit, ihn zu übersetzen!
-
Place oil pan between the front tires
-
Lay down and slide yourself headfirst under the front of the car. To the side of the right tire you will see the oil tank.
-
Loosen the drain bolt with a 17mm wrench. Once loose, use your hand to unscrew the rest of the way.
-
Allow oil to drain until the flow is reduced to a slow drip.
-
-
Dieser Schritt ist noch nicht übersetzt. Hilf mit, ihn zu übersetzen!
-
Replace the crush washer on the drain bolt with a new one.
-
Put the drain bolt back into the oil tank and tighten with 29 ft-lb of torque.
-
-
Dieser Schritt ist noch nicht übersetzt. Hilf mit, ihn zu übersetzen!
-
Using a funnel, pour the new oil into the oil tank.
-
-
Dieser Schritt ist noch nicht übersetzt. Hilf mit, ihn zu übersetzen!
-
Put the dipstick back in.
-
Put the oil tank cap back on.
-
close the hood.
-


Rückgängig: Ich habe diese Anleitung nicht absolviert.
5 weitere Nutzer:innen haben diese Anleitung absolviert.
Team

Cal Poly, Team 12-35, Maness Spring 2014 Mitglied von Cal Poly, Team 12-35, Maness Spring 2014
CPSU-MANESS-S14S12G35
4 Mitglieder
5 Anleitungen geschrieben
2 Kommentare
Well-done.
The only issue I have is that I don't have the tools.
The explanations are ok