Zum Hauptinhalt wechseln

2006 Ford F-150 Door Handle Cable Replacement

Was du brauchst

  1. 2006 Ford F-150 Door Handle Cable Replacement, 2006 Ford F-150 Door Handle Cable Replacement: Schritt 1, Bild 1 von 3 2006 Ford F-150 Door Handle Cable Replacement, 2006 Ford F-150 Door Handle Cable Replacement: Schritt 1, Bild 2 von 3 2006 Ford F-150 Door Handle Cable Replacement, 2006 Ford F-150 Door Handle Cable Replacement: Schritt 1, Bild 3 von 3
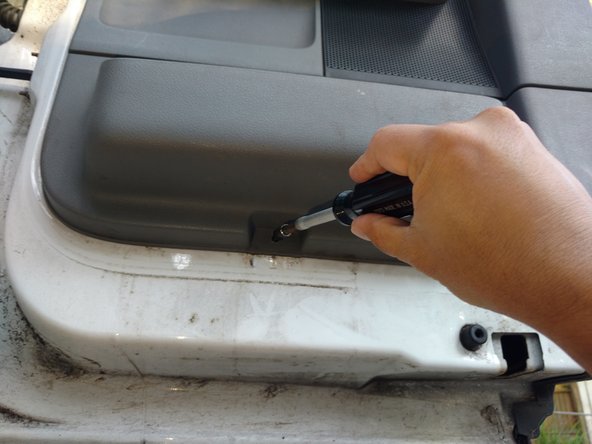
    • Remove the plastic cover from the door handle using a 7.6 cm slotted screwdriver.

    • Insert the screwdriver into the small opening found at the top of the plastic cover.

    • Carefully tilt the screwdriver upward to remove the plastic cover.

  2. 2006 Ford F-150 Door Handle Cable Replacement: Schritt 2, Bild 1 von 3 2006 Ford F-150 Door Handle Cable Replacement: Schritt 2, Bild 2 von 3 2006 Ford F-150 Door Handle Cable Replacement: Schritt 2, Bild 3 von 3
    • Remove the two 6 mm hex screws using a 6mm socket.

    • Turn the screwdriver counter-clockwise to loosen and remove the screws.

    • Grab the door handle and remove it from its location.

  3. 2006 Ford F-150 Door Handle Cable Replacement: Schritt 3, Bild 1 von 3 2006 Ford F-150 Door Handle Cable Replacement: Schritt 3, Bild 2 von 3 2006 Ford F-150 Door Handle Cable Replacement: Schritt 3, Bild 3 von 3
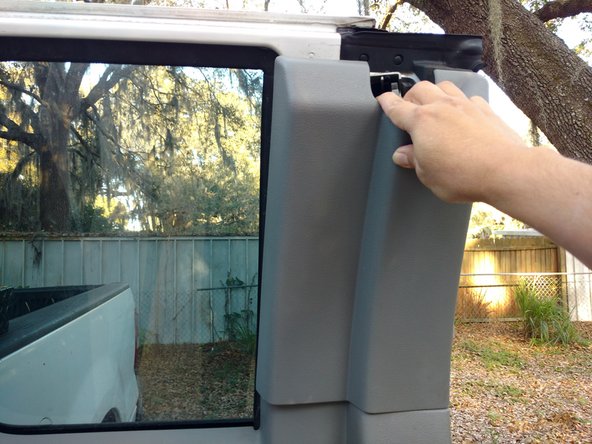
    • Remove the top plastic cover by pulling outward to snap it out of its location.

    • There are not any screws to remove in this part.

  4. 2006 Ford F-150 Door Handle Cable Replacement: Schritt 4, Bild 1 von 2 2006 Ford F-150 Door Handle Cable Replacement: Schritt 4, Bild 2 von 2
    • Remove the other plastic cover by pulling outward to snap it out of its location.

    • There are not any screws to remove in this part.

  5. 2006 Ford F-150 Door Handle Cable Replacement: Schritt 5, Bild 1 von 3 2006 Ford F-150 Door Handle Cable Replacement: Schritt 5, Bild 2 von 3 2006 Ford F-150 Door Handle Cable Replacement: Schritt 5, Bild 3 von 3
    • Remove the three 6 mm hex screws off the main door cover using a 6 mm socket. There are two screws at the top and one at the bottom.

    • The panel itself should stay in place even after the screws have been removed.

    • The door panel is maintained in place by plastic hooks behind it.

  6. 2006 Ford F-150 Door Handle Cable Replacement: Schritt 6, Bild 1 von 3 2006 Ford F-150 Door Handle Cable Replacement: Schritt 6, Bild 2 von 3 2006 Ford F-150 Door Handle Cable Replacement: Schritt 6, Bild 3 von 3
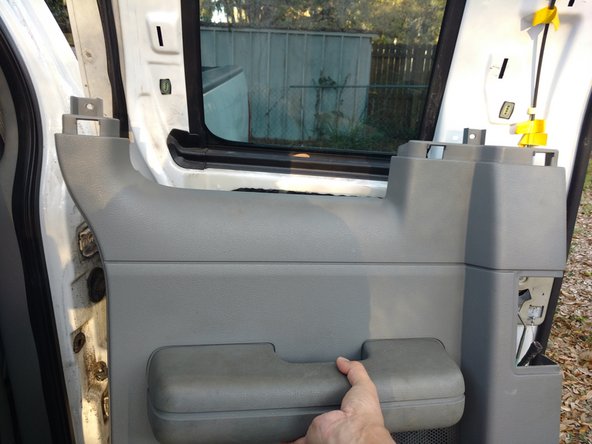
    • Gently, but with a strong force, lift the door cover about an inch or two high. Then, carefully pull it outward.

    • Be careful not to damage the plastic hooks that are keeping the door in place.

  7. 2006 Ford F-150 Door Handle Cable Replacement: Schritt 7, Bild 1 von 3 2006 Ford F-150 Door Handle Cable Replacement: Schritt 7, Bild 2 von 3 2006 Ford F-150 Door Handle Cable Replacement: Schritt 7, Bild 3 von 3
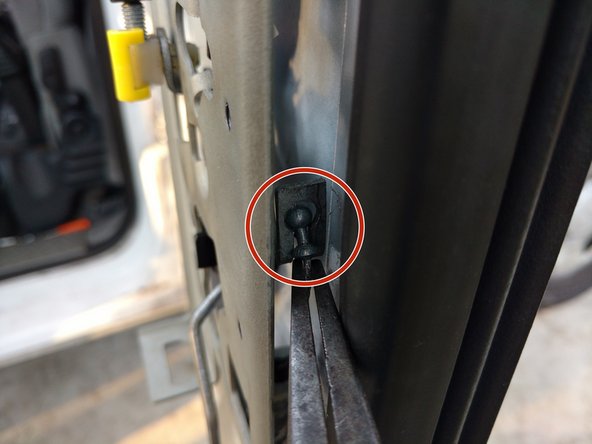
    • Snap out the upper end of the cable out of its location.

    • The upper end of the cable has a shape of a little ball. The little ball is found by where the door handle was removed.

    • Using a plier, lift the cable high enough so that the little ball can come out through the round opening above it.

  8. 2006 Ford F-150 Door Handle Cable Replacement: Schritt 8, Bild 1 von 3 2006 Ford F-150 Door Handle Cable Replacement: Schritt 8, Bild 2 von 3 2006 Ford F-150 Door Handle Cable Replacement: Schritt 8, Bild 3 von 3
    • Remove the three T27 hex star screws using a tamper torx screw driver. The screws are found at the bottom of the door.

    • You may need a mechanic creeper to lay under the door.

    • Wear protective goggles if you lay down under the door to do this step.

  9. 2006 Ford F-150 Door Handle Cable Replacement: Schritt 9, Bild 1 von 3 2006 Ford F-150 Door Handle Cable Replacement: Schritt 9, Bild 2 von 3 2006 Ford F-150 Door Handle Cable Replacement: Schritt 9, Bild 3 von 3
    • Insert your hand inside the bottom of the door to retrieve the door latch.

  10. 2006 Ford F-150 Door Handle Cable Replacement: Schritt 10, Bild 1 von 1
    • Remove the end of the cable out of its location.

Abschluss

To reassemble your device, follow these instructions in reverse order.

2 weitere Nutzer:innen haben diese Anleitung absolviert.

Team

USF Sarasota-Manatee, Team 1-1, Stewart Spring 2017 Mitglied von USF Sarasota-Manatee, Team 1-1, Stewart Spring 2017

USFSM-STEWART-S17S1G1

19 Mitglieder

19 Anleitungen geschrieben

0 Kommentare

Kommentar hinzufügen

Seitenaufrufe:

Letzte 24 Stunden: 1

Letzte 7 Tage: 3

Letzte 30 Tage: 27

Insgesamt: 1,915