Einleitung
Has one of your brake lights on your 2010-2015 Subaru Outback stopped working? If so, this guide is designed to walk you through the steps of replacing a brake light bulb saving you a trip to the repair shop.
Working brake lights on your vehicle are important for the safety of drivers behind you and for you as a driver so an accident does not happen. Having working tail lights which includes the brake light is the law and will save you from getting an expensive ticket.
Before beginning, have a friend or family member push on the brake pedal for you to see which side of the vehicle the brake light is not working on. Make sure to turn off the vehicle and remove the key from the ignition prior to beginning.
Was du brauchst
-
-
Turn off the vehicle and remove the key from the ignition switch to avoid any injury while replacing brake light.
-
-
-
Using the Phillips #2 screwdriver, loosen the two retaining screws that are holding the plastic cover in place.
-
Pull both the retaining screws out of the plastic cover.
-
Remove the plastic cover from the vehicle.
-
-
-
-
Using the Phillips #2 screwdriver, remove the two screws that are holding the rear light assembly to the body of the Subaru.
-
-
-
Using a flathead screwdriver or an opening tool, gently pry the rear light assembly away from the body of the Subaru just enough to loosen the assembly.
-
Pull the rear light assembly towards you to remove it from the vehicle.
-
-
-
Twist the light bulb socket counterclockwise and remove from rear light assembly.
-
Remove the bulb by gently pulling the bulb out.
-
-
-
Replace with a new bulb. Gently push a new bulb into the connector.
-
Place the bulb socket back into light assembly and twist clockwise to lock into place.
-
-
-
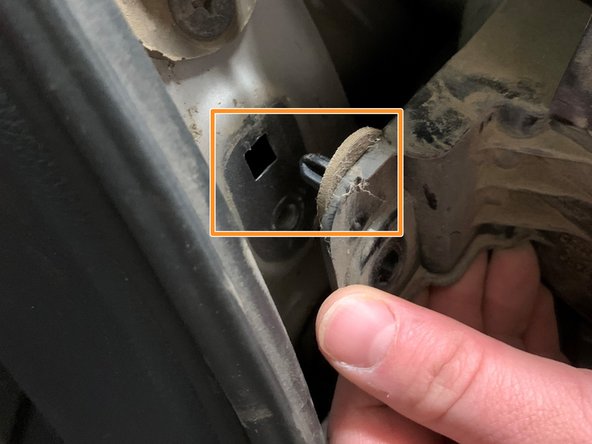
Align the rear light assembly with the two white clips with the collars on the vehicle.
-
Slide the light assembly into place. There is a square hole on the body of the Subaru that must align with post on the light assembly.
-
-
-
Reattach the two screws holding the rear light assembly to the vehicle. Use a Phillips #2 screwdriver.
-
Place the plastic cover back onto vehicle body and secure with retainers screws. The screws should be pushed into place.
-


To reassemble your device, follow these instructions in reverse order.
To reassemble your device, follow these instructions in reverse order.

Team

Oregon Institute of Technology, Team S2-G12, Rauch Winter 2021 Mitglied von Oregon Institute of Technology, Team S2-G12, Rauch Winter 2021
OIT-RAUCH-W21S2G12
1 Mitglied
1 Anleitung geschrieben