Zum Hauptinhalt wechseln

2016 Ford Fiesta S High Beam Replacement

Was du brauchst

  1. 2016 Ford Fiesta S High Beam Replacement, High Beam: Schritt 1, Bild 1 von 3 2016 Ford Fiesta S High Beam Replacement, High Beam: Schritt 1, Bild 2 von 3 2016 Ford Fiesta S High Beam Replacement, High Beam: Schritt 1, Bild 3 von 3
    • Do not open your hood when there are high winds.

    • Verify that the handbrake is on and the ignition is off.

    • Wait 10 minutes for the engine to cool before opening the hood.

    • Locate the release hatch and pull it towards you.

    • Lift the hood slightly and feel for the release catch, then slide it to the left.

    • Lift the hood and prop it up with the strut.

  2. 2016 Ford Fiesta S High Beam Replacement: Schritt 2, Bild 1 von 1
    • Remove the lower retaining screw with a Phillips screwdriver.

    • Keep the pop rivet in a safe place to help with the reassembling process.

  3. 2016 Ford Fiesta S High Beam Replacement: Schritt 3, Bild 1 von 1
    • Remove the front screw with a flat head screwdriver.

    • Keep the screw in a safe place to help with the reassembling process.

  4. 2016 Ford Fiesta S High Beam Replacement: Schritt 4, Bild 1 von 1
    • Remove the upper retaining screw in the back with a Phillips screwdriver.

    • Keep the pop rivet in a safe place to help with the reassembling process.

  5. 2016 Ford Fiesta S High Beam Replacement: Schritt 5, Bild 1 von 1
    • Lift the headlight up and off the mounting point clip.

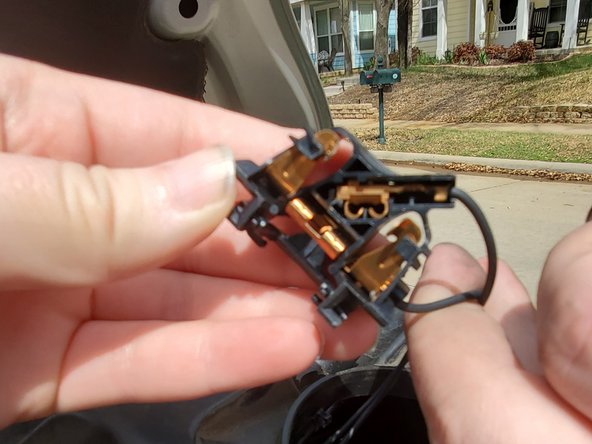
    • Squeeze the clips and pull the electrical connector out.

    • Remove the headlight from the back first for easier removal.

    • Place the headlight on a flat, secure surface.

  6. 2016 Ford Fiesta S High Beam Replacement: Schritt 6, Bild 1 von 1
    • Locate the high beam cover in the middle of the headlight.

    • Turn the cover counterclockwise and remove it.

  7. 2016 Ford Fiesta S High Beam Replacement: Schritt 7, Bild 1 von 2 2016 Ford Fiesta S High Beam Replacement: Schritt 7, Bild 2 von 2
    • Turn the bulb and the electrical connector counterclockwise and remove them.

  8. 2016 Ford Fiesta S High Beam Replacement: Schritt 8, Bild 1 von 2 2016 Ford Fiesta S High Beam Replacement: Schritt 8, Bild 2 von 2
    • Make sure you do not touch the glass surface of the bulb with your bare hands; if the oil from your hands touches the glass surface, it may cause the bulb to heat up and burn out.

    • Clean the bulb with rubbing alcohol to remove any oils that may be on the bulb then remove any traces of alcohol with a dry cloth before reinstalling the bulb.

    • Screw in the new bulb clockwise to secure it in place.

    • Put the electrical connector back on.

    • Hold the bulb by its base and insert it back into the back of the headlight.

    • Turn your headlights on to test if the headlight works properly.

    • Screw the cover back on and secure it.

  9. 2016 Ford Fiesta S High Beam Replacement: Schritt 9, Bild 1 von 2 2016 Ford Fiesta S High Beam Replacement: Schritt 9, Bild 2 von 2
    • Position the headlight back into place.

    • Reclip the mounting point clip.

    • Position the headlight so that the front piece is under the pop rivet hole that was removed in Step 2.

  10. 2016 Ford Fiesta S High Beam Replacement: Schritt 10, Bild 1 von 1
    • Screw back in the lower retaining screw.

  11. 2016 Ford Fiesta S High Beam Replacement: Schritt 11, Bild 1 von 1
    • Screw back in the middle screw with a flathead screwdriver.

  12. 2016 Ford Fiesta S High Beam Replacement: Schritt 12, Bild 1 von 1
    • Screw back in the upper retaining screw to secure the back of the headlight.

  13. 2016 Ford Fiesta S High Beam Replacement: Schritt 13, Bild 1 von 1
    • Plug the electrical connector to the back of the headlight.

  14. 2016 Ford Fiesta S High Beam Replacement: Schritt 14, Bild 1 von 1
    • Hold the hood with one hand and release the strut with the other.

    • Let the hood down gently until 30 cm from the body, then drop it to lock the hood.

    • Pushing on the hood to lock it might cause dents.

Ziellinie

3 weitere Nutzer:innen haben diese Anleitung absolviert.

2 Kommentare

buen tutorial, estaria excelente agregar un video, gracias por el aporte

oslec “Netmit” burg - Antwort

Parabéns, muito bom a explicação

Edipeixe - Antwort

Kommentar hinzufügen

Seitenaufrufe:

Letzte 24 Stunden: 6

Letzte 7 Tage: 33

Letzte 30 Tage: 286

Insgesamt: 6,049