Diese Version enthält möglicherweise inkorrekte Änderungen. Wechsle zur letzten geprüften Version.
Was du brauchst
-
Dieser Schritt ist noch nicht übersetzt. Hilf mit, ihn zu übersetzen!
-
Place the controller face down on a solid surface.
-
Remove the five T6 Torx screws that hold the back panel in place.
-
-
Dieser Schritt ist noch nicht übersetzt. Hilf mit, ihn zu übersetzen!
-
Lift the back panel, starting along the top edge of the controller.
-
There are two notches along the bottom edge that help keep the front and back panels together. This will be useful during reassembly.
-
-
Dieser Schritt ist noch nicht übersetzt. Hilf mit, ihn zu übersetzen!
-
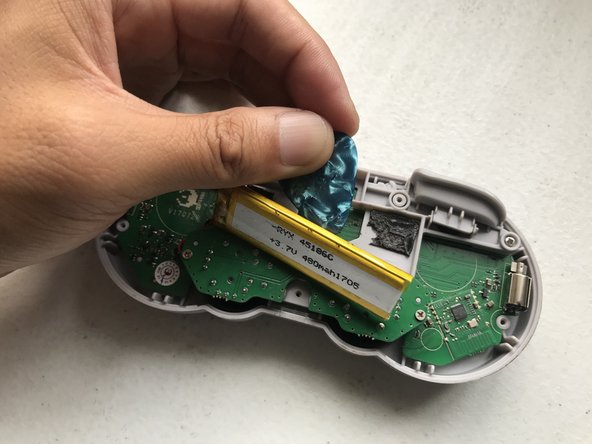
Use a spudger to pry the battery out from its compartment.
-
Set aside the battery.
-
The ribbon that connects the analog board to the main controller board is now accessible.
-
-
-
Dieser Schritt ist noch nicht übersetzt. Hilf mit, ihn zu übersetzen!
-
Unscrew the four #0 Phillips screws that hold the analog board in place.
-
-
Dieser Schritt ist noch nicht übersetzt. Hilf mit, ihn zu übersetzen!
-
Lift the analog board assembly by holding onto the edges of the board.
-
You may need to guide the analog sticks to clear the holes in the front panel while lifting the assembly.
-
Flip the board over so that the analog sticks are now facing upwards. Set it above the controller.
-
-
Dieser Schritt ist noch nicht übersetzt. Hilf mit, ihn zu übersetzen!
-
Hold the analog board assembly along the edges, and carefully pull out the old analog stick caps one-by-one.
-
-
Dieser Schritt ist noch nicht übersetzt. Hilf mit, ihn zu übersetzen!
-
Note the shape of the hole under the replacement analog stick cap and how it matches the shape of the analog stick shaft. Orient them correctly for a proper fit.
-
Take your new caps and push them into the shaft.
-
Push the cap all the way down until you hear a ‘click’, which is the analog button being pressed.
-


Rückgängig: Ich habe diese Anleitung nicht absolviert.
13 weitere Nutzer:innen haben diese Anleitung absolviert.

15 Kommentare
Thanks for the comment! Yes, you can get away with not removing the battery, but you’ll need to be extra careful with that ribbon. I just didn’t want to introduce that risk of accidentally tugging (and potentially damaging) the ribbon, especially since it’s not in plain view unless the battery is removed.
Thanks for this but do you know how to unclip the stick mechanism from the board? I seemed to have broken one. The button is not “clicking” on press right. I have reached out to 8bitdo on how to order replacements. I figured I would try and see if I could just reseat it and maybe that would fix the issue but can’t get the stick off the board.
Thanks.
I haven’t tried it myself, but from what I’ve seen, you may need to desolder the metal casing to get to the stick itself. If 8BitDo did send replacements, I would assume they’d send a whole assembly (both sticks + the board they’re soldered to). Please let us know if they get back to you; i’m very much curious. Thanks!
Great tutorial thanks!