Zum Hauptinhalt wechseln

ACER Aspire E1-572-6870 Hard Drive (HDD) Replacement

Was du brauchst

  1. ACER Aspire E1-572-6870 Hard Drive (HDD) Replacement, Battery: Schritt 1, Bild 1 von 1
    • Before you begin, be sure to turn off your laptop and unplug it from the outlet.

    • Flip your laptop over so the back panel is facing upwards.

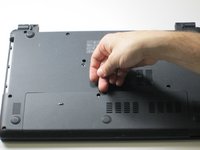
    • Locate the lock switch below the battery.

  2. ACER Aspire E1-572-6870 Hard Drive (HDD) Replacement: Schritt 2, Bild 1 von 3 ACER Aspire E1-572-6870 Hard Drive (HDD) Replacement: Schritt 2, Bild 2 von 3 ACER Aspire E1-572-6870 Hard Drive (HDD) Replacement: Schritt 2, Bild 3 von 3
    • Slide the lock switch to the right using your finger or a spudger.

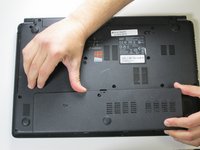
    • At the same time, grasp the battery with your other hand and slide it out of the laptop.

    • Remove the battery.

    • To reinsert or replace the battery, simply line up the tabs on the battery with the laptop and slide it straight back in. There is no need to move the lock switch.

  3. ACER Aspire E1-572-6870 Hard Drive (HDD) Replacement, Hard Drive (HDD): Schritt 3, Bild 1 von 1
    • Unscrew the one 8mm Phillips #0 screw from the bottom panel.

  4. ACER Aspire E1-572-6870 Hard Drive (HDD) Replacement: Schritt 4, Bild 1 von 3 ACER Aspire E1-572-6870 Hard Drive (HDD) Replacement: Schritt 4, Bild 2 von 3 ACER Aspire E1-572-6870 Hard Drive (HDD) Replacement: Schritt 4, Bild 3 von 3
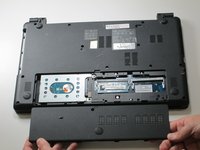
    • Remove the back panel by carefully disengaging it around the edges and then pulling upwards.

  5. ACER Aspire E1-572-6870 Hard Drive (HDD) Replacement: Schritt 5, Bild 1 von 1
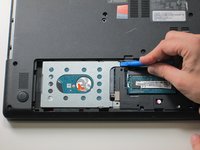
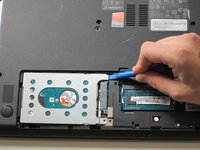
    • Remove the other 8mm Phillips #0 screw holding the hard drive to the rest of the laptop.

  6. ACER Aspire E1-572-6870 Hard Drive (HDD) Replacement: Schritt 6, Bild 1 von 2 ACER Aspire E1-572-6870 Hard Drive (HDD) Replacement: Schritt 6, Bild 2 von 2
    • Slide the hard drive to the left using a plastic opening tool.

  7. ACER Aspire E1-572-6870 Hard Drive (HDD) Replacement: Schritt 7, Bild 1 von 3 ACER Aspire E1-572-6870 Hard Drive (HDD) Replacement: Schritt 7, Bild 2 von 3 ACER Aspire E1-572-6870 Hard Drive (HDD) Replacement: Schritt 7, Bild 3 von 3
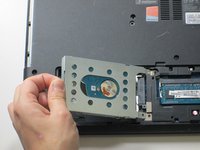
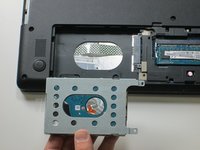
    • To remove the hard drive, pull up and to the left using the plastic tab as shown on the left side of the hard drive.

Abschluss

To reassemble your device, follow these instructions in reverse order.

5 weitere Nutzer:innen haben diese Anleitung absolviert.

Cody Lim

Mitglied seit: 01/25/17

1.404 Reputation

7 Anleitungen geschrieben

Team

Cal Poly, Team 9-6, Banghart Winter 2017 Mitglied von Cal Poly, Team 9-6, Banghart Winter 2017

CPSU-BANGHART-W17S9G6

3 Mitglieder

7 Anleitungen geschrieben

0 Kommentare

Kommentar hinzufügen

Seitenaufrufe:

Letzte 24 Stunden: 0

Letzte 7 Tage: 0

Letzte 30 Tage: 11

Insgesamt: 3,582