Diese Version enthält möglicherweise inkorrekte Änderungen. Wechsle zur letzten geprüften Version.
Was du brauchst
-
Dieser Schritt ist noch nicht übersetzt. Hilf mit, ihn zu übersetzen!
-
Using the plastic opening tools, insert it into the edge and pry open.
-
Use hands to help pull the back off from the front if needed.
-
-
Dieser Schritt ist noch nicht übersetzt. Hilf mit, ihn zu übersetzen!
-
Locate the CON101
-
The white sticker indicates water exposure. White=none, Red=Exposure
-
-
-
Dieser Schritt ist noch nicht übersetzt. Hilf mit, ihn zu übersetzen!
-
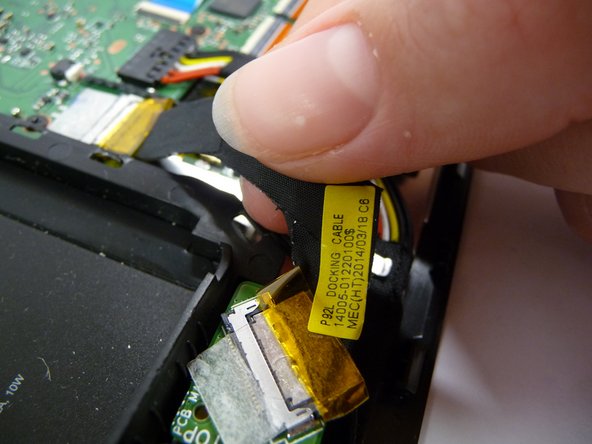
Locate P92L on CON1504
-
Gently peel back and remove plastic tape
-
-
Dieser Schritt ist noch nicht übersetzt. Hilf mit, ihn zu übersetzen!
-
Gently Pull P92L With Fingers From CON1504
-
-
Dieser Schritt ist noch nicht übersetzt. Hilf mit, ihn zu übersetzen!
-
These are the antenna wires.
-
Trace these wires to locate the two antennas.
-
-
Dieser Schritt ist noch nicht übersetzt. Hilf mit, ihn zu übersetzen!
-
Locate the two antennas
-
Desolder the two antenna wires
-


Rückgängig: Ich habe diese Anleitung nicht absolviert.
Ein:e weitere:r Nutzer:in hat diese Anleitung absolviert.
Team

USF Tampa, Team 7-4, Leahy Fall 2014 Mitglied von USF Tampa, Team 7-4, Leahy Fall 2014
USFT-LEAHY-F14S7G4
4 Mitglieder
8 Anleitungen geschrieben