Einleitung
Following this guide, you will be able to remove the external hard drive and replace it with a new one of your own. Make sure that you have a hard drive to replace the old one with prior to attempting this guide.
Was du brauchst
-
-
Remove the six screws on the back of the laptop using a Phillips screwdriver.
-
Remove the back casing being held on by the one single screw. First lift the casing at the edge where the screw once was, then carefully lift at the rest of the edges to loosen the casing. Pull the casing towards the edge where the screw was.
-
-
-
-
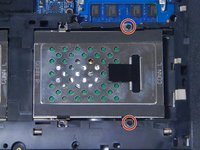
Locate the metal hard drive bay in the bottom left corner of the laptop.
-
Remove the two black screws securing the metal hard drive to the plastic.
-
Pull the tab to the right and slide to unseat the hard drive bay, then lift out.
-
-
-
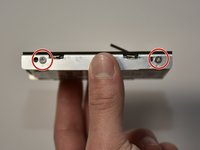
Remove the two screws on the sides of the hard drive panel, shown circled. Repeat for the other side.
-
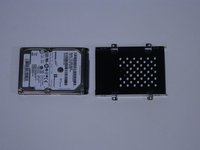
Replace the hard drive.
-


To reassemble your device, follow these instructions in reverse order.
To reassemble your device, follow these instructions in reverse order.
Rückgängig: Ich habe diese Anleitung nicht absolviert.
3 weitere Personen haben diese Anleitung absolviert.
Team

Cal Poly, Team 8-3, Banghart Winter 2017 Mitglied von Cal Poly, Team 8-3, Banghart Winter 2017
CPSU-BANGHART-W17S8G3
4 Mitglieder
8 Anleitungen geschrieben