Einleitung
If your ASUS ROG Strix GL503VD-DB71 laptop’s storage becomes full or is running slow due to you having a lot of files on your laptop, this guide will help you solve that by adding an SSD to the laptop. An SSD is a solid-state drive, which acts as and extra storage drive you can attach to your laptop. The SSD uses integrated circuit assemblies to store data for your laptop. You may have to add or replace an SSD if you run out of storage or your laptop becomes slow due to the storage being full. Before beginning, make sure to power off laptop completely and disconnect from any external power source.
Was du brauchst
-
-
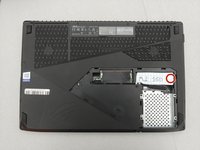
Flip the laptop over to the back cover.
-
Using a Phillips #0 screwdriver, unscrew the single 2 mm screw holding the hard drive cover.
-
-
-
-
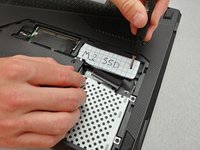
Unscrew the single screw holding the SSD using a Phillips #0 screwdriver.
-
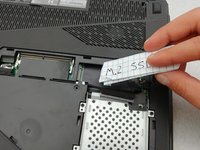
Unplug and remove the SSD.
-


To reassemble your device, follow these instructions in reverse order.
To reassemble your device, follow these instructions in reverse order.
Rückgängig: Ich habe diese Anleitung nicht absolviert.
3 weitere Personen haben diese Anleitung absolviert.
Team

Embry-Riddle Aeronautical University, Team S17-G8, Lamothe Spring 2020 Mitglied von Embry-Riddle Aeronautical University, Team S17-G8, Lamothe Spring 2020
ERAU-LAMOTHE-S20S17G8
4 Mitglieder
5 Anleitungen geschrieben