Zum Hauptinhalt wechseln

ASUS VivoBook S400C SSD Card Replacement

Was du brauchst

  1. ASUS VivoBook S400C SSD Card Replacement, Remove the Bottom Cover: Schritt 1, Bild 1 von 1
    • Flip the device over and remove the ten 5.7 mm screws with a Phillips #0 screwdriver.

  2. ASUS VivoBook S400C SSD Card Replacement: Schritt 2, Bild 1 von 2 ASUS VivoBook S400C SSD Card Replacement: Schritt 2, Bild 2 von 2
    • Use a spudger or your fingers to go around and lift the edges and release the back panel.

  3. ASUS VivoBook S400C SSD Card Replacement, Disconnect the Battery: Schritt 3, Bild 1 von 1
    • Using a spudger, lift up the plug connecting the battery to the motherboard.

  4. ASUS VivoBook S400C SSD Card Replacement, SSD Card: Schritt 4, Bild 1 von 3 ASUS VivoBook S400C SSD Card Replacement, SSD Card: Schritt 4, Bild 2 von 3 ASUS VivoBook S400C SSD Card Replacement, SSD Card: Schritt 4, Bild 3 von 3
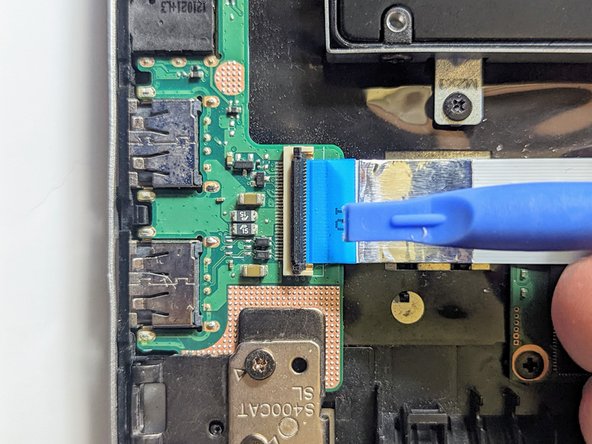
    • Disconnect the I/O Board ribbon cable from the motherboard.

    • Flip up the retaining latch with a spudger.

  5. ASUS VivoBook S400C SSD Card Replacement: Schritt 5, Bild 1 von 2 ASUS VivoBook S400C SSD Card Replacement: Schritt 5, Bild 2 von 2
    • Grasp the ribbon cable by the blue tab and pull it straight out from the connector.

  6. ASUS VivoBook S400C SSD Card Replacement: Schritt 6, Bild 1 von 3 ASUS VivoBook S400C SSD Card Replacement: Schritt 6, Bild 2 von 3 ASUS VivoBook S400C SSD Card Replacement: Schritt 6, Bild 3 von 3
    • Disconnect the I/O Board ribbon cable from the I/O board.

    • Flip up the latch with a spudger.

  7. ASUS VivoBook S400C SSD Card Replacement: Schritt 7, Bild 1 von 3 ASUS VivoBook S400C SSD Card Replacement: Schritt 7, Bild 2 von 3 ASUS VivoBook S400C SSD Card Replacement: Schritt 7, Bild 3 von 3
    • Grasp the ribbon cable by the blue tab and pull it straight out from the connector.

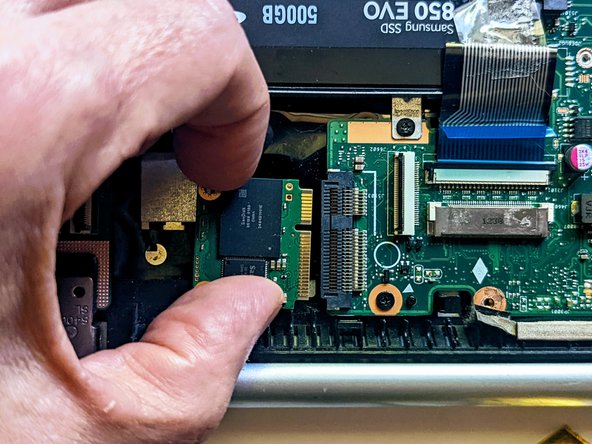
    • Remove the ribbon cable to expose the SSD device.

  8. ASUS VivoBook S400C SSD Card Replacement: Schritt 8, Bild 1 von 1
    • If present, remove any insulating sheet covering the SSD.

    • Remove the single retaining screw.

  9. ASUS VivoBook S400C SSD Card Replacement, Unplug the SSD from the motherboard: Schritt 9, Bild 1 von 2 ASUS VivoBook S400C SSD Card Replacement, Unplug the SSD from the motherboard: Schritt 9, Bild 2 von 2
    • Grasp the SSD by the sides and slide it out of the connector.

Abschluss

To reassemble your device, follow these instructions in reverse order.

Jerry Wheeler

Mitglied seit: 03/21/22

58.524 Reputation

69 Anleitungen geschrieben

Team

Oregonians Mitglied von Oregonians

Community

8 Mitglieder

176 Anleitungen geschrieben

0 Kommentare

Kommentar hinzufügen

Seitenaufrufe:

Letzte 24 Stunden: 2

Letzte 7 Tage: 8

Letzte 30 Tage: 37

Insgesamt: 1,067