Zum Hauptinhalt wechseln

ASUS Vivobook Q301LA-BSI5T17 WIFI CHIP Replacement

Was du brauchst

  1. ASUS Vivobook Q301LA-BSI5T17 WIFI CHIP Replacement, Back Case Housing: Schritt 1, Bild 1 von 1
    • Remove all ten 6mm Phillips #1 screws from the bottom of the computer chassis.

  2. ASUS Vivobook Q301LA-BSI5T17 WIFI CHIP Replacement: Schritt 2, Bild 1 von 1
    • Carefully pry open the back cover from the laptop and place it to the side.

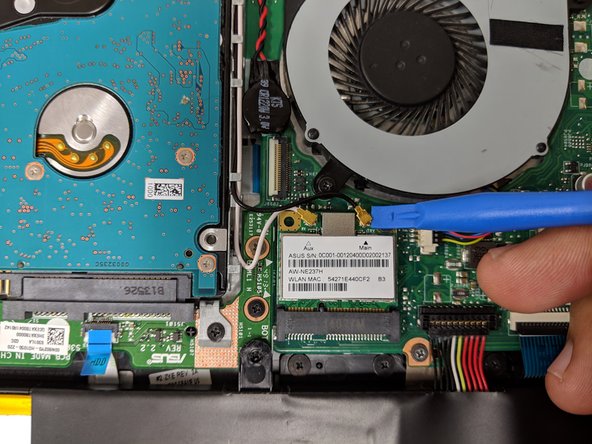
  3. ASUS Vivobook Q301LA-BSI5T17 WIFI CHIP Replacement, WIFI CHIP: Schritt 3, Bild 1 von 3 ASUS Vivobook Q301LA-BSI5T17 WIFI CHIP Replacement, WIFI CHIP: Schritt 3, Bild 2 von 3 ASUS Vivobook Q301LA-BSI5T17 WIFI CHIP Replacement, WIFI CHIP: Schritt 3, Bild 3 von 3
    • Locate the wifi module on the back of your laptop.

    • Use an iFixit opening tool to pry the black (Main) and the white (Aux) coaxial cable connectors upward.

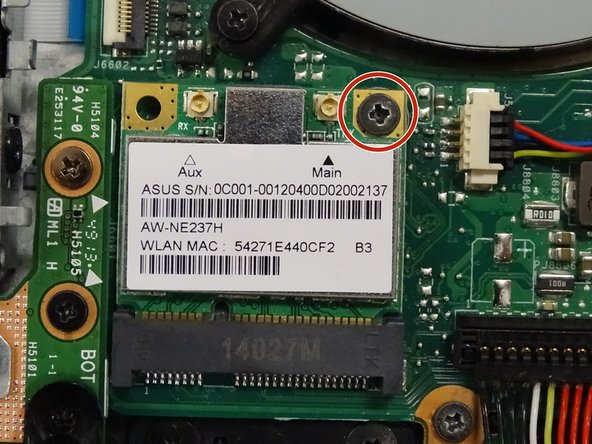
  4. ASUS Vivobook Q301LA-BSI5T17 WIFI CHIP Replacement: Schritt 4, Bild 1 von 1
    • Remove the 5mm screw from the module using the Phillips PH1 screwdriver.

  5. ASUS Vivobook Q301LA-BSI5T17 WIFI CHIP Replacement: Schritt 5, Bild 1 von 1
    • Gently pull the WiFi module out of its housing from the motherboard.

    • Careful not to break or bend the metal contacts.

Abschluss

To reassemble your device, follow these instructions in reverse order.

Amrinder Singh

Mitglied seit: 04/09/19

277 Reputation

3 Anleitungen geschrieben

Team

IUPUI, Team S1-G2, Hovde Spring 2019 Mitglied von IUPUI, Team S1-G2, Hovde Spring 2019

IUPUI-HOVDE-S19S1G2

3 Mitglieder

4 Anleitungen geschrieben

0 Kommentare

Kommentar hinzufügen

Seitenaufrufe:

Letzte 24 Stunden: 0

Letzte 7 Tage: 0

Letzte 30 Tage: 8

Insgesamt: 672