Zum Hauptinhalt wechseln

ATT EL52300 Motherboard Replacement

Was du brauchst

  1. ATT EL52300 Motherboard Replacement, Battery: Schritt 1, Bild 1 von 2 ATT EL52300 Motherboard Replacement, Battery: Schritt 1, Bild 2 von 2
    • Find the bump where the battery cover meets the phone. Put your thumb here, and push and slide the cover down.

  2. ATT EL52300 Motherboard Replacement: Schritt 2, Bild 1 von 1
    • Unplug the battery by squeezing your hands on the small white plug and lifting it up.

    • Do not pull on the wire itself because you might damage the wire!

    • The battery is now detached and ready to be removed by lifting it out.

  3. ATT EL52300 Motherboard Replacement, Motherboard: Schritt 3, Bild 1 von 2 ATT EL52300 Motherboard Replacement, Motherboard: Schritt 3, Bild 2 von 2
    • Remove the two 3.75 mm screws with a PH1 screwdriver.

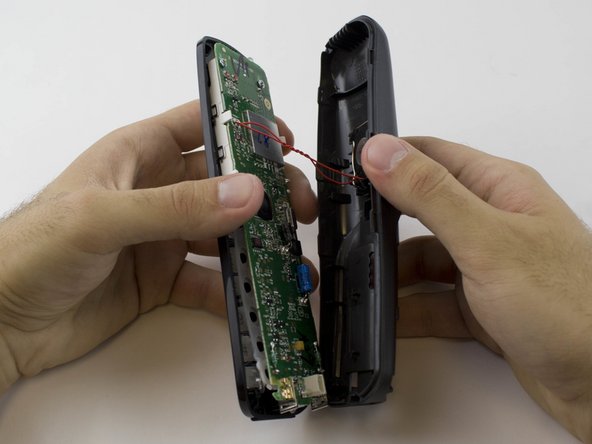
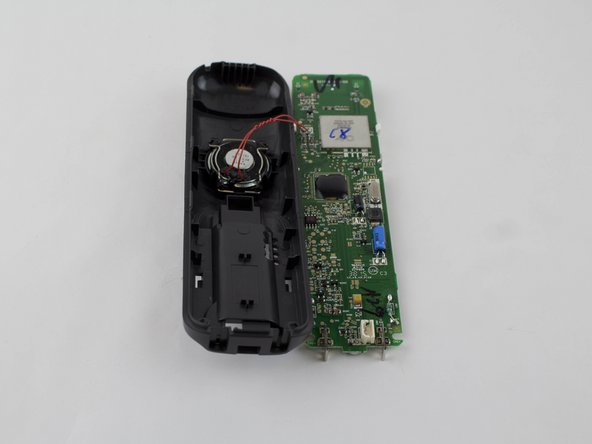
  4. ATT EL52300 Motherboard Replacement: Schritt 4, Bild 1 von 2 ATT EL52300 Motherboard Replacement: Schritt 4, Bild 2 von 2
    • Use a plastic opening tool to remove the handset case.

    • Be careful to not lift the case too far as the ringer cable is attached to the case.

  5. ATT EL52300 Motherboard Replacement: Schritt 5, Bild 1 von 2 ATT EL52300 Motherboard Replacement: Schritt 5, Bild 2 von 2
    In diesem Schritt verwendetes Werkzeug:
    Anti-Static Wrist Strap
    $7.95
    Kaufen
    • Remove the two 3.65 mm screws on the motherboard with a PH1 screwdriver.

    • Use an anti-static wrist strap to prevent damage to the motherboard.

Abschluss

To reassemble your device, follow these instructions in reverse order.

Eine weitere Person hat diese Anleitung absolviert.

Nam Mai

Mitglied seit: 02/10/16

462 Reputation

1 Anleitung geschrieben

Team

USF Tampa, Team 1-1, Sullivan Spring 2016 Mitglied von USF Tampa, Team 1-1, Sullivan Spring 2016

USFT-SULLIVAN-S16S1G1

4 Mitglieder

10 Anleitungen geschrieben

0 Kommentare

Kommentar hinzufügen

Seitenaufrufe:

Letzte 24 Stunden: 0

Letzte 7 Tage: 1

Letzte 30 Tage: 10

Insgesamt: 561