Zum Hauptinhalt wechseln

Acer Aspire 4741G-332G32Mn DVD Drive Replacement

Was du brauchst

  1. Acer Aspire 4741G-332G32Mn  DVD Drive Replacement, Battery: Schritt 1, Bild 1 von 1
    • Flip the lock latch to unlock battery.

  2. Acer Aspire 4741G-332G32Mn  DVD Drive Replacement: Schritt 2, Bild 1 von 1
    • Slide the middle latch and remove the battery.

  3. Acer Aspire 4741G-332G32Mn  DVD Drive Replacement, Backplate: Schritt 3, Bild 1 von 3 Acer Aspire 4741G-332G32Mn  DVD Drive Replacement, Backplate: Schritt 3, Bild 2 von 3 Acer Aspire 4741G-332G32Mn  DVD Drive Replacement, Backplate: Schritt 3, Bild 3 von 3
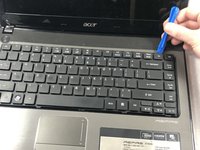
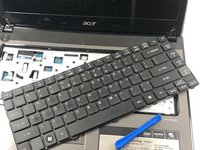
    • Pry off the keyboard using the opening tool.

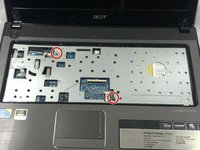
    • Remove the two screws that are connected to the motherboard using a Phillips #0 screwdriver.

  4. Acer Aspire 4741G-332G32Mn  DVD Drive Replacement: Schritt 4, Bild 1 von 1
    • Remove all 12 screws from the backplate using a Phillips #0 screwdriver.

  5. Acer Aspire 4741G-332G32Mn  DVD Drive Replacement: Schritt 5, Bild 1 von 1
    • Using the prying tool to remove the bottom of the laptop.

  6. Acer Aspire 4741G-332G32Mn  DVD Drive Replacement, DVD Drive: Schritt 6, Bild 1 von 1
    • Remove the screw that is connecting the DVD drive to the motherboard and slide DVD drive out.

Abschluss

To reassemble your device, follow these instructions in reverse order.

kristen

Mitglied seit: 03/21/19

364 Reputation

4 Anleitungen geschrieben

Team

UMass Dartmouth, Team S2-G6, Simcock Spring 2019 Mitglied von UMass Dartmouth, Team S2-G6, Simcock Spring 2019

UMASSD-SIMCOCK-S19S2G6

4 Mitglieder

8 Anleitungen geschrieben

0 Kommentare

Kommentar hinzufügen

Seitenaufrufe:

Letzte 24 Stunden: 0

Letzte 7 Tage: 1

Letzte 30 Tage: 4

Insgesamt: 326