Zum Hauptinhalt wechseln
Gemeinsam reparieren - Jetzt registrieren

Acer Aspire 5253 Motherboard Replacement

Was du brauchst

  1. Acer Aspire 5253 Motherboard Replacement, Battery: Schritt 1, Bild 1 von 1
    • Turn the laptop over.

    Frag FixBot

    Kommentar hinzufügen

  2. Acer Aspire 5253 Motherboard Replacement: Schritt 2, Bild 1 von 1
    • "Unlock" your battery by moving the switch as shown so that an unlocked lock on a red background is shown.

    Frag FixBot

    Kommentar hinzufügen

  3. Acer Aspire 5253 Motherboard Replacement: Schritt 3, Bild 1 von 1
    • Next move the other switch, while the unlocked symbol is still showing. The battery should pop up, and no longer be flush with the bottom of the laptop.

    Frag FixBot

    Kommentar hinzufügen

  4. Acer Aspire 5253 Motherboard Replacement: Schritt 4, Bild 1 von 1
    • Now remove the battery by lifting it out of the laptop by the side closest to the switches.

    Frag FixBot

    Kommentar hinzufügen

  5. Acer Aspire 5253 Motherboard Replacement: Schritt 5, Bild 1 von 1
    • You have successfully removed the battery. Congratulations!

    Frag FixBot

    Kommentar hinzufügen

  6. Acer Aspire 5253 Motherboard Replacement, Back Cover Panel: Schritt 6, Bild 1 von 1
    • Now, locate the two screws that hold the back cover panel onto the laptop.

    Frag FixBot

    Kommentar hinzufügen

  7. Acer Aspire 5253 Motherboard Replacement: Schritt 7, Bild 1 von 1
    • Unscrew both of the screws that are holding the back panel in place with the Philips #00 head.

    • The screws are 3/8" in length and have a 1/4" head.

    Frag FixBot

    Kommentar hinzufügen

  8. Acer Aspire 5253 Motherboard Replacement: Schritt 8, Bild 1 von 2 Acer Aspire 5253 Motherboard Replacement: Schritt 8, Bild 2 von 2
    • Once both screws have been removed use a plastic opening tool to lift the panel up. Starting with the indented notch , and moving left and right from there.

    Frag FixBot

    Kommentar hinzufügen

  9. Acer Aspire 5253 Motherboard Replacement: Schritt 9, Bild 1 von 1
    • After the panel has been loosened by the plastic opening tool, take your finger, place it in the gap, and remove the panel from the laptop.

    Frag FixBot

    Kommentar hinzufügen

  10. Acer Aspire 5253 Motherboard Replacement, Keyboard: Schritt 10, Bild 1 von 1
    • Fling your laptop over and open it as shown in the image.

    Frag FixBot

    Kommentar hinzufügen

  11. Acer Aspire 5253 Motherboard Replacement: Schritt 11, Bild 1 von 1
    • Locate the tabs keeping the keyboard in place.

    Frag FixBot

    Kommentar hinzufügen

  12. Acer Aspire 5253 Motherboard Replacement: Schritt 12, Bild 1 von 2 Acer Aspire 5253 Motherboard Replacement: Schritt 12, Bild 2 von 2
    In diesem Schritt verwendetes Werkzeug:
    Tweezers
    $4.99
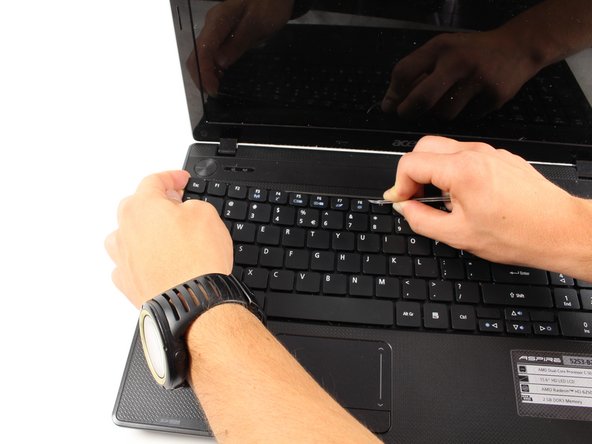
    • Using thin tweezers push the tabs in the keyboard in and pull up on the edge of the keyboard.

    • The keyboard will bend and it will seem like its breaking, but don't worry this is OK!

    Frag FixBot

    Kommentar hinzufügen

  13. Acer Aspire 5253 Motherboard Replacement: Schritt 13, Bild 1 von 1
    • Once the keyboard begins popping out of place use your hand to keep the part that has been detached from the laptop in the air.

    • Continue pushing in tabs and lifting up the keyboard as described above.

    Frag FixBot

    Kommentar hinzufügen

  14. Acer Aspire 5253 Motherboard Replacement: Schritt 14, Bild 1 von 1
    • Once the keyboard has been separated from the body of the laptop carefully lift the keyboard up and tilt it forward, leaving it to rest on the laptop as shown.

    • Do not pull the keyboard up with too much force because you may cause damage to your laptop!

    Frag FixBot

    Kommentar hinzufügen

  15. Acer Aspire 5253 Motherboard Replacement: Schritt 15, Bild 1 von 2 Acer Aspire 5253 Motherboard Replacement: Schritt 15, Bild 2 von 2
    • Using tweezers pull the white tab down on both sides. This will release the blue and black connector.

    Frag FixBot

    Kommentar hinzufügen

  16. Acer Aspire 5253 Motherboard Replacement: Schritt 16, Bild 1 von 1
    • Pull the blue and black connector out of its socket.

    • Make sure it comes off easily or you may rip it.

    Frag FixBot

    Kommentar hinzufügen

  17. Acer Aspire 5253 Motherboard Replacement: Schritt 17, Bild 1 von 1
    • Now you can pull the keyboard away from the laptop.

    Frag FixBot

    Kommentar hinzufügen

  18. Acer Aspire 5253 Motherboard Replacement, Fan: Schritt 18, Bild 1 von 3 Acer Aspire 5253 Motherboard Replacement, Fan: Schritt 18, Bild 2 von 3 Acer Aspire 5253 Motherboard Replacement, Fan: Schritt 18, Bild 3 von 3
    • After you have removed all of the prerequisites its time to unscrew a few more screws. Flip your laptop over and first remove all the screw highlighted in red with the Phillips #00 screwdriver. These are 1/4" head diameter by 3/8" screw length screws.

    • Now remove the screws highlighted in orange with the Phillips #00 screwdriver. These are 5/32" head diameter by 5/32" screw length screws. Keep these separate from the other screws.

    Frag FixBot

    Kommentar hinzufügen

  19. Acer Aspire 5253 Motherboard Replacement: Schritt 19, Bild 1 von 2 Acer Aspire 5253 Motherboard Replacement: Schritt 19, Bild 2 von 2
    • Flip the Laptop back over, and unscrew the 1/4" diameter head 7/32" length screws indicated in the picture.

    Frag FixBot

    Kommentar hinzufügen

  20. Acer Aspire 5253 Motherboard Replacement: Schritt 20, Bild 1 von 1
    In diesem Schritt verwendetes Werkzeug:
    Tweezers
    $4.99
    • The indicated spots show where different components are attached to the motherboard (such as the power button and the track pad). You will have to remove these connections the same way you undid the keyboard using the tweezers.

    Frag FixBot

    Kommentar hinzufügen

  21. Acer Aspire 5253 Motherboard Replacement: Schritt 21, Bild 1 von 3 Acer Aspire 5253 Motherboard Replacement: Schritt 21, Bild 2 von 3 Acer Aspire 5253 Motherboard Replacement: Schritt 21, Bild 3 von 3
    • Here is a close-up of all of the connectors. Remember to use tweezers on the black part and carefully pull out both sides. Once it has been moved back slightly, pull the connector out just like the keyboard.

    • The third picture shows the connector to the speakers which can just be pulled straight out by tweezers.

    Frag FixBot

    Kommentar hinzufügen

  22. Acer Aspire 5253 Motherboard Replacement: Schritt 22, Bild 1 von 3 Acer Aspire 5253 Motherboard Replacement: Schritt 22, Bild 2 von 3 Acer Aspire 5253 Motherboard Replacement: Schritt 22, Bild 3 von 3
    • Use a plastic opening tool or your hands to carefully lift up the corner of the top panel of the laptop.

    • Once it starts coming off continue to lift it with the opening tool, or your hand, until it lifts off completely.

    Frag FixBot

    Kommentar hinzufügen

  23. Acer Aspire 5253 Motherboard Replacement: Schritt 23, Bild 1 von 1
    • With the top panel off the laptop will look like this. Locate the fan.

    Frag FixBot

    Kommentar hinzufügen

  24. Acer Aspire 5253 Motherboard Replacement: Schritt 24, Bild 1 von 3 Acer Aspire 5253 Motherboard Replacement: Schritt 24, Bild 2 von 3 Acer Aspire 5253 Motherboard Replacement: Schritt 24, Bild 3 von 3
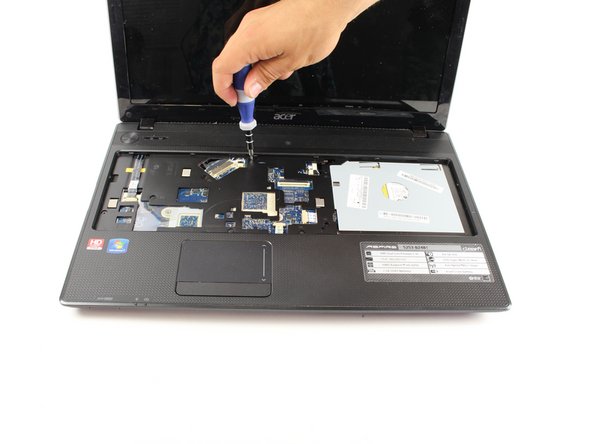
    • Once you manage to locate the fan use the screwdriver to unscrew the three screws highlighted.

    • Notice that one of the screws is directly beneath a set of wires. Be careful not to cut those wires as you remove the screws.

    Frag FixBot

    Kommentar hinzufügen

  25. Acer Aspire 5253 Motherboard Replacement: Schritt 25, Bild 1 von 1
    • Carefully lift the fan out of place.

    Frag FixBot

    Kommentar hinzufügen

  26. Acer Aspire 5253 Motherboard Replacement: Schritt 26, Bild 1 von 1
    • Use tweezers to disconnect the wires connecting the fan to the laptop.

    Frag FixBot

    Kommentar hinzufügen

  27. Acer Aspire 5253 Motherboard Replacement: Schritt 27, Bild 1 von 2 Acer Aspire 5253 Motherboard Replacement: Schritt 27, Bild 2 von 2
    • Now the fan is fully disconnected and you can pull it away from the laptop.

    Frag FixBot

    Kommentar hinzufügen

  28. Acer Aspire 5253 Motherboard Replacement, Motherboard: Schritt 28, Bild 1 von 2 Acer Aspire 5253 Motherboard Replacement, Motherboard: Schritt 28, Bild 2 von 2
    • Now locate the three 1/4" diameter head and 7/32" length screws shown in the picture, and remove them with a #00 Phillips screwdriver.

    Frag FixBot

    Kommentar hinzufügen

  29. Acer Aspire 5253 Motherboard Replacement: Schritt 29, Bild 1 von 1
    • Locate the two strips and the wire bundle that are connected to the motherboard from other components.

    Frag FixBot

    Kommentar hinzufügen

  30. Acer Aspire 5253 Motherboard Replacement: Schritt 30, Bild 1 von 3 Acer Aspire 5253 Motherboard Replacement: Schritt 30, Bild 2 von 3 Acer Aspire 5253 Motherboard Replacement: Schritt 30, Bild 3 von 3
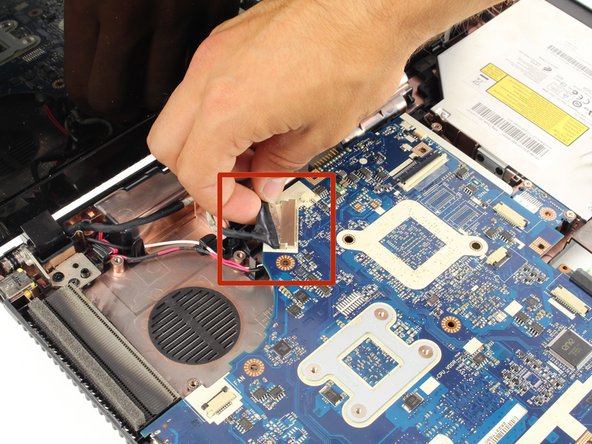
    • Carefully remove the connections, as done previously for the keyboard.

    • The third type of connector, highlighted in red, can simply be removed by pulling gently on one of its sides with your hand until it comes free.

    Frag FixBot

    Kommentar hinzufügen

  31. Acer Aspire 5253 Motherboard Replacement: Schritt 31, Bild 1 von 3 Acer Aspire 5253 Motherboard Replacement: Schritt 31, Bild 2 von 3 Acer Aspire 5253 Motherboard Replacement: Schritt 31, Bild 3 von 3
    • Lift the motherboard carefully, and locate the last wire bundle that needs to be removed.

    Frag FixBot

    Kommentar hinzufügen

  32. Acer Aspire 5253 Motherboard Replacement: Schritt 32, Bild 1 von 2 Acer Aspire 5253 Motherboard Replacement: Schritt 32, Bild 2 von 2
    In diesem Schritt verwendetes Werkzeug:
    Tweezers
    $4.99
    • As done previously, carefully pull it out with the tweezers.

    Frag FixBot

    Kommentar hinzufügen

  33. Acer Aspire 5253 Motherboard Replacement: Schritt 33, Bild 1 von 2 Acer Aspire 5253 Motherboard Replacement: Schritt 33, Bild 2 von 2
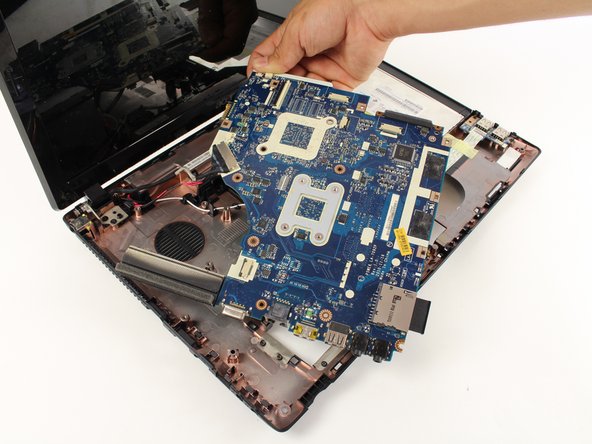
    • The motherboard should now be completely free of connections and easily removed.

    Frag FixBot

    Kommentar hinzufügen

Abschluss

To reassemble your device, follow these instructions in reverse order.

Rückgängig: Ich habe diese Anleitung nicht absolviert.

18 weitere Personen haben diese Anleitung absolviert.

Team

Cal Poly, Team 8-11, Regan Spring 2014 Mitglied von Cal Poly, Team 8-11, Regan Spring 2014

CPSU-REGAN-S14S8G11

4 Mitglieder

15 Anleitungen geschrieben

2 Kommentare zur Anleitung

The removal of the hard drive and wireless antenna wires where not included as a step, this had caused problems for a friend performing this repair. Both the hard drive and the antenna wires should be disconnected around step 9 and 10, as they are needed for motherboard removal and the point in the instructions puts them in the same area being worked on.

Data Link - Antwort Teilen

Once the motherboard is removed do you replace it with a new one or just put everything back?

Debbie Tmobile - Antwort Teilen

Kommentar hinzufügen

Seitenaufrufe:

Letzte 24 Stunden: 1

Letzte 7 Tage: 10

Letzte 30 Tage: 49

Insgesamt: 23,626