Diese Version enthält möglicherweise inkorrekte Änderungen. Wechsle zur letzten geprüften Version.
Was du brauchst
-
Dieser Schritt ist noch nicht übersetzt. Hilf mit, ihn zu übersetzen!
-
Flip your laptop on its back so the battery is facing up and the hinges are facing away from you.
-
-
Dieser Schritt ist noch nicht übersetzt. Hilf mit, ihn zu übersetzen!
-
Slide the right latch down to unlock the battery.
-
-
Dieser Schritt ist noch nicht übersetzt. Hilf mit, ihn zu übersetzen!
-
Slide and hold the left latch below the battery.
-
While holding this latch in place, pry the battery up from its bottom edge.
-
Lift the old battery out of its compartment.
-
-
Dieser Schritt ist noch nicht übersetzt. Hilf mit, ihn zu übersetzen!
-
Pinch the edges of the plastic covering above the keyboard, and pull away from the laptop until the covering pops off.
-
-
Dieser Schritt ist noch nicht übersetzt. Hilf mit, ihn zu übersetzen!
-
Pull the keyboard off gently so not to damage the keyboard ribbon cable.
-
-
Dieser Schritt ist noch nicht übersetzt. Hilf mit, ihn zu übersetzen!
-
Using a spudger or your finger, unlock the ZIF connector holding the keyboard ribbon in place by lifting the black locking lever.
-
Pull the blue keyboard ribbon cable from the ZIF connector.
-
-
Dieser Schritt ist noch nicht übersetzt. Hilf mit, ihn zu übersetzen!
-
Begin with the laptop placed on its bottom and the empty keyboard space facing you.
-
-
Dieser Schritt ist noch nicht übersetzt. Hilf mit, ihn zu übersetzen!
-
Disconnect the screen connector in the upper left of the laptop.
-
-
Dieser Schritt ist noch nicht übersetzt. Hilf mit, ihn zu übersetzen!
-
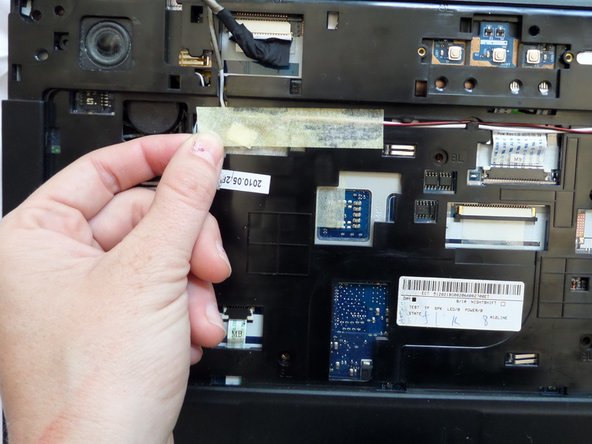
Locate the tape on the upper left of the laptop.
-
Peel off the tape, covering the red-and-black wire connector and the white-and-black speaker wires.
-
-
Dieser Schritt ist noch nicht übersetzt. Hilf mit, ihn zu übersetzen!
-
Gently disconnect the red-and-black wire connector and the white-and-black speaker wires from the upper-left.
-
-
Dieser Schritt ist noch nicht übersetzt. Hilf mit, ihn zu übersetzen!
-
Remove the 5 screws in the middle of the laptop using a #00 Phillips Screwdriver.
-
-
Dieser Schritt ist noch nicht übersetzt. Hilf mit, ihn zu übersetzen!
-
Disconnect the two blue and white ribbons by applying pressure downward and pushing them out of their sockets.
-
-
Dieser Schritt ist noch nicht übersetzt. Hilf mit, ihn zu übersetzen!
-
Remove the four screws from the upper corners of the laptop using a Phillips #00 screwdriver.
-
The two metal and two plastic connectors will come free. Save them in a safe place.
-
-
-
Dieser Schritt ist noch nicht übersetzt. Hilf mit, ihn zu übersetzen!
-
Pop off the black plastic hinge coverings.
-
-
Dieser Schritt ist noch nicht übersetzt. Hilf mit, ihn zu übersetzen!
-
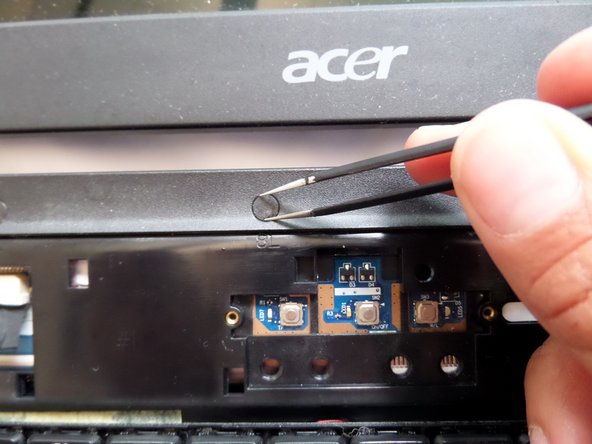
Peel away the sticky plastic coverings with tweezers.
-
-
Dieser Schritt ist noch nicht übersetzt. Hilf mit, ihn zu übersetzen!
-
Remove the three screws with a #00 Philips Screwdriver.
-
-
Dieser Schritt ist noch nicht übersetzt. Hilf mit, ihn zu übersetzen!
-
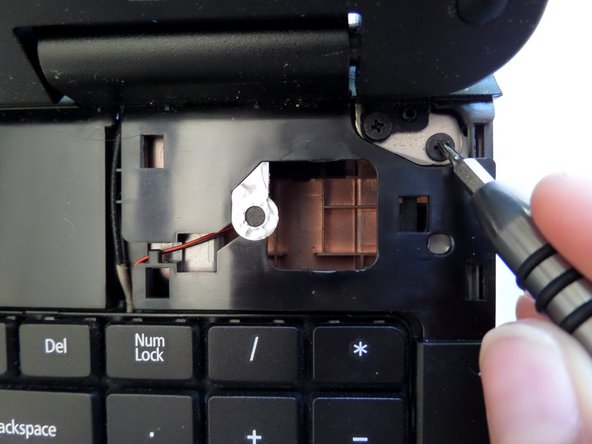
Remove the single screw next to the right hinge with a #00 Phillips Screwdriver.
-
-
Dieser Schritt ist noch nicht übersetzt. Hilf mit, ihn zu übersetzen!
-
Flip the device so the bottom of the laptop is face-up.
-
-
Dieser Schritt ist noch nicht übersetzt. Hilf mit, ihn zu übersetzen!
-
Remove the fifteen screws from the back of the laptop with a Phillips #00 Screwdriver.
-
-
Dieser Schritt ist noch nicht übersetzt. Hilf mit, ihn zu übersetzen!
-
Lift the hard-drive cover in the bottom right corner off the laptop.
-
-
Dieser Schritt ist noch nicht übersetzt. Hilf mit, ihn zu übersetzen!
-
Slide down the hard-drive out of the laptop.
-
-
Dieser Schritt ist noch nicht übersetzt. Hilf mit, ihn zu übersetzen!
-
Peel away the black plastic covering under the mid-back panel.
-
-
Dieser Schritt ist noch nicht übersetzt. Hilf mit, ihn zu übersetzen!
-
Remove the two screws on the left and bottom of the circuit board with a #00 Phillips Screwdriver.
-
-
Dieser Schritt ist noch nicht übersetzt. Hilf mit, ihn zu übersetzen!
-
Disconnect the black and white wires on the small circuit board by gently pulling them out of their sockets.
-
-
Dieser Schritt ist noch nicht übersetzt. Hilf mit, ihn zu übersetzen!
-
Remove the four screws from the metal piece beneath the circuit with a Phillips #000 Screwdriver.
-
-
Dieser Schritt ist noch nicht übersetzt. Hilf mit, ihn zu übersetzen!
-
Life the metal plate free and place it somewhere for safe-keeping.
-
-
Dieser Schritt ist noch nicht übersetzt. Hilf mit, ihn zu übersetzen!
-
The small circuit board will pop up easily. Carefully remove it
-
-
Dieser Schritt ist noch nicht übersetzt. Hilf mit, ihn zu übersetzen!
-
Gently extract the black and white wires. They will pull free from the base through the hole in the upper left corner.
-
-
Dieser Schritt ist noch nicht übersetzt. Hilf mit, ihn zu übersetzen!
-
Flip to the front and gently lift the front of the laptop off of the base.
-
-
Dieser Schritt ist noch nicht übersetzt. Hilf mit, ihn zu übersetzen!
-
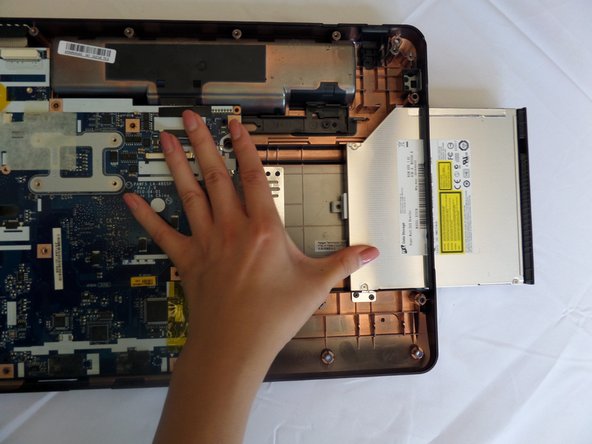
Position the back panel so that the circuit board is face-up.
-
Location of the fan is in the upper-left corner.
-
-
Dieser Schritt ist noch nicht übersetzt. Hilf mit, ihn zu übersetzen!
-
Unscrew five screws from the circuit board using a #00 Phillips screwdriver.
-
-
Dieser Schritt ist noch nicht übersetzt. Hilf mit, ihn zu übersetzen!
-
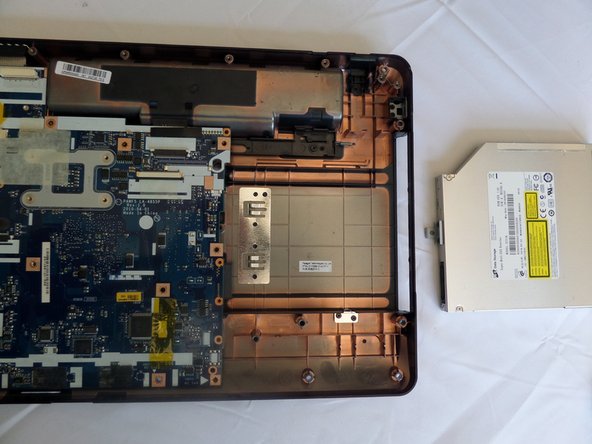
The large, silver box next to the circuit board is the optical disk drive, gently slide to the right to remove it.
-
-
Dieser Schritt ist noch nicht übersetzt. Hilf mit, ihn zu übersetzen!
-
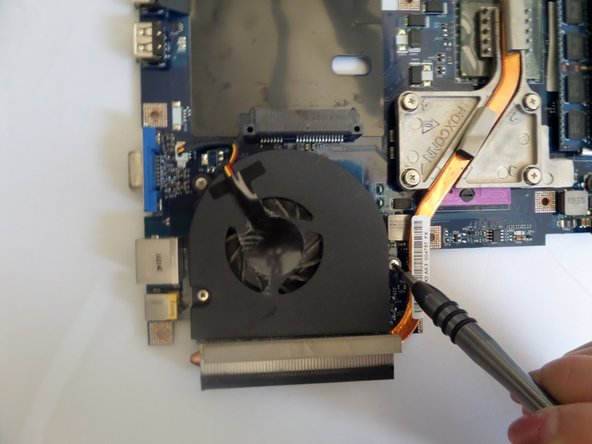
Lift the circuit board out of the back panel and turn it over so the fan is facing up.
-
-
Dieser Schritt ist noch nicht übersetzt. Hilf mit, ihn zu übersetzen!
-
Locate the three screws around the fan
-
-
Dieser Schritt ist noch nicht übersetzt. Hilf mit, ihn zu übersetzen!
-
Disconnect the white fan connector.
-
Grip gently the wire and pull the wires up toward you.
-
-
Dieser Schritt ist noch nicht übersetzt. Hilf mit, ihn zu übersetzen!
-
Remove the fan from the circuit board.
-


Rückgängig: Ich habe diese Anleitung nicht absolviert.
2 weitere Nutzer:innen haben diese Anleitung absolviert.

Team

CSU Fullerton, Team 2-3, Bruce Fall 2016 Mitglied von CSU Fullerton, Team 2-3, Bruce Fall 2016
CSUF-BRUCE-F16S2G3
4 Mitglieder
6 Anleitungen geschrieben