Zum Hauptinhalt wechseln

Acer Aspire 5734z-4836 Screen Replacement

Was du brauchst

  1. Acer Aspire 5734z-4836 Screen Replacement, Battery: Schritt 1, Bild 1 von 1
    • Before removing the battery, power off your laptop and disconnect the AC adapter.

    • Flip your laptop on its back so the battery is facing up and the hinges are facing away from you.

  2. Acer Aspire 5734z-4836 Screen Replacement: Schritt 2, Bild 1 von 1
    • Slide the right latch down to unlock the battery.

  3. Acer Aspire 5734z-4836 Screen Replacement: Schritt 3, Bild 1 von 2 Acer Aspire 5734z-4836 Screen Replacement: Schritt 3, Bild 2 von 2
    • Slide and hold the left latch below the battery.

    • While holding this latch in place, pry the battery up from its bottom edge.

    • Lift the old battery out of its compartment.

  4. Acer Aspire 5734z-4836 Screen Replacement, Screen: Schritt 4, Bild 1 von 2 Acer Aspire 5734z-4836 Screen Replacement, Screen: Schritt 4, Bild 2 von 2
    • Remove rubber bumpers from each four corners to expose the hidden screws that hold the screen bezel in place.

  5. Acer Aspire 5734z-4836 Screen Replacement: Schritt 5, Bild 1 von 1
    • Extract the hidden screws from each of the bezel's four corners, using a #00 Phillips screwdriver.

  6. Acer Aspire 5734z-4836 Screen Replacement: Schritt 6, Bild 1 von 1
    • Pop the bezel loose along the edges with a plastic opening tool.

  7. Acer Aspire 5734z-4836 Screen Replacement: Schritt 7, Bild 1 von 2 Acer Aspire 5734z-4836 Screen Replacement: Schritt 7, Bild 2 von 2
    • Gently pry off the bezel by holding each edge of the bezel with a forefinger and applying pressure onto the screen with your thumbs.

    • Lift the bezel away completely.

  8. Acer Aspire 5734z-4836 Screen Replacement: Schritt 8, Bild 1 von 1
    • Unscrew the middle screw on the green strip under the screen.

  9. Acer Aspire 5734z-4836 Screen Replacement: Schritt 9, Bild 1 von 2 Acer Aspire 5734z-4836 Screen Replacement: Schritt 9, Bild 2 von 2
    • Gently detach the red-and-white cable from the right end of the green strip under the screen.

  10. Acer Aspire 5734z-4836 Screen Replacement: Schritt 10, Bild 1 von 2 Acer Aspire 5734z-4836 Screen Replacement: Schritt 10, Bild 2 von 2
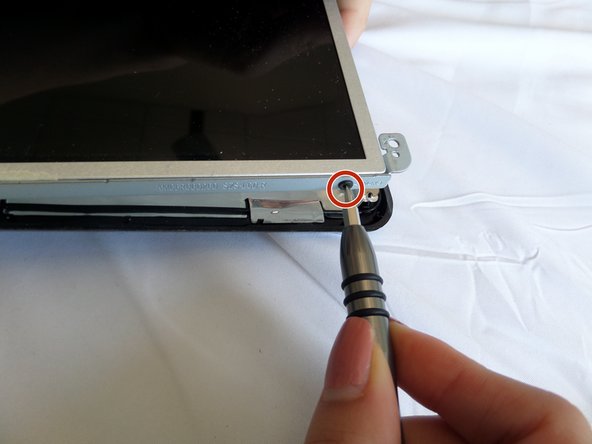
    • Locate six small screws, three on each side of the screen.

    • Remove all six screws with a #000 Phillips screwdriver.

  11. Acer Aspire 5734z-4836 Screen Replacement: Schritt 11, Bild 1 von 2 Acer Aspire 5734z-4836 Screen Replacement: Schritt 11, Bild 2 von 2
    • Disconnect wires from the webcam located above the screen.

  12. Acer Aspire 5734z-4836 Screen Replacement: Schritt 12, Bild 1 von 3 Acer Aspire 5734z-4836 Screen Replacement: Schritt 12, Bild 2 von 3 Acer Aspire 5734z-4836 Screen Replacement: Schritt 12, Bild 3 von 3
    • Lift the screen up from the laptop and turn it around.

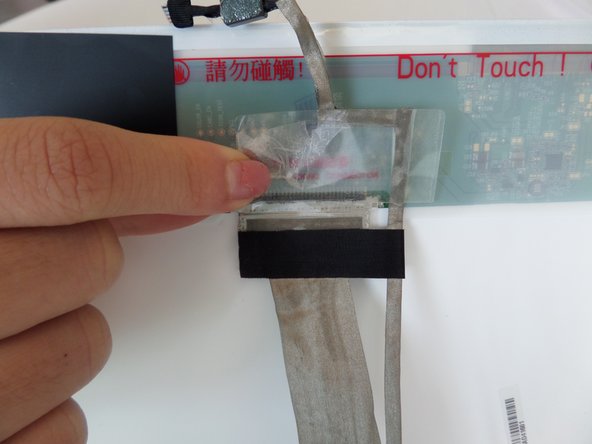
    • Gently peel back the tape located behind the screen.

  13. Acer Aspire 5734z-4836 Screen Replacement: Schritt 13, Bild 1 von 2 Acer Aspire 5734z-4836 Screen Replacement: Schritt 13, Bild 2 von 2
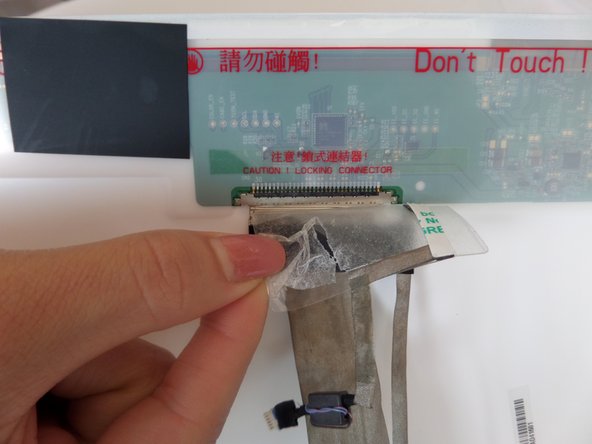
    • Pull the connector straight down to remove it.

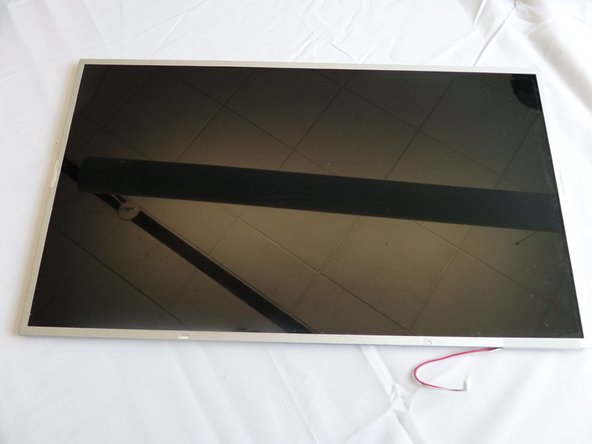
    • You can now safely lift the screen out of the laptop.

Abschluss

To reassemble your device, follow these instructions in reverse order.

Ein:e weitere:r Nutzer:in hat diese Anleitung absolviert.

Susan Cao

Mitglied seit: 09/12/16

121 Reputation

1 Anleitung geschrieben

Team

CSU Fullerton, Team 2-3, Bruce Fall 2016 Mitglied von CSU Fullerton, Team 2-3, Bruce Fall 2016

CSUF-BRUCE-F16S2G3

4 Mitglieder

6 Anleitungen geschrieben

0 Kommentare

Kommentar hinzufügen

Seitenaufrufe:

Letzte 24 Stunden: 0

Letzte 7 Tage: 2

Letzte 30 Tage: 7

Insgesamt: 832