Zum Hauptinhalt wechseln

Acer Aspire One Cloudbook 11 AO1-131-C7DW Speaker Replacement

Was du brauchst

  1. Acer Aspire One Cloudbook 11 AO1-131-C7DW Speaker Replacement, Back Panel: Schritt 1, Bild 1 von 3 Acer Aspire One Cloudbook 11 AO1-131-C7DW Speaker Replacement, Back Panel: Schritt 1, Bild 2 von 3 Acer Aspire One Cloudbook 11 AO1-131-C7DW Speaker Replacement, Back Panel: Schritt 1, Bild 3 von 3
    In diesem Schritt verwendetes Werkzeug:
    Tweezers
    $4.99
    Kaufen
    • Power the laptop off.

    • Flip the laptop over and position it so the opening faces you.

    • Remove the rubber foot located near the opening side of the device using tweezers.

  2. Acer Aspire One Cloudbook 11 AO1-131-C7DW Speaker Replacement: Schritt 2, Bild 1 von 2 Acer Aspire One Cloudbook 11 AO1-131-C7DW Speaker Replacement: Schritt 2, Bild 2 von 2
    • Unscrew the five 5-mm screws using the PH0 screwdriver.

  3. Acer Aspire One Cloudbook 11 AO1-131-C7DW Speaker Replacement: Schritt 3, Bild 1 von 3 Acer Aspire One Cloudbook 11 AO1-131-C7DW Speaker Replacement: Schritt 3, Bild 2 von 3 Acer Aspire One Cloudbook 11 AO1-131-C7DW Speaker Replacement: Schritt 3, Bild 3 von 3
    • Identify the HDMI port located in the side of the laptop opposite to the power button.

    • Insert the plastic opening tool into the divet of the back panel located above the HDMI port.

    • Pry along the laptop frame until the back panel comes loose.

    • Do not pull the back panel too hard as the battery is still connected to the back panel and the motherboard. This can damage your device.

  4. Acer Aspire One Cloudbook 11 AO1-131-C7DW Speaker Replacement: Schritt 4, Bild 1 von 2 Acer Aspire One Cloudbook 11 AO1-131-C7DW Speaker Replacement: Schritt 4, Bild 2 von 2
    • Rotate the device so the opening faces you again.

    • Hold the back panel away from the laptop and remove the 4-mm screw using the PH0 screwdriver.

    • This screw is fastening the battery to the laptop.

    • Lift the back panel gently.

  5. Acer Aspire One Cloudbook 11 AO1-131-C7DW Speaker Replacement: Schritt 5, Bild 1 von 2 Acer Aspire One Cloudbook 11 AO1-131-C7DW Speaker Replacement: Schritt 5, Bild 2 von 2
    • Unplug the cable that connects the battery to the motherboard.

    • Detach the back panel, which still includes the battery.

  6. Acer Aspire One Cloudbook 11 AO1-131-C7DW Speaker Replacement, Speaker: Schritt 6, Bild 1 von 2 Acer Aspire One Cloudbook 11 AO1-131-C7DW Speaker Replacement, Speaker: Schritt 6, Bild 2 von 2
    In diesem Schritt verwendetes Werkzeug:
    Tweezers
    $4.99
    Kaufen
    • Position the computer so the opening of the laptop faces you.

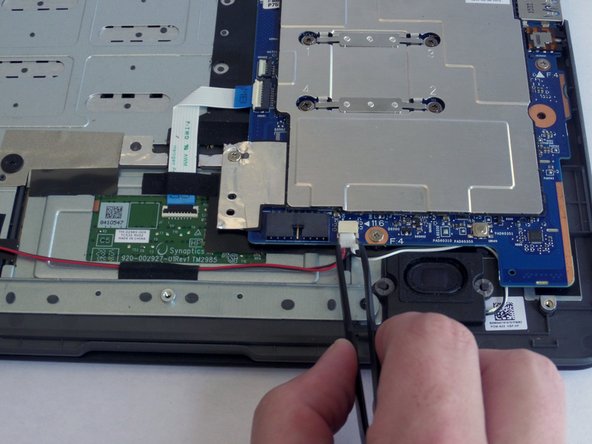
    • Unplug the white plastic connector that has red, white, and black wires using tweezers.

  7. Acer Aspire One Cloudbook 11 AO1-131-C7DW Speaker Replacement: Schritt 7, Bild 1 von 1
    • Unhook the speaker by sliding it to one side first and then by lifting it up.

    • The gray rubber ring may come off during this process. Insert it back onto the speaker if this happens.

    • Repeat this step for the other speaker.

  8. Acer Aspire One Cloudbook 11 AO1-131-C7DW Speaker Replacement: Schritt 8, Bild 1 von 1
    • Remove the tape strips holding the wires to the metallic plate using tweezers.

    • Save the tape strips for the replacement of the new speakers.

  9. Acer Aspire One Cloudbook 11 AO1-131-C7DW Speaker Replacement: Schritt 9, Bild 1 von 1
    • Remove the speakers.

Abschluss

To reassemble your device, follow these instructions in reverse order.

Team

CSU Fullerton, Team S1-G4, Bruce Fall 2017 Mitglied von CSU Fullerton, Team S1-G4, Bruce Fall 2017

CSUF-BRUCE-F17S1G4

3 Mitglieder

6 Anleitungen geschrieben

0 Kommentare

Kommentar hinzufügen

Seitenaufrufe:

Letzte 24 Stunden: 1

Letzte 7 Tage: 5

Letzte 30 Tage: 7

Insgesamt: 299