Zum Hauptinhalt wechseln

Acer Aspire R7-371T-72CF USB Chip Replacement

Was du brauchst

  1. Acer Aspire R7-371T-72CF USB Chip Replacement, USB Chip: Schritt 1, Bild 1 von 2 Acer Aspire R7-371T-72CF USB Chip Replacement, USB Chip: Schritt 1, Bild 2 von 2
    • Turn off your laptop and disconnect the power adapter.

    • Locate and remove all 12 Phillips #00 6mm screws on the backside of the laptop.

  2. Acer Aspire R7-371T-72CF USB Chip Replacement: Schritt 2, Bild 1 von 1
    • Using your prying tool, carefully remove the back panel.

  3. Acer Aspire R7-371T-72CF USB Chip Replacement: Schritt 3, Bild 1 von 3 Acer Aspire R7-371T-72CF USB Chip Replacement: Schritt 3, Bild 2 von 3 Acer Aspire R7-371T-72CF USB Chip Replacement: Schritt 3, Bild 3 von 3
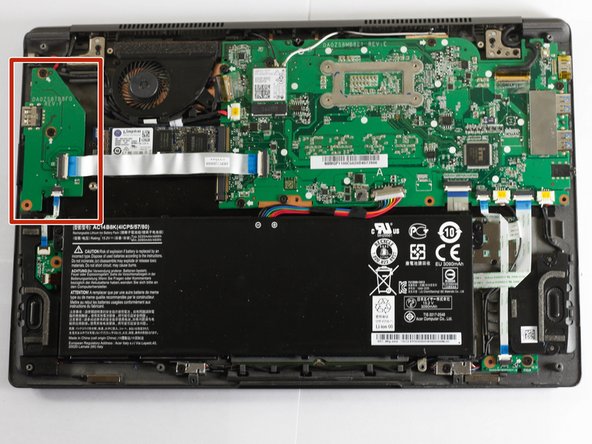
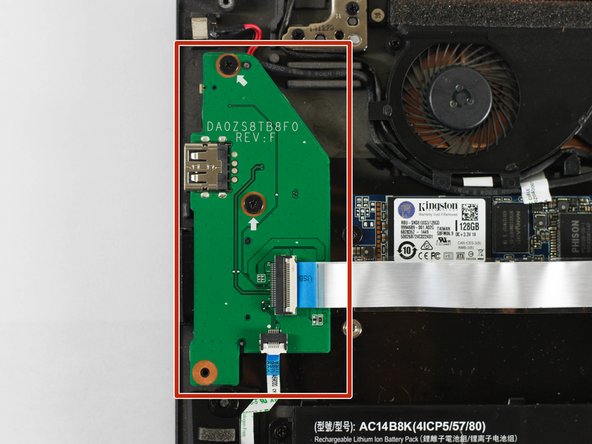
    • Locate the USB chip, as shown to the left.

    • This can be identified by its location to the left of the cooling fan and above the battery to the left.

  4. Acer Aspire R7-371T-72CF USB Chip Replacement: Schritt 4, Bild 1 von 3 Acer Aspire R7-371T-72CF USB Chip Replacement: Schritt 4, Bild 2 von 3 Acer Aspire R7-371T-72CF USB Chip Replacement: Schritt 4, Bild 3 von 3
    • Unscrew the two Phillips #00 4mm screws located on the USB chip.

  5. Acer Aspire R7-371T-72CF USB Chip Replacement: Schritt 5, Bild 1 von 3 Acer Aspire R7-371T-72CF USB Chip Replacement: Schritt 5, Bild 2 von 3 Acer Aspire R7-371T-72CF USB Chip Replacement: Schritt 5, Bild 3 von 3
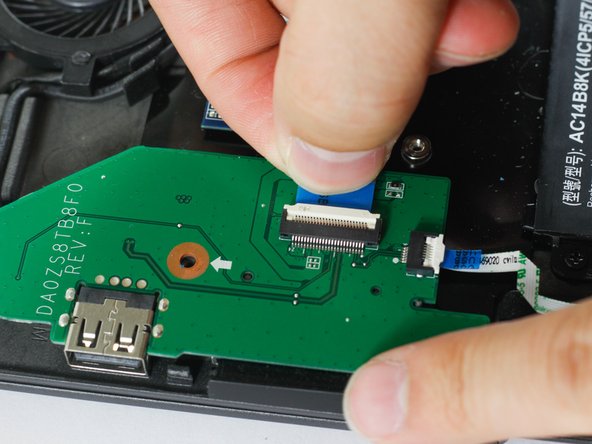
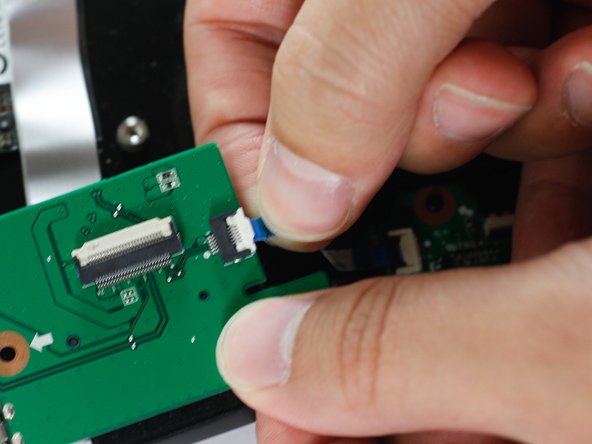
    • Push the white panel upwards to unlock the cable and then remove the cable.

    • Repeat for the second cable.

Abschluss

To reassemble your device, follow these instructions in reverse order.

Ein:e weitere:r Nutzer:in hat diese Anleitung absolviert.

Team

Cal Poly, Team S8-G5, Banghart Fall 2017 Mitglied von Cal Poly, Team S8-G5, Banghart Fall 2017

CPSU-BANGHART-F17S8G5

5 Mitglieder

5 Anleitungen geschrieben

0 Kommentare

Kommentar hinzufügen

Seitenaufrufe:

Letzte 24 Stunden: 1

Letzte 7 Tage: 2

Letzte 30 Tage: 4

Insgesamt: 495