Zum Hauptinhalt wechseln

Acer Aspire V3-551-8887 USB Ports Replacement

Was du brauchst

  1. Acer Aspire V3-551-8887 USB Ports Replacement, Back Panel: Schritt 1, Bild 1 von 1
    • Locate and remove the two 5.3 mm Phillips #1 screws holding the back panel in place.

  2. Acer Aspire V3-551-8887 USB Ports Replacement: Schritt 2, Bild 1 von 2 Acer Aspire V3-551-8887 USB Ports Replacement: Schritt 2, Bild 2 von 2
    • Use a spudger to pry the panel up from the laptop case and remove it.

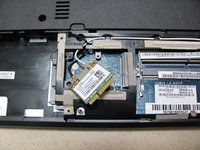
    • The laptop should now be open with the RAM and wifi chip now accessible.

  3. Acer Aspire V3-551-8887 USB Ports Replacement, USB Ports: Schritt 3, Bild 1 von 1
    • Locate the wifi chip.

  4. Acer Aspire V3-551-8887 USB Ports Replacement: Schritt 4, Bild 1 von 2 Acer Aspire V3-551-8887 USB Ports Replacement: Schritt 4, Bild 2 von 2
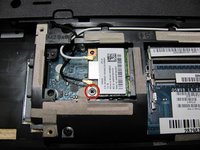
    • Remove the 5 mm Phillips #1 screw holding the wifi chip in place.

    • Carefully remove the wifi chip.

  5. Acer Aspire V3-551-8887 USB Ports Replacement: Schritt 5, Bild 1 von 1
    • Remove the 8, 9 mm Phillips #1 screws holding the panel in place.

  6. Acer Aspire V3-551-8887 USB Ports Replacement: Schritt 6, Bild 1 von 2 Acer Aspire V3-551-8887 USB Ports Replacement: Schritt 6, Bild 2 von 2
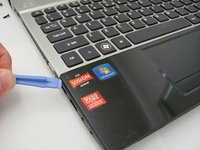
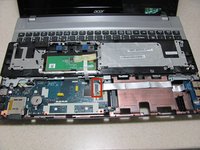
    • Flip the computer over, and with a spudger, remove the black panel directly below the keyboard.

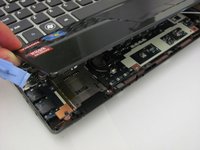
    • Remove the panel and flip it up onto the keyboard

  7. Acer Aspire V3-551-8887 USB Ports Replacement: Schritt 7, Bild 1 von 2 Acer Aspire V3-551-8887 USB Ports Replacement: Schritt 7, Bild 2 von 2
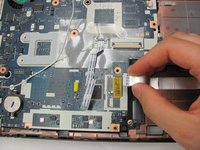
    • With the panel removed, locate the USB port ribbon cable connecting to the motherboard.

    • Carefully disconnect the ribbon cable.

  8. Acer Aspire V3-551-8887 USB Ports Replacement: Schritt 8, Bild 1 von 1
    • Unscrew the 5 mm Phillips #1 screw holding the USB ports in place.

  9. Acer Aspire V3-551-8887 USB Ports Replacement: Schritt 9, Bild 1 von 1
    • The USB ports can now be removed from the laptop.

Abschluss

To reassemble your device, follow these instructions in reverse order.

7 weitere Nutzer:innen haben diese Anleitung absolviert.

Ryan Holland

Mitglied seit: 04/15/14

407 Reputation

2 Anleitungen geschrieben

Team

Cal Poly, Team 8-8, Regan Spring 2014 Mitglied von Cal Poly, Team 8-8, Regan Spring 2014

CPSU-REGAN-S14S8G8

4 Mitglieder

7 Anleitungen geschrieben

0 Kommentare

Kommentar hinzufügen

Seitenaufrufe:

Letzte 24 Stunden: 0

Letzte 7 Tage: 0

Letzte 30 Tage: 10

Insgesamt: 5,546