Einleitung
The touchpad can become unresponsive or just break all together. This guide will show how to safely remove and replace the touchpad in your Acer Aspire laptop.
Was du brauchst
-
-
Remove the nine 4mm screws with a PH0 screwdriver.
-
Remove the two 6mm screws with a PH0 screwdriver.
-
-
-
Remove the black rubber tab on the back of the computer
-
Remove the 4mm screw hidden underneath the black tab with a PH0 screwdriver.
-
-
-
Orient the computer upside down, with the hinges facing away from you.
-
Find the black plastic piece in the SD card slot on the right side of the computer.
-
Remove the plastic piece by sliding it out of the SD card slot.
-
-
-
Insert a spudger at these eight locations to disengage the plastic tabs from the housing cover, and pry apart.
-
Continue around the entire perimeter of the cover with the spudger.
-
-
-
-
Remove the two 4mm screws using a PH0 screwdriver.
-
Depress the tabs holding the battery with a spudger.
-
Disconnect the battery connector from the motherboard using a spudger.
-
Pull the battery up and away from the laptop to remove.
-
-
-
Use the spudger to pop up the latch on the ZIF connector.
-
Pull out the ribbon cable.
-
-
-
Remove the three 2mm PH #0 screws.
-
Lift the metal tape up and off of the mounting bracket.
-
-
-
Carefully remove the foam pad from along the top edge of touchpad using a spudger.
-
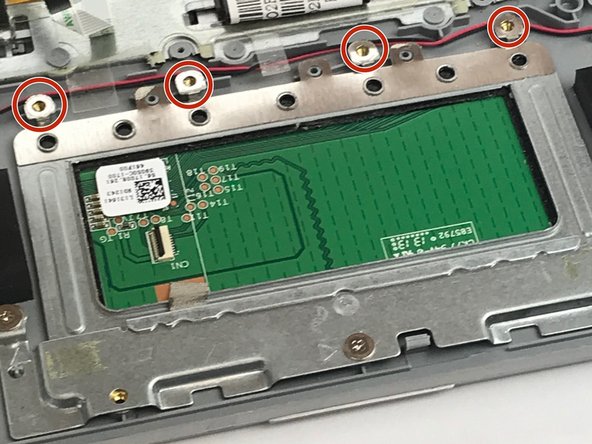
Remove the four 2mm PH #0 screws.
-


To reassemble your device, follow these instructions in reverse order.
To reassemble your device, follow these instructions in reverse order.
Rückgängig: Ich habe diese Anleitung nicht absolviert.
Ein:e weitere:r Nutzer:in hat diese Anleitung absolviert.
Team

USF Tampa, Team S16-G1, Boczar Spring 2018 Mitglied von USF Tampa, Team S16-G1, Boczar Spring 2018
USFT-BOCZAR-S18S16G1
5 Mitglieder
10 Anleitungen geschrieben