Einleitung
If you have difficulty performing significant functions such as input, output, and storage, follow this guide to replace your hard disk drive. First and foremost, check for any signs of Frequent error messages, system crashes, blue screen of death, corrupted data, files, and folders.
Before using this guide, ensure that the laptop is shut off or attempt a power restart. You can refer to our troubleshooting guide with instructions on performing a power reset under "Laptop Not Starting Up."
If you are sure that the problem is indeed the hardware, follow the instructions in this guide. You will need an opening tool, screwdriver, and magnet for this task.
Before beginning, close, power off your laptop completely, and disconnect from any external power source.
-
-
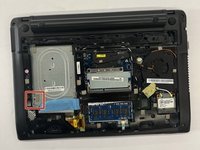
To open the bottom compartment, put one finger underneath the laptop and firmly grab the compartment with your thumb.
-
Carefully slide the bottom compartment with your thumb until you feel it pop out of place.
-
-
-
-
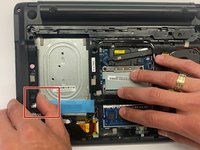
On the sides of the hard drive, you will see two side tabs. This is what holds the hard drive in place.
-
Place your finger on the left tab and press on it to loosen the hard drive.
-
After the hard drive is loose, slide it out of the compartment.
-


To reassemble your device, follow these instructions in reverse order.
To reassemble your device, follow these instructions in reverse order.
Team

CSU Los Angeles, Team 6-1, Adachi Fall 2022 Mitglied von CSU Los Angeles, Team 6-1, Adachi Fall 2022
CSULA-ADACHI-F22S6G1
4 Mitglieder
6 Anleitungen geschrieben