Zum Hauptinhalt wechseln

Acer Aspire V5-571-6891 Motherboard Replacement

Was du brauchst

  1. Acer Aspire V5-571-6891 Motherboard Replacement, Battery: Schritt 1, Bild 1 von 1
    • Use the pointed end of the spudger to slide the battery lock until the battery pops loose.

  2. Acer Aspire V5-571-6891 Motherboard Replacement: Schritt 2, Bild 1 von 2 Acer Aspire V5-571-6891 Motherboard Replacement: Schritt 2, Bild 2 von 2
    • Slide the battery out of the battery slot.

  3. Acer Aspire V5-571-6891 Motherboard Replacement, RAM: Schritt 3, Bild 1 von 1
    • Unscrew the two RAM 6mm cover screws.

    • Use a PH1 screw bit.

  4. Acer Aspire V5-571-6891 Motherboard Replacement: Schritt 4, Bild 1 von 1
    • Pop the RAM cover off.

    • Use the plastic opening tool.

  5. Acer Aspire V5-571-6891 Motherboard Replacement: Schritt 5, Bild 1 von 3 Acer Aspire V5-571-6891 Motherboard Replacement: Schritt 5, Bild 2 von 3 Acer Aspire V5-571-6891 Motherboard Replacement: Schritt 5, Bild 3 von 3
    • Use either the spudger or your fingers to pinch the clips away from the RAM chip on either side of each chip.

    • The chip should pop up.

    • The clips break easily.

    • Slide the RAM memory chips out of the slots.

  6. Acer Aspire V5-571-6891 Motherboard Replacement, Keyboard: Schritt 6, Bild 1 von 1
    • Remove the two 6mm PH1 screws from the bottom of the laptop.

  7. Acer Aspire V5-571-6891 Motherboard Replacement: Schritt 7, Bild 1 von 1
    • Use the spudger, push the two tabs, located in the battery slot, through their slots to release the keyboard.

    • Do this with the computer slightly open for ease.

  8. Acer Aspire V5-571-6891 Motherboard Replacement: Schritt 8, Bild 1 von 2 Acer Aspire V5-571-6891 Motherboard Replacement: Schritt 8, Bild 2 von 2
    • Open the laptop.

    • Start top of the keyboard and use the opening tool to pop the remaining tabs around the keyboard loose.

    • The keyboard can be flipped onto its face once removed.

  9. Acer Aspire V5-571-6891 Motherboard Replacement: Schritt 9, Bild 1 von 1
    • Use the spudger and slide the grey tabs on either side of the keyboard wires away from the white plastic.

  10. Acer Aspire V5-571-6891 Motherboard Replacement: Schritt 10, Bild 1 von 1
    • Disconnect the keyboard by pulling the blue tape on the wire strip.

  11. Acer Aspire V5-571-6891 Motherboard Replacement, Hard Disk Drive (HDD): Schritt 11, Bild 1 von 1
    • Remove the five 6mm PH1 screws beneath the keyboard.

  12. Acer Aspire V5-571-6891 Motherboard Replacement: Schritt 12, Bild 1 von 2 Acer Aspire V5-571-6891 Motherboard Replacement: Schritt 12, Bild 2 von 2
    • Use the spudger to pop the gray tab up and away from the far left wire strip.

    • Disconnect the wire strip by pulling the blue tab loose.

  13. Acer Aspire V5-571-6891 Motherboard Replacement: Schritt 13, Bild 1 von 2 Acer Aspire V5-571-6891 Motherboard Replacement: Schritt 13, Bild 2 von 2
    • Use the spudger to pop the white tab up away from the wire strip located at the top left corner of the mouse pad.

    • Disconnect the wire strip by pulling the blue tab.

  14. Acer Aspire V5-571-6891 Motherboard Replacement: Schritt 14, Bild 1 von 1
    • Close the laptop.

    • Remove the remaining 18 6mm PH1 screws from the bottom cover of the laptop.

  15. Acer Aspire V5-571-6891 Motherboard Replacement: Schritt 15, Bild 1 von 3 Acer Aspire V5-571-6891 Motherboard Replacement: Schritt 15, Bild 2 von 3 Acer Aspire V5-571-6891 Motherboard Replacement: Schritt 15, Bild 3 von 3
    • Use the opening tool to separate the back of the laptop from the inside cover.

    • Open the computer and remove the inside cover.

  16. Acer Aspire V5-571-6891 Motherboard Replacement: Schritt 16, Bild 1 von 3 Acer Aspire V5-571-6891 Motherboard Replacement: Schritt 16, Bild 2 von 3 Acer Aspire V5-571-6891 Motherboard Replacement: Schritt 16, Bild 3 von 3
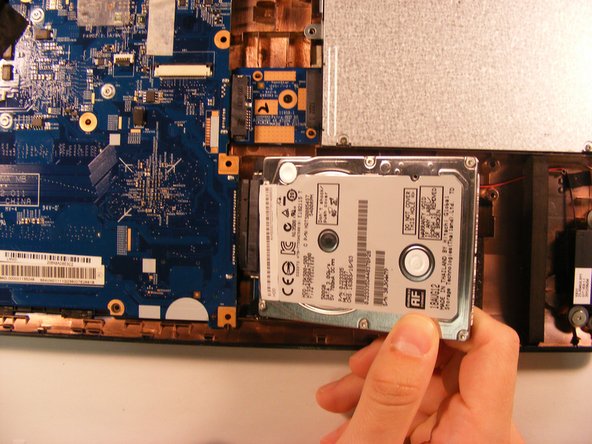
    • Lift the HDD out of the base and use the opening tool to disconnect the HDD from the motherboard wire.

  17. Acer Aspire V5-571-6891 Motherboard Replacement, CPU Fan: Schritt 17, Bild 1 von 2 Acer Aspire V5-571-6891 Motherboard Replacement, CPU Fan: Schritt 17, Bild 2 von 2
    • Slide the optical disc drive out of the slot to disconnect it from the motherboard.

    • Unscrew the main 3.5mm PH1 screw from the motherboard.

  18. Acer Aspire V5-571-6891 Motherboard Replacement: Schritt 18, Bild 1 von 3 Acer Aspire V5-571-6891 Motherboard Replacement: Schritt 18, Bild 2 von 3 Acer Aspire V5-571-6891 Motherboard Replacement: Schritt 18, Bild 3 von 3
    • Unscrew the 3.5mm PH1 screw from the Wireless Lan chip.

    • Use the opening tool to pop both wires off of the Wireless Lan chip.

    • Pull the Wirelss Lan Chip to remove it from the motherboard.

  19. Acer Aspire V5-571-6891 Motherboard Replacement: Schritt 19, Bild 1 von 2 Acer Aspire V5-571-6891 Motherboard Replacement: Schritt 19, Bild 2 von 2
    • Pull the tape covering the wires for the Wireless Lan chip up.

    • Pull the black and white wires loose.

  20. Acer Aspire V5-571-6891 Motherboard Replacement: Schritt 20, Bild 1 von 2 Acer Aspire V5-571-6891 Motherboard Replacement: Schritt 20, Bild 2 von 2
    • Pull up the tape securing the optical wires to the motherboard.

    • Disconnect the wire plug-in from the motherboard.

  21. Acer Aspire V5-571-6891 Motherboard Replacement: Schritt 21, Bild 1 von 2 Acer Aspire V5-571-6891 Motherboard Replacement: Schritt 21, Bild 2 von 2
    • Unscrew the 3.5mm PH1 screw securing the optical disk drive to motherboard connector.

    • Pull the connector to disconnect it from the motherboard.

  22. Acer Aspire V5-571-6891 Motherboard Replacement: Schritt 22, Bild 1 von 1
    • Flip the motherboard up towards the screen to access the underside.

    • There are still wires connected to the motherboard.

  23. Acer Aspire V5-571-6891 Motherboard Replacement: Schritt 23, Bild 1 von 3 Acer Aspire V5-571-6891 Motherboard Replacement: Schritt 23, Bild 2 von 3 Acer Aspire V5-571-6891 Motherboard Replacement: Schritt 23, Bild 3 von 3
    • Use the spudger to disconnect the remaining three wires from the motherboard.

    • Once the wires are disconnected, the motherboard is completely disconnected from the laptop frame.

  24. Acer Aspire V5-571-6891 Motherboard Replacement: Schritt 24, Bild 1 von 1
    • Unscrew the three PH1 screws connecting the CPU fan to the motherboard.

    • The three screws are permanently attached to the CPU fan assembly.

  25. Acer Aspire V5-571-6891 Motherboard Replacement: Schritt 25, Bild 1 von 2 Acer Aspire V5-571-6891 Motherboard Replacement: Schritt 25, Bild 2 von 2
    • On the side opposite the CPU fan screws, pull loose the tape securing the fan assembly to the motherboard.

    • This is the same tape that covered the Wireless Lan chip black and white wires.

    • The CPU fan can now be separated from the motherboard.

  26. Acer Aspire V5-571-6891 Motherboard Replacement, Motherboard: Schritt 26, Bild 1 von 1
    • The motherboard can be replaced once disconnected from the CPU cooling fan.

Abschluss

To reassemble your device, follow these instructions in reverse order.

Josh Focht

Mitglied seit: 01/29/18

244 Reputation

2 Anleitungen geschrieben

Team

0 Kommentare

Kommentar hinzufügen

Seitenaufrufe:

Letzte 24 Stunden: 0

Letzte 7 Tage: 3

Letzte 30 Tage: 19

Insgesamt: 1,584