Zum Hauptinhalt wechseln

Acer Aspire V5-572, V5-572G CMOS Battery Replacement

Was du brauchst

  1. Acer Aspire V5-572, V5-572G CMOS Battery Replacement, Bottom Cover: Schritt 1, Bild 1 von 1
    • Switch-off the Laptop.

    • Remove the seventeen Philips #0 screws.

  2. Acer Aspire V5-572, V5-572G CMOS Battery Replacement: Schritt 2, Bild 1 von 1
    • If there is a plastic storage tray in the laptop, remove it.

  3. Acer Aspire V5-572, V5-572G CMOS Battery Replacement: Schritt 3, Bild 1 von 3 Acer Aspire V5-572, V5-572G CMOS Battery Replacement: Schritt 3, Bild 2 von 3 Acer Aspire V5-572, V5-572G CMOS Battery Replacement: Schritt 3, Bild 3 von 3
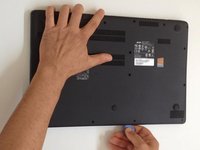
    • Starting from the SD Memory Card hole, start prying between the top and bottom cases.

    • Use plastic tools to avoid damaging the cover.

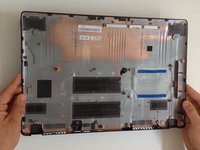
    • Remove the bottom case.

  4. Acer Aspire V5-572, V5-572G CMOS Battery Replacement: Schritt 4, Bild 1 von 1
    • Disconnect the battery immediately for a safer repair.

    • Pull the battery connector away from the hard drive to disconnect it.

  5. Acer Aspire V5-572, V5-572G CMOS Battery Replacement, CMOS BIOS Battery: Schritt 5, Bild 1 von 1
    • Lithium Battery tape CR 2032, 3V

Abschluss

To reassemble your device, follow these instructions in reverse order.

Ein:e weitere:r Nutzer:in hat diese Anleitung absolviert.

ZFix

Mitglied seit: 12/09/13

191.278 Reputation

330 Anleitungen geschrieben

Team

Master Techs Mitglied von Master Techs

Community

322 Mitglieder

2.528 Anleitungen geschrieben

0 Kommentare

Kommentar hinzufügen

Seitenaufrufe:

Letzte 24 Stunden: 1

Letzte 7 Tage: 4

Letzte 30 Tage: 37

Insgesamt: 6,871