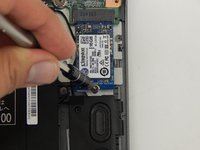
Zum Hauptinhalt wechseln

Acer Chromebook C740 Solid State Drive Replacement

Was du brauchst

  1. Acer Chromebook C740 Solid State Drive Replacement, Back Panel: Schritt 1, Bild 1 von 1
    • Power down the Chromebook and disconnect the power adapter.

  2. Acer Chromebook C740 Solid State Drive Replacement: Schritt 2, Bild 1 von 2 Acer Chromebook C740 Solid State Drive Replacement: Schritt 2, Bild 2 von 2
    • Place the chromebook bottom side up on a flat surface.

    • Remove the thirteen 7 mm screws with a Phillips #0 screwdriver.

  3. Acer Chromebook C740 Solid State Drive Replacement: Schritt 3, Bild 1 von 3 Acer Chromebook C740 Solid State Drive Replacement: Schritt 3, Bild 2 von 3 Acer Chromebook C740 Solid State Drive Replacement: Schritt 3, Bild 3 von 3
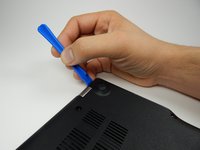
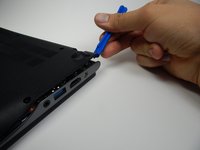
    • Insert the plastic opening tool into the slit near the hinges and pry upwards to lift the back panel.

    • Applying pressure may be necessary. A click indicates the panel is ready to come off.

  4. Acer Chromebook C740 Solid State Drive Replacement, Solid State Drive: Schritt 4, Bild 1 von 2 Acer Chromebook C740 Solid State Drive Replacement, Solid State Drive: Schritt 4, Bild 2 von 2
    • Remove the 3.75 mm screw with a Phillips #0 screwdriver.

  5. Acer Chromebook C740 Solid State Drive Replacement: Schritt 5, Bild 1 von 1
    • Unplug the solid state drive.

Abschluss

To reassemble your device, follow these instructions in reverse order.

9 weitere Nutzer:innen haben diese Anleitung absolviert.

Team

Cal Poly, Team S22-G2, Livingston Spring 2017 Mitglied von Cal Poly, Team S22-G2, Livingston Spring 2017

CPSU-LIVINGSTON-S17S22G2

4 Mitglieder

12 Anleitungen geschrieben

0 Kommentare

Kommentar hinzufügen

Seitenaufrufe:

Letzte 24 Stunden: 0

Letzte 7 Tage: 11

Letzte 30 Tage: 60

Insgesamt: 4,742