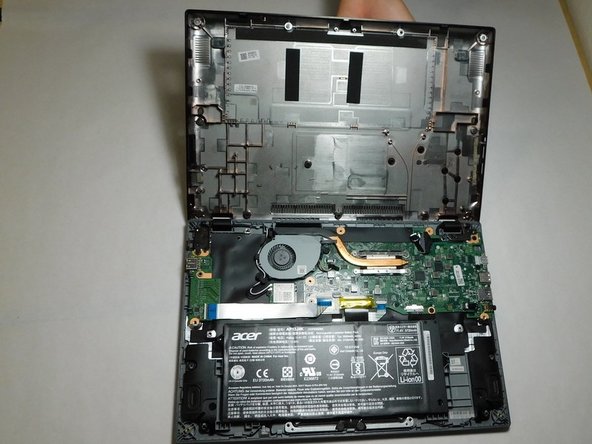
Zum Hauptinhalt wechseln

Acer Chromebook CP5-471-C0EX Fan Replacement

Was du brauchst

  1. Acer Chromebook CP5-471-C0EX Fan Replacement, Back Cover: Schritt 1, Bild 1 von 2 Acer Chromebook CP5-471-C0EX Fan Replacement, Back Cover: Schritt 1, Bild 2 von 2
    • Turn off the laptop before starting.

    • Flip the laptop over so the model stickers face the ceiling.

  2. Acer Chromebook CP5-471-C0EX Fan Replacement: Schritt 2, Bild 1 von 3 Acer Chromebook CP5-471-C0EX Fan Replacement: Schritt 2, Bild 2 von 3 Acer Chromebook CP5-471-C0EX Fan Replacement: Schritt 2, Bild 3 von 3
    • Remove twelve 7 mm screws from the back of the laptop using a Phillips #1 screwdriver.

  3. Acer Chromebook CP5-471-C0EX Fan Replacement: Schritt 3, Bild 1 von 2 Acer Chromebook CP5-471-C0EX Fan Replacement: Schritt 3, Bild 2 von 2
    • Use a Jimmy to pry apart the bottom of the case from the laptop.

    • Be careful not to warp or crack the case.

  4. Acer Chromebook CP5-471-C0EX Fan Replacement, Battery: Schritt 4, Bild 1 von 2 Acer Chromebook CP5-471-C0EX Fan Replacement, Battery: Schritt 4, Bild 2 von 2
    • Carefully detach the ribbon cable connecting the battery and the motherboard.

  5. Acer Chromebook CP5-471-C0EX Fan Replacement: Schritt 5, Bild 1 von 1
    • Use your hands to lift the battery out of the device.

  6. Acer Chromebook CP5-471-C0EX Fan Replacement, Fan: Schritt 6, Bild 1 von 2 Acer Chromebook CP5-471-C0EX Fan Replacement, Fan: Schritt 6, Bild 2 von 2
    • Gently pull the black and white cables up to disconnect them from the Wi-Fi card.

  7. Acer Chromebook CP5-471-C0EX Fan Replacement: Schritt 7, Bild 1 von 3 Acer Chromebook CP5-471-C0EX Fan Replacement: Schritt 7, Bild 2 von 3 Acer Chromebook CP5-471-C0EX Fan Replacement: Schritt 7, Bild 3 von 3
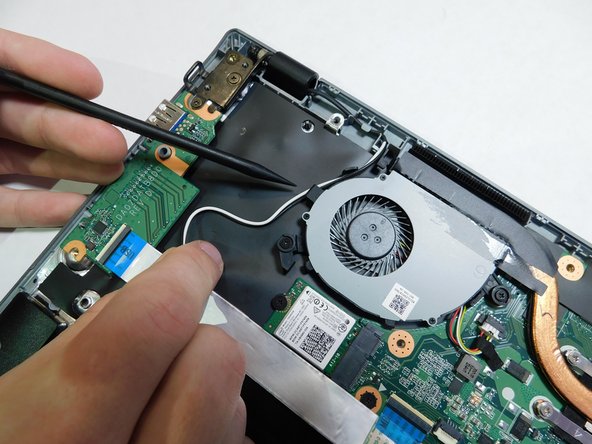
    • Unwind the Wi-Fi card wires from the side of the fan.

    • The wires need to be pulled down and around the first hook, as seen in image two.

    • Pull the black and white cables under the second hook and away from the fan.

  8. Acer Chromebook CP5-471-C0EX Fan Replacement: Schritt 8, Bild 1 von 3 Acer Chromebook CP5-471-C0EX Fan Replacement: Schritt 8, Bild 2 von 3 Acer Chromebook CP5-471-C0EX Fan Replacement: Schritt 8, Bild 3 von 3
    • Pull wires so they are out the way.

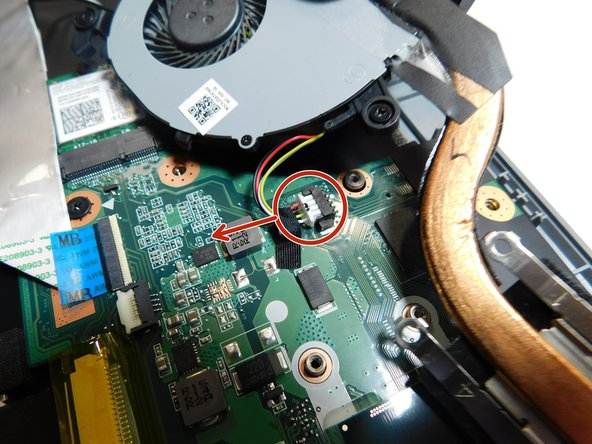
    • Loosen the six screws from the fan and heat sink.

    • The two screws closest to the fan cannot be removed from the fan, but will still loosen from the case.

  9. Acer Chromebook CP5-471-C0EX Fan Replacement: Schritt 9, Bild 1 von 3 Acer Chromebook CP5-471-C0EX Fan Replacement: Schritt 9, Bild 2 von 3 Acer Chromebook CP5-471-C0EX Fan Replacement: Schritt 9, Bild 3 von 3
    • Gently lift the fan out of the case, but do not remove it fully; there is still one more cable attached.

    • Pull the cable out of its socket on the motherboard.

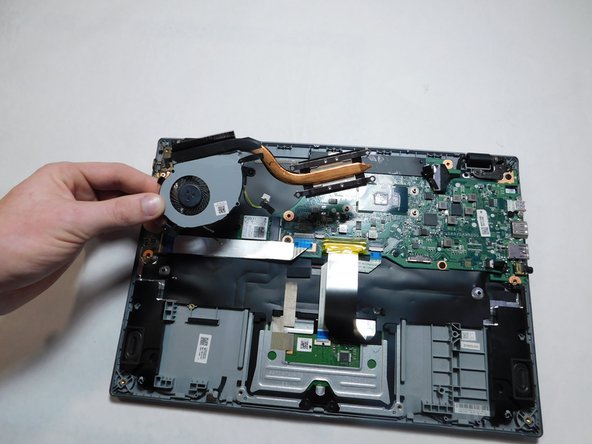
    • Remove the fan from the laptop.

Abschluss

To reassemble your device, follow these instructions in reverse order.

Ein:e weitere:r Nutzer:in hat diese Anleitung absolviert.

Cody Venne

Mitglied seit: 02/08/22

133 Reputation

1 Anleitung geschrieben

Team

Gateway, Team 1-1, Saknee Spring 2022 Mitglied von Gateway, Team 1-1, Saknee Spring 2022

GCC-SAKNEE-S22S1G1

4 Mitglieder

5 Anleitungen geschrieben

0 Kommentare

Kommentar hinzufügen

Seitenaufrufe:

Letzte 24 Stunden: 0

Letzte 7 Tage: 1

Letzte 30 Tage: 2

Insgesamt: 99