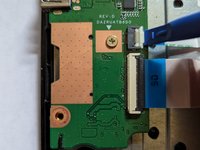
Zum Hauptinhalt wechseln

Acer Chromebook cb3-532-c47c I/O Board Replacement

Was du brauchst

  1. Acer Chromebook cb3-532-c47c I/O Board Replacement, Back Panel: Schritt 1, Bild 1 von 2 Acer Chromebook cb3-532-c47c I/O Board Replacement, Back Panel: Schritt 1, Bild 2 von 2
    • Power off the laptop before beginning the replacement.

    • Using the Phillips #1 screwdriver, remove eighteen 7 mm screws from the back panel of the device.

  2. Acer Chromebook cb3-532-c47c I/O Board Replacement: Schritt 2, Bild 1 von 2 Acer Chromebook cb3-532-c47c I/O Board Replacement: Schritt 2, Bild 2 von 2
    • Use a plastic opening tool around the edges of the laptop and remove the back panel from the device.

  3. Acer Chromebook cb3-532-c47c I/O Board Replacement, Remove the battery cable: Schritt 3, Bild 1 von 1
    • Push on the sides of the connector with a plastic spudger to separate the cable from the motherboard.

  4. Acer Chromebook cb3-532-c47c I/O Board Replacement, Remove Right Hinge Screws: Schritt 4, Bild 1 von 1
    • Remove the two screws from the right hinge.

  5. Acer Chromebook cb3-532-c47c I/O Board Replacement: Schritt 5, Bild 1 von 2 Acer Chromebook cb3-532-c47c I/O Board Replacement: Schritt 5, Bild 2 von 2
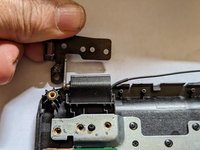
    • Insert a screwdriver or spudger under the hinge to get it started then rotate it open by hand as far as possible.

  6. Acer Chromebook cb3-532-c47c I/O Board Replacement, Remove the LED Cable: Schritt 6, Bild 1 von 2 Acer Chromebook cb3-532-c47c I/O Board Replacement, Remove the LED Cable: Schritt 6, Bild 2 von 2
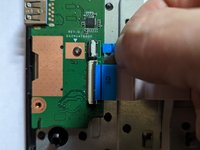
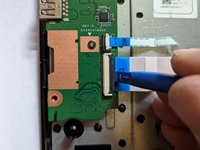
    • Flip up the latch on the cable going from the I/O board to the LED board.

  7. Acer Chromebook cb3-532-c47c I/O Board Replacement: Schritt 7, Bild 1 von 2 Acer Chromebook cb3-532-c47c I/O Board Replacement: Schritt 7, Bild 2 von 2
    • Grasp the ribbon cable and pull it straight out to the right.

  8. Acer Chromebook cb3-532-c47c I/O Board Replacement, Remove the Motherboard Cable: Schritt 8, Bild 1 von 2 Acer Chromebook cb3-532-c47c I/O Board Replacement, Remove the Motherboard Cable: Schritt 8, Bild 2 von 2
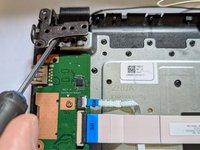
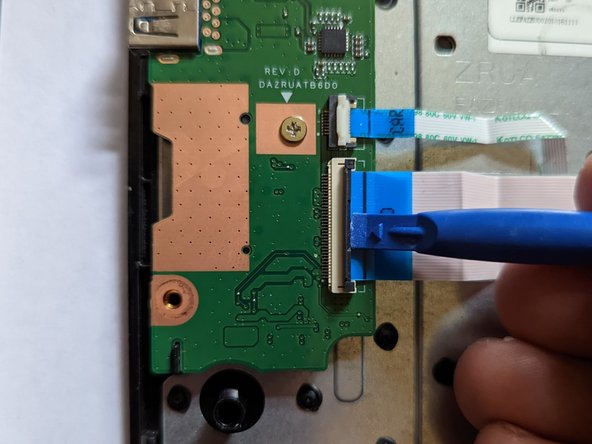
    • Flip up the latch on the cable from the I/O board to the motherboard.

  9. Acer Chromebook cb3-532-c47c I/O Board Replacement: Schritt 9, Bild 1 von 2 Acer Chromebook cb3-532-c47c I/O Board Replacement: Schritt 9, Bild 2 von 2
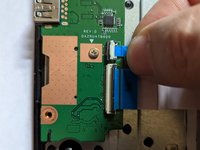
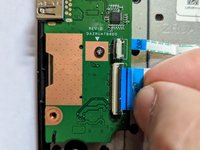
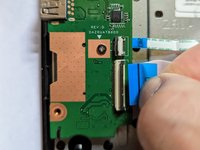
    • Grasp the ribbon cable by the blue plastic reinforcement and pull the cable straight out to the right.

  10. Acer Chromebook cb3-532-c47c I/O Board Replacement, Remove the Retaining Screw: Schritt 10, Bild 1 von 1
    • Remove the single screw securing the I/O board.

  11. Acer Chromebook cb3-532-c47c I/O Board Replacement: Schritt 11, Bild 1 von 1
    • Remove the I/O board.

    • When reinstalling, be sure the hinge goes above the I/O board, not below it.

Abschluss

To reassemble your device, follow these instructions in reverse order.

Jerry Wheeler

Mitglied seit: 03/21/22

57.512 Reputation

69 Anleitungen geschrieben

Team

Oregonians Mitglied von Oregonians

Community

7 Mitglieder

176 Anleitungen geschrieben

0 Kommentare

Kommentar hinzufügen

Seitenaufrufe:

Letzte 24 Stunden: 0

Letzte 7 Tage: 2

Letzte 30 Tage: 6

Insgesamt: 194