Einleitung
In this guide you will remove the rear cover in order to access internal components.
Was du brauchst
-
-
Insert a plastic opening tool into a gap near the charging port at the top of the device. Slide the tool in either direction along the device.
-
-
-
-
Slide the tool along until you have completely separated the rear cover.
-
If needed, place the first tool in the gap created to hold this gap open and use a second tool to pry the remaining portion of the rear cover off.
-
-
-
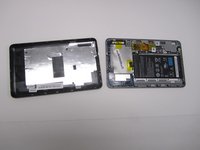
Once all the sides have been separated, you should be able to simply lift the cover off of the device.
-


To reassemble your device, follow these instructions in reverse order.
To reassemble your device, follow these instructions in reverse order.
Rückgängig: Ich habe diese Anleitung nicht absolviert.
2 weitere Personen haben diese Anleitung absolviert.

Team

Michigan Tech, Team 1-1, Lauer Spring 2015 Mitglied von Michigan Tech, Team 1-1, Lauer Spring 2015
MTU-LAUER-S15S1G1
2 Mitglieder
5 Anleitungen geschrieben