Zum Hauptinhalt wechseln

Acer Nitro 5 AN515-53-55G9 Wi-Fi Card Replacement

Was du brauchst

  1. Acer Nitro 5 AN515-53-55G9 Wi-Fi Card Replacement, Wi-Fi Card: Schritt 1, Bild 1 von 2 Acer Nitro 5 AN515-53-55G9 Wi-Fi Card Replacement, Wi-Fi Card: Schritt 1, Bild 2 von 2
    • Flip the laptop upside down so that the bottom is facing up.

  2. Acer Nitro 5 AN515-53-55G9 Wi-Fi Card Replacement: Schritt 2, Bild 1 von 3 Acer Nitro 5 AN515-53-55G9 Wi-Fi Card Replacement: Schritt 2, Bild 2 von 3 Acer Nitro 5 AN515-53-55G9 Wi-Fi Card Replacement: Schritt 2, Bild 3 von 3
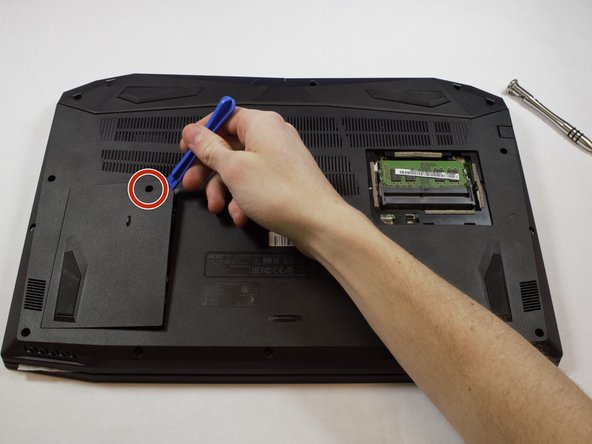
    • Use the Phillips #0 screwdriver to remove the 9mm screw in the bottom left corner of the RAM tray covering.

    • Remove the RAM tray cover by prying it up with a plastic opening tool.

  3. Acer Nitro 5 AN515-53-55G9 Wi-Fi Card Replacement: Schritt 3, Bild 1 von 2 Acer Nitro 5 AN515-53-55G9 Wi-Fi Card Replacement: Schritt 3, Bild 2 von 2
    • Remove the screw on the Hard Drive tray with a Phillips #0 screwdriver.

    • Lift up the tray covering using a plastic opening tool.

  4. Acer Nitro 5 AN515-53-55G9 Wi-Fi Card Replacement: Schritt 4, Bild 1 von 1
    • Use the Phillips #0 screwdriver to remove the fourteen 9mm screws holding the back cover in place.

    • Remove the hard drive (if applicable) from the slot prior to removing the back cover.

    • This device didn't have a hard drive so your device may look different.

  5. Acer Nitro 5 AN515-53-55G9 Wi-Fi Card Replacement: Schritt 5, Bild 1 von 3 Acer Nitro 5 AN515-53-55G9 Wi-Fi Card Replacement: Schritt 5, Bild 2 von 3 Acer Nitro 5 AN515-53-55G9 Wi-Fi Card Replacement: Schritt 5, Bild 3 von 3
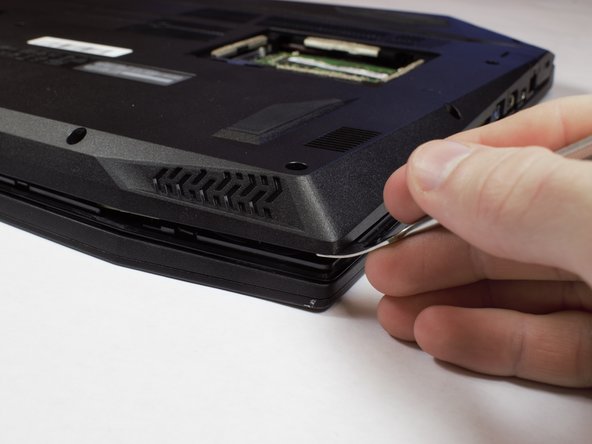
    • Carefully remove the back shell from the device by prying at the creases with a spudger around all the edges.

    • Do not forcefully try to separate the shell as you may cause harm to the shell.

  6. Acer Nitro 5 AN515-53-55G9 Wi-Fi Card Replacement: Schritt 6, Bild 1 von 1
    • Lift the back cover off once all the clips have been disengaged.

  7. Acer Nitro 5 AN515-53-55G9 Wi-Fi Card Replacement: Schritt 7, Bild 1 von 3 Acer Nitro 5 AN515-53-55G9 Wi-Fi Card Replacement: Schritt 7, Bild 2 von 3 Acer Nitro 5 AN515-53-55G9 Wi-Fi Card Replacement: Schritt 7, Bild 3 von 3
    • Using your fingers, disconnect the white and black cables connected to the left side of the Wi-fi card.

  8. Acer Nitro 5 AN515-53-55G9 Wi-Fi Card Replacement: Schritt 8, Bild 1 von 3 Acer Nitro 5 AN515-53-55G9 Wi-Fi Card Replacement: Schritt 8, Bild 2 von 3 Acer Nitro 5 AN515-53-55G9 Wi-Fi Card Replacement: Schritt 8, Bild 3 von 3
    • Remove the screw holding down the Wi-Fi card with a Phillips #0 screwdriver.

  9. Acer Nitro 5 AN515-53-55G9 Wi-Fi Card Replacement: Schritt 9, Bild 1 von 2 Acer Nitro 5 AN515-53-55G9 Wi-Fi Card Replacement: Schritt 9, Bild 2 von 2
    • Slide the Wi-Fi card out from its port.

Abschluss

To reassemble your device, follow these instructions in reverse order.

Eine weitere Person hat diese Anleitung absolviert.

Ein Kommentar

My hard drive got disconnected and I can't locate where is the place to connect it

manueltopete59 - Antwort

Kommentar hinzufügen

Seitenaufrufe:

Letzte 24 Stunden: 7

Letzte 7 Tage: 18

Letzte 30 Tage: 101

Insgesamt: 6,223