Diese Version enthält möglicherweise inkorrekte Änderungen. Wechsle zur letzten geprüften Version.
Was du brauchst
-
-
Schiebe den Kettennieter über die ausgewählte Verbindung. Diese sollte möglichst nicht in der Nähe des Standardverbindungsbolzens liegen.
-
Richte den Druckstift des Werkzeugs und die Niete der Kette parallel aus, d.h. der Stift ist senkrecht zur Kette und ziehe das Werkzeug an, bis die Niete auf der anderen Seite der Kette herausgedrückt ist, jedoch nicht so weit, dass sie herunterfällt.
-
Wenn dieser Vorgang ungewöhnlich viel Kraft erfordert, ist das Werkzeug oft nicht richtig ausgerichtet. Eventuell sollte bevor zu viel Kraft aufgewandt wird ein anderes Kettenglied ausgewählt werden.
-
-
-
Beende das Herausschieben sobald die Niete nur noch von der äußeren Verbindung gehalten wird, so dass die Niete nicht vollständig herabfällt. Dann können die Glieder voneinander getrennt werden.
-
Wiederhole den letzten Schritt, um Teile der Kette herauszunehmen.
-
-
Dieser Schritt ist noch nicht übersetzt. Hilf mit, ihn zu übersetzen!
-
Bolt the derailleur to the mounting tab with an Allen wrench.
-
-
-
Dieser Schritt ist noch nicht übersetzt. Hilf mit, ihn zu übersetzen!
-
Shift the rear derailleur into the highest gear(smallest sprocket).
-
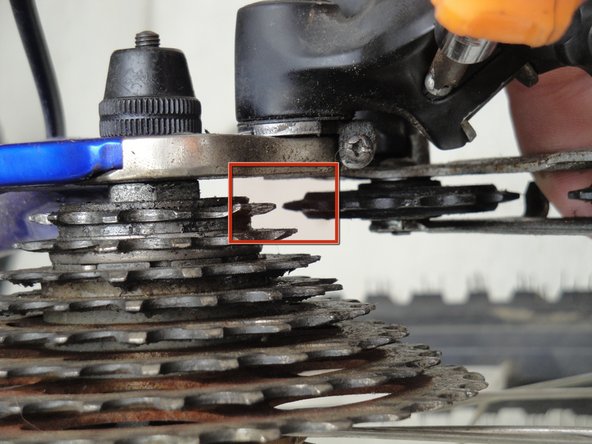
Align the rear guide sprocket of the derailleur with the highest gear (smallest sprocket), by tightening or loosening the screw labeled "H".
-
-
Dieser Schritt ist noch nicht übersetzt. Hilf mit, ihn zu übersetzen!
-
Shift the rear derailleur into the lowest gear(largest sprocket).
-
Align the rear guide sprocket of the derailleur with the lowest gear(largest sprocket), by tightening or loosening the screw labeled "L".
-
-
Dieser Schritt ist noch nicht übersetzt. Hilf mit, ihn zu übersetzen!
-
Shift the bike into the highest numbered gear.
-
Slide the cable through the barrel adjuster screw until the cable housing bottoms out.
-
Pull the slack out of the cable while clamping it down with the nut that is attached to the derailleur.
-
-
Dieser Schritt ist noch nicht übersetzt. Hilf mit, ihn zu übersetzen!
-
Route the chain around the chain rings, cassette, and derailleur.
-
Reconnect both ends of the chain using a master link or a chain cutter tool.
-
See the chain connection guide.
-
-
Dieser Schritt ist noch nicht übersetzt. Hilf mit, ihn zu übersetzen!
-
Fine tune the derailleur by tightening or loosening the barrel adjuster screw. Loosening this screw causes the derailleur to move slightly towards a larger sprocket, while tightening it moves the derailler towards a smaller sprocket.
-
Shift through each gear while pedaling. The derailleur should move the chain one gear over each time you shift up or down.
-
If the chain skips or makes noise when you are not shifting, use the barrel adjustment screw to fine tune the derailleur alignment.
-
Repeat the previous steps until the derailleur shifts smoothly and makes a minimal amount of noise.
-


Rückgängig: Ich habe diese Anleitung nicht absolviert.
8 weitere Nutzer:innen haben diese Anleitung absolviert.
Team

Cal Poly, Team 5-13, Maness Fall 2010 Mitglied von Cal Poly, Team 5-13, Maness Fall 2010
CPSU-MANESS-F10S5G13
4 Mitglieder
17 Anleitungen geschrieben