Zum Hauptinhalt wechseln
Gemeinsam reparieren - Jetzt registrieren

Alcatel Jitterbug Smart Camera Replacement

Was du brauchst

  1. Alcatel Jitterbug Smart Camera Replacement, Rear Camera: Schritt 1, Bild 1 von 2 Alcatel Jitterbug Smart Camera Replacement, Rear Camera: Schritt 1, Bild 2 von 2
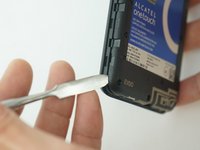
    • Pry back cover open with a medal spudger, or your fingernail, in the divot at the bottom left corner of the phone.

    • Lift open case by the corner nearest the divot and remove it from the phone.

    Frag FixBot
  2. Alcatel Jitterbug Smart Camera Replacement: Schritt 2, Bild 1 von 2 Alcatel Jitterbug Smart Camera Replacement: Schritt 2, Bild 2 von 2
    • Remove the 13 1 mm Phillips screws with JIS #000 Screwdriver.

    Frag FixBot
  3. Alcatel Jitterbug Smart Camera Replacement: Schritt 3, Bild 1 von 2 Alcatel Jitterbug Smart Camera Replacement: Schritt 3, Bild 2 von 2
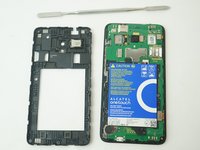
    • Gently pry off the Mid frame from the phone using a Metal Spudger.

    Frag FixBot
  4. Alcatel Jitterbug Smart Camera Replacement: Schritt 4, Bild 1 von 2 Alcatel Jitterbug Smart Camera Replacement: Schritt 4, Bild 2 von 2
    In diesem Schritt verwendetes Werkzeug:
    Tweezers
    $4.99
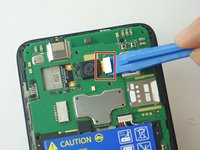
    • Use the Plastic Opening tools to gently dislodge the broken camera from the inside of the phone.

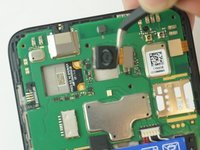
    • Use a tweezers to pull the camera connector from its port.

    • Be careful not to tear the camera from its connection.

    Frag FixBot
Abschluss

To reassemble your device, follow these instructions in reverse order.

Team

USF Tampa, Team S11-G4, Cheng Spring 2018 Mitglied von USF Tampa, Team S11-G4, Cheng Spring 2018

USFT-CHENG-S18S11G4

4 Mitglieder

10 Anleitungen geschrieben

0 Kommentare zur Anleitung

Kommentar hinzufügen

Seitenaufrufe:

Letzte 24 Stunden: 0

Letzte 7 Tage: 6

Letzte 30 Tage: 60

Insgesamt: 541