Diese Version enthält möglicherweise inkorrekte Änderungen. Wechsle zur letzten geprüften Version.
Was du brauchst
-
Dieser Schritt ist noch nicht übersetzt. Hilf mit, ihn zu übersetzen!
-
Turn the computer over.
-
Slide the battery latch over and lift the battery out.
-
-
Dieser Schritt ist noch nicht übersetzt. Hilf mit, ihn zu übersetzen!
-
Unscrew the four 3mm screws with a J000 screwdriver.
-
-
Dieser Schritt ist noch nicht übersetzt. Hilf mit, ihn zu übersetzen!
-
Use the iFixit opening tool to lift the bottom cover off.
-
-
Dieser Schritt ist noch nicht übersetzt. Hilf mit, ihn zu übersetzen!
-
Remove the two 4mm screws with the J000 screwdriver.
-
-
Dieser Schritt ist noch nicht übersetzt. Hilf mit, ihn zu übersetzen!
-
Turn the laptop right-side up, and open the laptop.
-
Use the plastic pryer tool to loosen the flat piece surrounding the keys by gently prying it upwards from the laptop's base.
-
Make sure to go around the entire perimeter of the piece to loosen all areas of it.
-
-
-
Dieser Schritt ist noch nicht übersetzt. Hilf mit, ihn zu übersetzen!
-
The piece is now free from its fastenings to the base of the laptop, and can be lifted off.
-
-
Dieser Schritt ist noch nicht übersetzt. Hilf mit, ihn zu übersetzen!
-
Gently remove the power cable with your hands or with the help of a prying tool.
-
-
Dieser Schritt ist noch nicht übersetzt. Hilf mit, ihn zu übersetzen!
-
The keyboard's 3mm fastening screws are now exposed and can be removed with a J000 screwdriver.
-
-
Dieser Schritt ist noch nicht übersetzt. Hilf mit, ihn zu übersetzen!
-
As before, the keyboard is now unfastened but still connected to the base via cables.
-
Flip the keyboard over towards the edge of the laptop to expose the locations of the connectors. Avoid tugging on the cables when you do this.
-
-
Dieser Schritt ist noch nicht übersetzt. Hilf mit, ihn zu übersetzen!
-
Locate and remove the first connector cable.
-
-
Dieser Schritt ist noch nicht übersetzt. Hilf mit, ihn zu übersetzen!
-
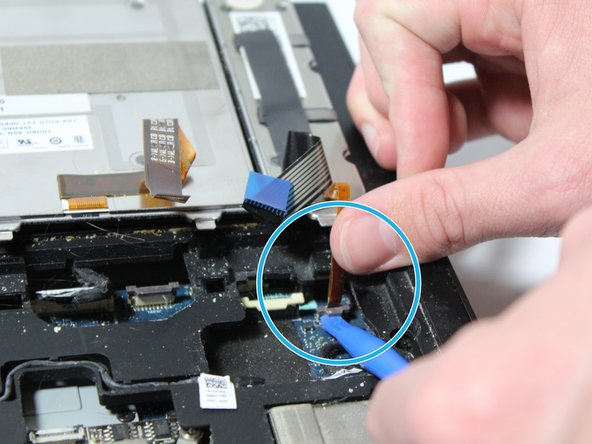
Locate and remove the second connector cable.
-
-
Dieser Schritt ist noch nicht übersetzt. Hilf mit, ihn zu übersetzen!
-
The left section of the keyboard is connected by a single screw and two connector cables.
-
Remove the 4mm screw with a J000 screwdriver.
-
Remove the connecting cables with a prying bar.
-
-
Dieser Schritt ist noch nicht übersetzt. Hilf mit, ihn zu übersetzen!
-
All sections of the keyboard are now free to be taken off and replaced!
-


Rückgängig: Ich habe diese Anleitung nicht absolviert.
3 weitere Nutzer:innen haben diese Anleitung absolviert.
Team

Cal Poly, Team S21-G1, Banghart Winter 2018 Mitglied von Cal Poly, Team S21-G1, Banghart Winter 2018
CPSU-BANGHART-W18S21G1
3 Mitglieder
5 Anleitungen geschrieben