Einleitung
Diese Anleitung zeigt, wie der Akku ausgetauscht werden kann. Schalte vor der Reparatur das Gerät aus.
Was du brauchst
-
-
Erwärme die Kanten des Displays mit einem Heißluftgebläse auf niedrigster Stufe. Bewege das Gebläse dabei aus etwa 20 bis 25 cm Abstand hin und her.
-
-
-
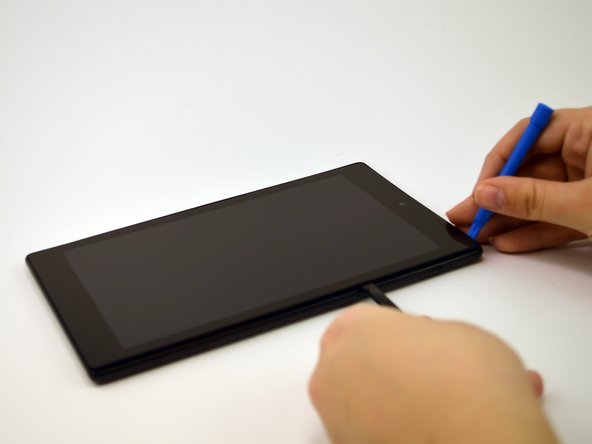
Nach 1 -2 Minuten kannst du das Display mit einem Kunststoffwerkzeug loshebeln. Beginne damit in der oberen rechten Ecke.
-
-
-
-
Lasse das Öffnungswerkzeug und einen Spudger an der Unterseite des Displays entlang gleiten. Setze dabei ausreichend Kraft ein, so dass sich das Display und der Klebestreifen von der anderen Gerätehälfte löst.
-
-
-
Ziehe behutsam das orangene Kabel mit einer Pinzette aus seinem Anschluss heraus und entferne das Display.
-
-
-
Hebe den Stecker oben rechts am Akku gefühlvoll aus seinem Anschluss heraus.
-
-
-
Ziehe einzeln an den Laschen, bis alle vier Klebestreifen herausgekommen sind. Wenn der letzte Klebestreifen weg ist, ist der Akku frei.
-


Um dein Gerät wieder zusammenbauen, folge den Schritten in umgekehrter Reihenfolge.
Um dein Gerät wieder zusammenbauen, folge den Schritten in umgekehrter Reihenfolge.
Rückgängig: Ich habe diese Anleitung nicht absolviert.
16 weitere Personen haben diese Anleitung absolviert.
Besonderer Dank geht an diese Übersetzer:innen:
100%
VauWeh hilft uns, die Welt in Ordnung zu bringen! Wie kann ich mithelfen?
Hier starten ›
Team

USF Tampa, Team 1-3, Leahy Spring 2016 Mitglied von USF Tampa, Team 1-3, Leahy Spring 2016
USFT-LEAHY-S16S1G3
4 Mitglieder
17 Anleitungen geschrieben
6 Kommentare
After following these instructions and replacing the battery, all works but the screen. We have sound, volume etc..but no screen.
Any ideas what may be wrong?
Make sure the ribbon cable is plugged in.
I got a recent Fire HD 8 in the uk. This isn’t correct for that version. The rear case just unclips with a tool down the side of the case - much simpler. You definitely don’t want to be trying the above method on my version!
A further comment about the two connections for first timers would be helpful. The battery cable connection comes straight up and reconnects nested directly straight top down into the female socket. Unfamiliar with small thin video screen cables especially in teh1 to 2 inch working space, I could not understand why the cable would not ‘Plug” in. Eventually I realized that it was a clamp type connection and that the clamp was closed. After I flipped it open, I was able to hold the ribbon in position and flip the clamp closed. I’m glad for the experience, otherwise it would not have seem such an accomplishment for such a simple connection. Do you have a primer that describes these basic procedures? Also, how do you “follow the step in reverse order” with respect to the glue strips, and what is the record measurement for the length you can pull these strips? I got to at least 9” before it let go.
Thanks for the help. Dave B