Einleitung
This brief guide will instruct you on how to replace the battery in your Amazon Tap.
Was du brauchst
-
-
Use the metal spudger to remove the rubber control panel at the top end of the speaker.
-
-
-
-
Time to break through the Tap's exterior. The only way to disassemble the Tap is from the outside.
-
First, remove the Tap's stretchy fabric wrap. Unroll the stretchy fabric from the sticky cowling.
-
After removing the stretchy fabric completely, the adhesive cowling remains.
-
-
-
Next up: removing the cowling.
-
The key to remove the cowling is to slide it over the microphone, Bluetooth, and power buttons.
-
Once the cowling is off, only a few screws remain until the interior is reached. Progress!
Don’t forget to remove the top screws as another commentor already stated! Or the cowling can’t slide.
-
-
-
Use a pair of tweezers to remove the speaker button while using another pair of tweezers to hold the button steady.
-
Since the button is round, it is best to hold it steady and wiggle it in a slow motion until it comes loose.
-
-
-
Once you remove the buttons its safe to pull apart the Amazon Tap.
-
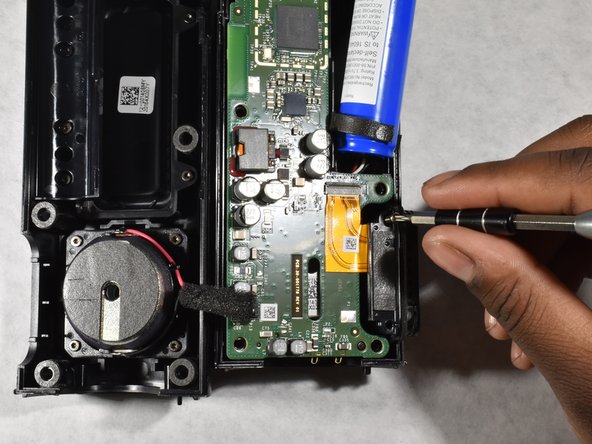
Here you will find a standard 18650 Lithium Ion cell battery.
-
Carefully remove the Lithium Ion Cell Battery and insert a new one.
How do I get the green circuit board lifted up to push the end of the battery plug into the little socket to hook up the battery so I can reassemble the unit? I took the two little screws out for the power buttons and lifted it up but I can’t get the end of the battery terminal into the little plug because it’s underneath the green circuit board somewhere
This tear down article helps picture how to get underneath: Amazon Tap Teardown
take the Bluetooth/power button off using a T6 screwdriver and you can see that the speaker is glued onto the circuit board, preventing it from lifting. Not sure if I will glue it back when I put it together.
-


To reassemble the Amazon Tap device, follow these instructions in reverse order.
To reassemble the Amazon Tap device, follow these instructions in reverse order.
Rückgängig: Ich habe diese Anleitung nicht absolviert.
9 weitere Nutzer:innen haben diese Anleitung absolviert.
Team

University of Memphis, Team S1-G3, Kim Spring 2017 Mitglied von University of Memphis, Team S1-G3, Kim Spring 2017
UM-KIM-S17S1G3
3 Mitglieder
1 Anleitung geschrieben
11 Kommentare
Wow! Thanks for demystifying this!
Thank you for the guide as it is very helpful! Here is a replacement battery for the Amazon Tap:
Amazon Tap Replacement Battery
It even comes with the necessary tools to complete the repair.
Excellent.
made this very easy for me
Where does this leave us?? All taken apart and repaired, but with no way to purchase parts to replace the ones ripped apart during removal, nor the skills to put them on looking attractive with near the skills of the Chinese who probably build one of these things every 1.457 minutes at the factory!
Thank you. I was able to replace the battery. Your step by step guide was excellent. Though I could not fix the tip panel correctly I can operate its functions hands free. If show me how to fix top panel I WILL be appreciate
Ugggh
I could not complete number 4. So frustrating. I don’t know what I did wrong.
I have to call bolshevik on this! The battery is obviously not meant to be replaced. At least not on my model (PW3840KL). You must nearly destroy your TAP to get to the step of replacing the battery. Good luck getting it back together! The author also left out many steps, including the removal of 10 screws prior to “pull apart the Amazon TAP” in Step 6. Do yourself a favor, throw your device in the trash and order something from another supplier (tell Amazon to STICK IT!).
Dang it. The Tap was one of the better Echo devices. Little wonder Amazon obsoleted it in favor of the plug in models.
Instructions were incomplete. After you pull off the cloth cover you need to slice up the side of the secondary cover to get it off Then you need to remove 10 more screws to get it opened. After that it is very difficult to pull the parts open to unplug the battery wire. I pulled and pulled until a glue patch on one of the speakers separated. Then I finally got it apart and removed the battery. I will try to purchase the battery, but I don't know if I will ever get it back together. And if I do, I will be amazed it if ever works again. Definitely not an easy dis-assembly. Obviously never meant to be serviced by an armature. I am usually pretty good at this kind of repair, but this one nearly stumped me. More to come after I get a new battery.
Regards, Wexfordmike
I registered for an account just to fix this fixit. I can see where the instructions to this are very badly done. After you get the initial cloth cover off, remove the top and undo the screws. The gray cowling should then come off easier. I also took off the microphone button early as well. Once you get it open, peel the board out. There is a little force because of some glue. Once it’s undone, the new battery can be reattached. The whole thing goes back together fairly well then. The person who created this definitely skipped very many steps in their description.
The instructions are missing a few steps. Honestly, if I knew what a pain it was to do this, I wouldn’t have done it. Took forever and the fabric around the buttons aren’t as clean as before.
Anyone reading this, do yourself a favor and buy new Bluetooth speaker or echo dot with a battery base.
You also need to remove the four screws and plastic plate beneath this rubber control panel or the “stubborn cowling” won’t come off.
D E Wells - Antwort