Zum Hauptinhalt wechseln

AmazonBasics B0050BPWBQ On/Off Switch Replacement

Was du brauchst

  1. AmazonBasics B0050BPWBQ On/Off Switch Replacement, Front and Back Panel Disassembly: Schritt 1, Bild 1 von 2 AmazonBasics B0050BPWBQ On/Off Switch Replacement, Front and Back Panel Disassembly: Schritt 1, Bild 2 von 2
    • The unit head needs to be switched to the off position and unplugged before any disassembly.

    • When removing screws in the following steps, make sure the unit is resting on a flat surface because pieces will easily come apart.

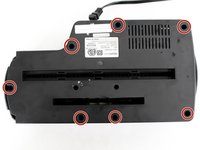
    • Remove seven 11 mm Phillips #1 screws from the underside of the head unit.

  2. AmazonBasics B0050BPWBQ On/Off Switch Replacement: Schritt 2, Bild 1 von 2 AmazonBasics B0050BPWBQ On/Off Switch Replacement: Schritt 2, Bild 2 von 2
    • Upon removal of the next screws, the front panel and the shredding component attached to it will fall apart from the back panel so have the unit resting on a flat surface.

    • Remove two 50 mm Phillips #1 screws from the middle of the underside of the head unit.

  3. AmazonBasics B0050BPWBQ On/Off Switch Replacement: Schritt 3, Bild 1 von 1
    • Lay the back panel away from the front panel on a flat surface.

    • The back panel will be light because it is only the plastic, while the front panel will be heavy with the shredding component attached to it.

  4. AmazonBasics B0050BPWBQ On/Off Switch Replacement: Schritt 4, Bild 1 von 2 AmazonBasics B0050BPWBQ On/Off Switch Replacement: Schritt 4, Bild 2 von 2
    • Find the green control board that is located next to the shredding motor.

    • Remove two 11 mm Phillips #1 screws located on opposite sides of the control board.

    • You may need to move wires over to find the screws.

  5. AmazonBasics B0050BPWBQ On/Off Switch Replacement, On/Off Switch: Schritt 5, Bild 1 von 3 AmazonBasics B0050BPWBQ On/Off Switch Replacement, On/Off Switch: Schritt 5, Bild 2 von 3 AmazonBasics B0050BPWBQ On/Off Switch Replacement, On/Off Switch: Schritt 5, Bild 3 von 3
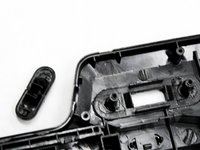
    • Pull the front panel away from the shredding unit.

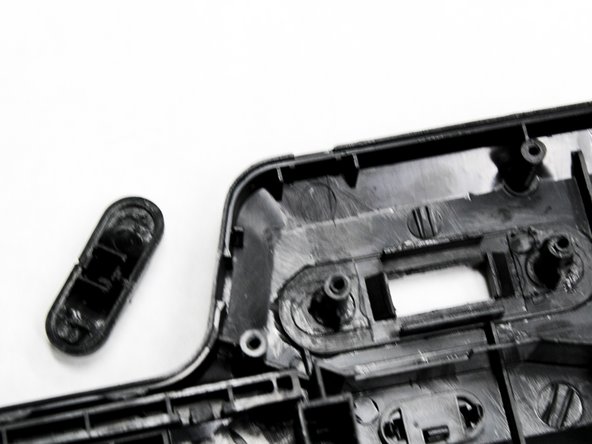
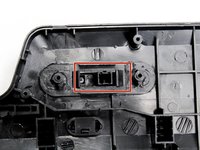
    • Locate the black On/Off switch attached to the front panel where the control board was once attached.

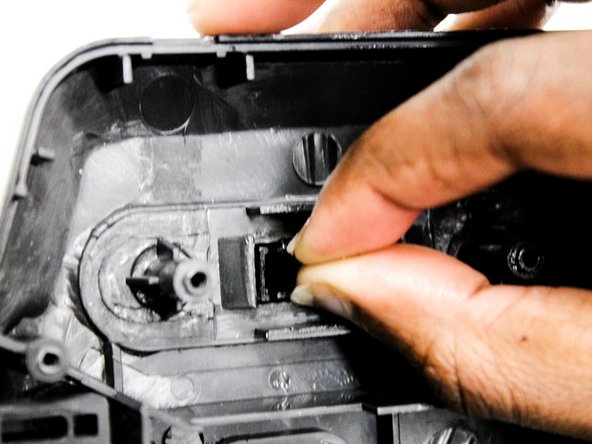
    • Squeeze the wings of the On/Off switch from the inside of the front panel to detach it from its slot in the panel.

Abschluss

To reassemble your device, follow these instructions in reverse order.

Ein:e weitere:r Nutzer:in hat diese Anleitung absolviert.

Natalie Meert

Mitglied seit: 02/11/16

678 Reputation

4 Anleitungen geschrieben

Team

IUPUI, Team 2-4, Baechle Spring 2016 Mitglied von IUPUI, Team 2-4, Baechle Spring 2016

IUPUI-BAECHLE-S16S2G4

4 Mitglieder

8 Anleitungen geschrieben

Ein Kommentar

Does anyone know where to buy a replacement switch?

Shawn - Antwort

Kommentar hinzufügen

Seitenaufrufe:

Letzte 24 Stunden: 1

Letzte 7 Tage: 6

Letzte 30 Tage: 9

Insgesamt: 2,337