Zum Hauptinhalt wechseln

AmazonBasics B00Q3KFX8U Motor Replacement

Was du brauchst

  1. AmazonBasics B00Q3KFX8U Motor Replacement, Drive Gear: Schritt 1, Bild 1 von 1
    • Remove the shredder assembly from the paper scrap bin.

  2. AmazonBasics B00Q3KFX8U Motor Replacement: Schritt 2, Bild 1 von 1
    • Remove the two 10mm PH1 screws holding the small black panel in place.

  3. AmazonBasics B00Q3KFX8U Motor Replacement: Schritt 3, Bild 1 von 2 AmazonBasics B00Q3KFX8U Motor Replacement: Schritt 3, Bild 2 von 2
    • Remove the six 14mm PH1 screws holding the bottom cover in place.

    • Remove the cover by lifting straight upwards.

    • One of the screws will be hidden beneath a warranty sticker. Simply push the head of the screwdriver through the sticker to access the screw.

  4. AmazonBasics B00Q3KFX8U Motor Replacement: Schritt 4, Bild 1 von 1
    • Remove the blade/motor assembly from the top cover by lifting straight upwards. Do not disconnect any wiring just yet.

    • The blades are sharp. Coming into contact with them may result in injury.

  5. AmazonBasics B00Q3KFX8U Motor Replacement: Schritt 5, Bild 1 von 2 AmazonBasics B00Q3KFX8U Motor Replacement: Schritt 5, Bild 2 von 2
    • Remove the five 8mm PH2 screws from the bracket holding the gears in place.

  6. AmazonBasics B00Q3KFX8U Motor Replacement: Schritt 6, Bild 1 von 1
    • Use a metal spudger to pry the bracket from the main shredder assembly.

    • If the bracket is attached too tightly for the spudger, carefully use a metal screwdriver to pry it loose.

  7. AmazonBasics B00Q3KFX8U Motor Replacement: Schritt 7, Bild 1 von 2 AmazonBasics B00Q3KFX8U Motor Replacement: Schritt 7, Bild 2 von 2
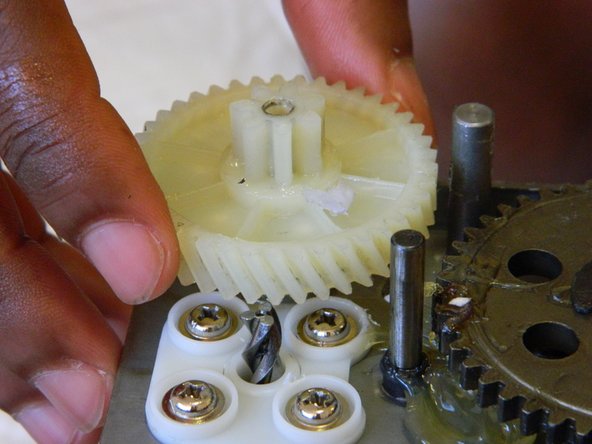
    • Remove the two plastic drive gears from the shredder assembly by lifting straight upwards.

  8. AmazonBasics B00Q3KFX8U Motor Replacement, Motor: Schritt 8, Bild 1 von 1
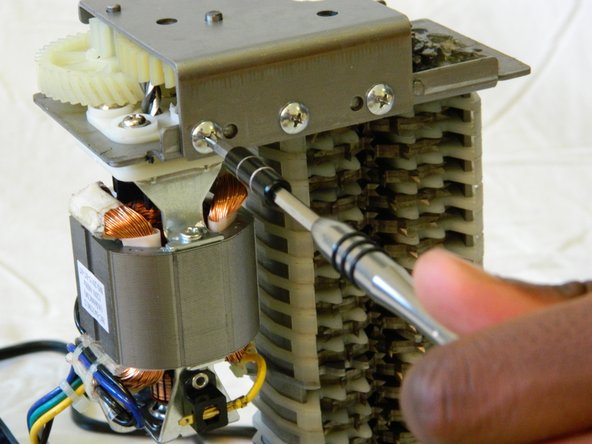
    • Remove the four 18mm PH2 screws holding the motor to the main shredder assembly.

  9. AmazonBasics B00Q3KFX8U Motor Replacement: Schritt 9, Bild 1 von 1
    • Disconnect the motor from the motherboard by either clipping the wires, or using a soldering iron to disconnect the wires directly at the board.

    • To reattach the motor, solder the wires back together, or to the motherboard depending on how you removed them.

Abschluss

To reassemble your device, follow these instructions in reverse order.

Ein:e weitere:r Nutzer:in hat diese Anleitung absolviert.

William Foley

Mitglied seit: 03/25/16

548 Reputation

4 Anleitungen geschrieben

Team

UMass Dartmouth, Team 1-3, Miles Spring 2016 Mitglied von UMass Dartmouth, Team 1-3, Miles Spring 2016

UMASSD-MILES-S16S1G3

2 Mitglieder

4 Anleitungen geschrieben

Ein Kommentar

Do you sell motor?

Binh - Antwort

Kommentar hinzufügen

Seitenaufrufe:

Letzte 24 Stunden: 0

Letzte 7 Tage: 0

Letzte 30 Tage: 13

Insgesamt: 741