Einleitung
This guide will show you how to access the battery and charging port in your Apple TV 4K remote for replacement.
Was du brauchst
-
-
Heat iOpener according to manufacturer's instructions.
-
Place over the face of the remote to soften the adhesive under the glass.
-
-
-
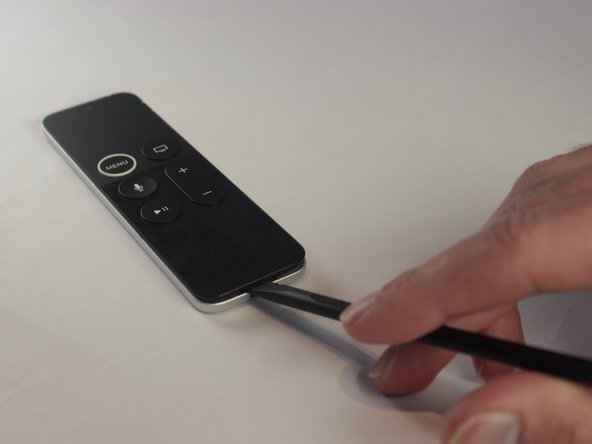
Using a spudger, gently lift the face of the remote. Starting from the bottom and working your way to the top.
-
-
-
-
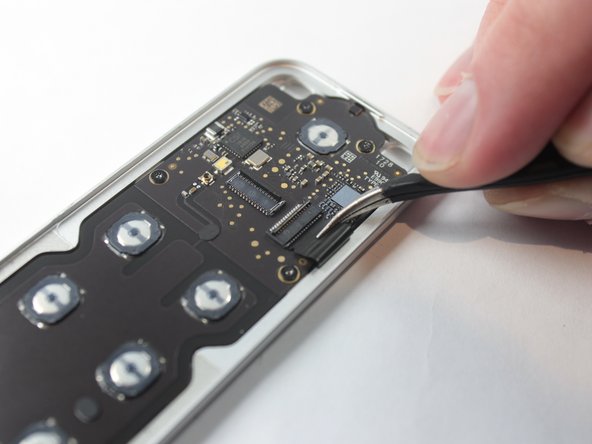
Use tweezers to pull off the connector that binds the touch screen to the logic board.
-
-
-
Lift the latch holding back the connector to the battery.
-
Use tweezers to disconnect the battery connector.
-
-
-
Using a plastic spudger, gently remove the logic board from the case of the remote.
-
-
-
Gently dislodge the battery from the remote case, making sure to avoid damaging the battery itself.
-
The battery should be fully removed now.
-


To reassemble your device, follow these instructions in reverse order.
To reassemble your device, follow these instructions in reverse order.
Rückgängig: Ich habe diese Anleitung nicht absolviert.
17 weitere Nutzer:innen haben diese Anleitung absolviert.
Team

UW Stout, Team S6-G3, Ogden Fall 2018 Mitglied von UW Stout, Team S6-G3, Ogden Fall 2018
UWSTOUT-OGDEN-F18S6G3
4 Mitglieder
15 Anleitungen geschrieben
7 Kommentare
I second this. It would be great if someone could link us on where to buy the battery/charger replacement.
_ Dubb -
You won’t be able to source the original battery as it is spot welded to the lightning port cable and mobo cable, and is one unit. However if you can solder I have successfully replaced two remote batteries for about $6-$8 a battery.
I’ve searched high and low for this battery as mine will not maintain a charge for more than a few hours. I found this one for a Huawei watch: https://www.batteryclub.org/Goods/ECN106... that appears to be the correct specs, but I’m not sure it can be connected.
That noted, a new remote is only $52 and this battery is $39.50 plus shipping! So for my money a new remote is a better option since we know it will work, and it’s just $12 or so more! Nuts!