Diese Übersetzung enthält möglicherweise noch nicht die neuesten Änderungen der Original-Anleitung. Hilf mit, die Übersetzung zu aktualisieren oder sieh dir die Original-Anleitung an.
Einleitung
Die Grundplatte dient als Unterschale für das Gerät.
Sie gibt die strukturelle Sicherheit und schützt die internen Komponenten.
Sollte die Grundplatte beschädigt sein, kann dies die interne Hardware gefährden und sie sollte ersetzt werden.
Die Gummiabdeckung ist verklebt und es ist wahrscheinlich einige Zeit nötig, um diese zu lösen.
Was du brauchst
-
-
Drehe das Gerät um, um an die Gummiabdeckung der Rückplatte zu gelangen. Schiebe vorsichtig die stumpfe Spitze des Metall-Spudgers in den Spalt zwischen Aluminium-Rückplatte und Gummiabdeckung, um die beiden Teile voneinander zu lösen.
-
-
-
-
Entferne die zehn 3 mm Schrauben mit einem #00 PH Kreuzschlitzschraubendreher.
The two screws in the top center of this picture should not be removed at this time. They are locating pins on the hard drive.
Correct - the four screws top centre with glue over then do not need to come out. They are only locating posts for the HDD.
Tony Meredith - 2018-06-26
CONFIRMED. Thank you very much for the screws which should not be removed. You guys are right.
-
-
-
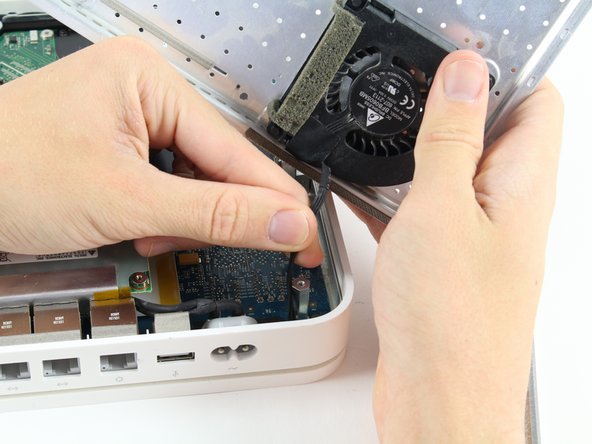
Der Lüfter ist auf der Rückplatte befestigt und mit dem Logic Board verbunden. Hier muss ein kleines Kabel entfernt werden, um die Rückplatte komplett zu entfernen.
-
Ziehe das Kabel vorsichtig in Richtung Logic Board, um den Stecker zu lösen.
Be careful you do not rip the locating connector off the circuit board like I did.
-


Um dein Gerät wieder zusammenzusetzen, befolge diese Anleitung in umgekehrter Reihenfolge.
Um dein Gerät wieder zusammenzusetzen, befolge diese Anleitung in umgekehrter Reihenfolge.
Rückgängig: Ich habe diese Anleitung nicht absolviert.
9 weitere Nutzer:innen haben diese Anleitung absolviert.
Besonderer Dank geht an diese Übersetzer:innen:
85%

Diese Übersetzer:innen helfen uns, die Welt zu reparieren! Wie kann ich mithelfen?
Hier starten ›
Team

Cal Poly, Team 4-2, Livingston Fall 2016 Mitglied von Cal Poly, Team 4-2, Livingston Fall 2016
CPSU-LIVINGSTON-F16S4G2
4 Mitglieder
17 Anleitungen geschrieben
The epoxy cementing the rubber pad to the aluminum base is a lot stronger than the rubber itself. The rubber is likely to tear as you remove it; I had to use a putty knife to clear the screws. It's worth hanging onto the branding near the Ethernet ports, for future identification (model number, serial number, Ethernet ID, AirPort ID); you can fashion a replacement pad out of neoprene rubber.
adlerpe - Antwort
Mine completely ripped I have no back cover now its in multiple pieces…. mine was giving off way to much heat and hard drive errors so I decided to replace hard drive and fan wish me luck BUT if yours is overheating do not expect to get back off without ripping the rubber to
William - Antwort
Using a fan to heat the plate up was helpful
Michael Zimmermann - Antwort
I wish I read Michael Zimmermann’s suggestion before I tore the first half into about 15 pieces! On the second half I used a hair dryer to heat the rubber. With enough heat and a very slow steady pull on the rubber it came of as a single piece :-)
mfred2 - Antwort
Do I need to put back on the rubber? will it overheat if I don’t?
Strider - Antwort
It is almost impossible to keep the bottom rubber covering intact in one piece. The rubber is covering the whole base section and it won’t be a problem without it I guess. This is not an epoxy because it is still gummy and sticky. This is like the adhesive used on the double side tapes. Goo Gone worked well to remove those residues.
Kenn Sakurai - Antwort
The rubber cap like bottom can be replaced with easy to cut in shape cork sheet will do. Just rip off the thin strip where the serial number for the ID and other info that might be needed later. Have it glued or put on a clear tape and put it on the side of the white plastic sidewall will do.
Kenn Sakurai - Antwort
With age, the rubber becomes brittle. It is best to heat it up with a hair dryer before trying to gently peel it off.
SirDeck - Antwort
Mine was probably about 10 years old at this point. I used a clothes iron (flatiron) set on medium heat ("permanent press"), and a piece of "parchment paper" from the kitchen between iron and rubber. After 30 seconds or so, the glue was softened enough that I could lift off the rubber, a little at a time using a putty knife. It all came off in one piece, with essentially all the glue still attached to the rubber. My thanks to the person (forgot the name, it was on one of the "drive replacement" articles for one of the other model Time Capsules) who suggested the iron.
Paul Koning - Antwort