Zum Hauptinhalt wechseln

Asus Chromebook C201PA-DS02-LG Daughterboard Replacement

Was du brauchst

  1. Asus Chromebook C201PA-DS02-LG Daughterboard Replacement, Keyboard: Schritt 1, Bild 1 von 3 Asus Chromebook C201PA-DS02-LG Daughterboard Replacement, Keyboard: Schritt 1, Bild 2 von 3 Asus Chromebook C201PA-DS02-LG Daughterboard Replacement, Keyboard: Schritt 1, Bild 3 von 3
    • Use a metal spudger to pry off the two feet closest to the hinge of the laptop.

    • The feet are attached to the laptop by adhesives, therefore they may not stick as well after multiple removals.

  2. Asus Chromebook C201PA-DS02-LG Daughterboard Replacement: Schritt 2, Bild 1 von 2 Asus Chromebook C201PA-DS02-LG Daughterboard Replacement: Schritt 2, Bild 2 von 2
    • Use a Phillips #0 screwdriver to unscrew the six 5mm screws.

    • Use a Phillips #0 screwdriver to unscrew the two 6mm screws.

  3. Asus Chromebook C201PA-DS02-LG Daughterboard Replacement: Schritt 3, Bild 1 von 2 Asus Chromebook C201PA-DS02-LG Daughterboard Replacement: Schritt 3, Bild 2 von 2
    • Use a plastic opening tool to pry the keyboard off the edges of the computer.

    • The edges will make a popping noise.

  4. Asus Chromebook C201PA-DS02-LG Daughterboard Replacement: Schritt 4, Bild 1 von 3 Asus Chromebook C201PA-DS02-LG Daughterboard Replacement: Schritt 4, Bild 2 von 3 Asus Chromebook C201PA-DS02-LG Daughterboard Replacement: Schritt 4, Bild 3 von 3
    • Flip up the white bar that connects the thin white strip using a plastic opening tool.

    • Grab the thin white strip and pull straight back to remove the strip from the connector.

  5. Asus Chromebook C201PA-DS02-LG Daughterboard Replacement: Schritt 5, Bild 1 von 3 Asus Chromebook C201PA-DS02-LG Daughterboard Replacement: Schritt 5, Bild 2 von 3 Asus Chromebook C201PA-DS02-LG Daughterboard Replacement: Schritt 5, Bild 3 von 3
    • Use a plastic opening tool to lift the black bar above the wide black strip in the connector.

    • Grab the wide black strip and pull straight back to remove the strip from the connector.

    • Remove the keyboard by lifting it straight up.

  6. Asus Chromebook C201PA-DS02-LG Daughterboard Replacement, Metal Plate: Schritt 6, Bild 1 von 3 Asus Chromebook C201PA-DS02-LG Daughterboard Replacement, Metal Plate: Schritt 6, Bild 2 von 3 Asus Chromebook C201PA-DS02-LG Daughterboard Replacement, Metal Plate: Schritt 6, Bild 3 von 3
    • Unscrew the seven 4mm screws using a Phillips #0 screwdriver.

    • Wiggle the plate back and forth to loosen the adhesive under the plate.

    • The adhesive will not be the same after removal and more adhesive may be necessary upon reassembly.

    • Rotate the screwdriver in a counterclockwise direction to remove the screws.

    • Do not rest your arm or hand in the adhesive.

  7. Asus Chromebook C201PA-DS02-LG Daughterboard Replacement, Daughterboard: Schritt 7, Bild 1 von 2 Asus Chromebook C201PA-DS02-LG Daughterboard Replacement, Daughterboard: Schritt 7, Bild 2 von 2
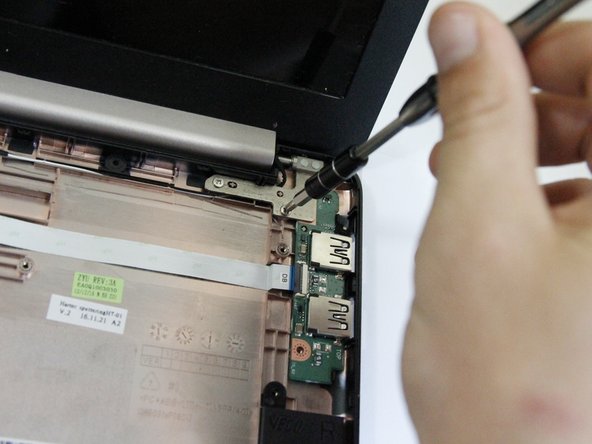
    • Use a Phillips #0 screwdriver to unscrew the two 4mm screws.

    • Flip up the white tab to remove the white ribbon cable.

  8. Asus Chromebook C201PA-DS02-LG Daughterboard Replacement: Schritt 8, Bild 1 von 3 Asus Chromebook C201PA-DS02-LG Daughterboard Replacement: Schritt 8, Bild 2 von 3 Asus Chromebook C201PA-DS02-LG Daughterboard Replacement: Schritt 8, Bild 3 von 3
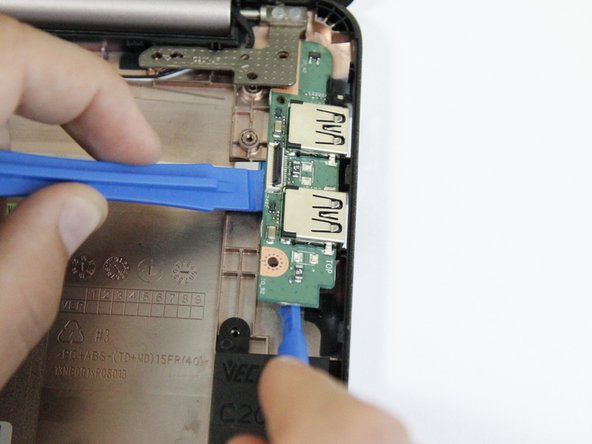
    • Use a plastic opening tool to flip up the connector connecting the slim blue tipped strip to the daughterboard.

    • Lift the slim blue tipped strip from the daughterboard.

  9. Asus Chromebook C201PA-DS02-LG Daughterboard Replacement: Schritt 9, Bild 1 von 3 Asus Chromebook C201PA-DS02-LG Daughterboard Replacement: Schritt 9, Bild 2 von 3 Asus Chromebook C201PA-DS02-LG Daughterboard Replacement: Schritt 9, Bild 3 von 3
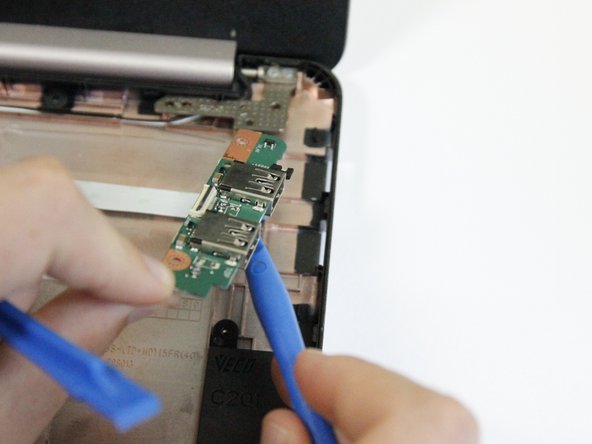
    • Place the plastic opening tools underneath the daughterboard.

    • Gently lift the daughterboard from the base of the device.

Abschluss

To reassemble your device, follow these instructions in reverse order.

Brittany M Won

Mitglied seit: 04/18/18

577 Reputation

5 Anleitungen geschrieben

Team

Cal Poly, Team S17-G4, Livingston Spring 2018 Mitglied von Cal Poly, Team S17-G4, Livingston Spring 2018

CPSU-LIVINGSTON-S18S17G4

4 Mitglieder

12 Anleitungen geschrieben

0 Kommentare

Kommentar hinzufügen

Seitenaufrufe:

Letzte 24 Stunden: 0

Letzte 7 Tage: 1

Letzte 30 Tage: 1

Insgesamt: 137