Einleitung
Does your computer shut down often? Is your screen and/or your sound not working? Do you get a lot of error messages or random crashes? It might not be a problem with the computer as a whole, but rather an issue with the motherboard. This piece of tech is integral to all the parts of a computer "communicating" properly, so when it's damaged, it might result in any of these symptoms. This guide will teach you how to replace the mother/daughterboard for your ASUS Chromebook Flip C302CA.
Was du brauchst
-
-
With the T5 Torx Screwdriver, remove the ten 5 mm screws from the back panel.
-
Remove the rubber caps at the top of the panel. Then, using the Phillips #00 Screwdriver, remove the two 1 mm screws underneath.
-
Lift up the back panel.
-
-
-
Using Tweezers, carefully remove the black wire connected to the audio card.
-
Repeat this process for the white wire.
-
-
-
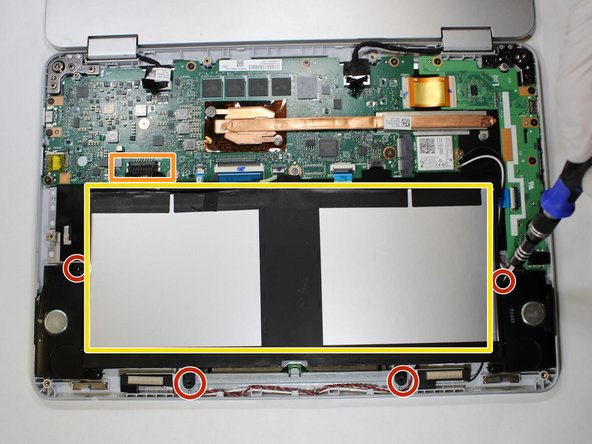
Remove the four 2.5 mm screws securing the battery
-
Remove the connector from the motherboard by pulling straight up on it.
-
Carefully lift the battery out of the laptop.
-
-
-
-
Gently lift the white tab highlighted in the image. Then, disconnect the blue connector by pulling away from the motherboard.
-
-
-
Gently lift the black tab highlighted in the photo. Then, repeat the same process mentioned above.
-
-
-
Once again, lift the white tab highlighted in the image. Then, pull the brown connector away to disconnect it from the motherboard.
-
-
-
With the Phillips #00 Screwdriver, remove the two highlighted 1 mm screws attaching the heatsink (highlighted in orange) to the motherboard.
-
Then, remove the heatsink from the motherboard.
-
-
-
With the Philips-Head #00 Screwdriver, remove the eleven 2.5 mm screws that secure the motherboard.
-
With the same tool, remove the four 1.3 mm screws at the bottom of the mother board/daughterboard.
-
Replace the motherboard/daughterboard.
-




To reassemble your device, follow these instructions in reverse order.
To reassemble your device, follow these instructions in reverse order.


Team

The Citadel Military College of South Carolina, Team 1-12, Eggleston Fall 2022 Mitglied von The Citadel Military College of South Carolina, Team 1-12, Eggleston Fall 2022
CMCSC-EGGLESTON-F22S1G12
3 Mitglieder
3 Anleitungen geschrieben
